2009年07月26日
S@R Sparkling Eye Manual (E)
【Features / Attachment】
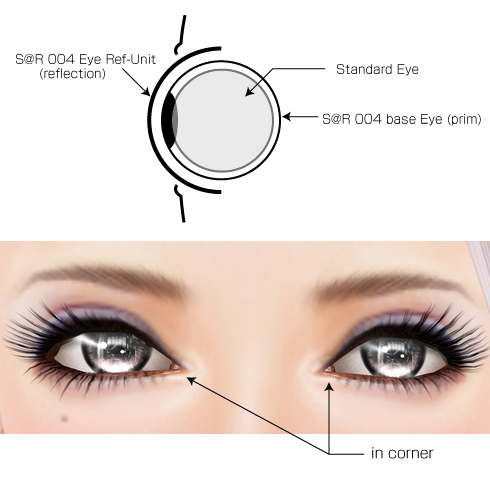
These eyes consist of 2 different types of the prims. One is the base
eyes, and the other is the parts of the highlight of the eyes.
Please wear the base eyes,"S@R 004 eye base unit (right)" and
"S@R 004 eye base unit (left)". (You can wear them, when you drag and
drop these eyes on your avatar.)
Next you will find the parts of the highlights prims named "S@R 004 eye Reflection-unit",which you can choose one of the 3 attachment positions
of (nose), (chin), or (mouth).
Please wear one of them to the available position of your avatar.
* The customer who bought the several uni color's eyes don't need
to change the "S@R 004 eye base unit (right)(left)" each time.
Because "S@R 004 eye Reflection-unit"controls the color change.
-----------------------------------------------------------------------------
【Adjustment / Customize】
After the preparation above, a transparent prim is attached on
the nose tip of your avatar.
If you "Left-mouse click FOR A LONG WHILE" on your avatar's nose tip,
the setup dialog will appear. If you cannot click on your nose tip, because
your hair or face light is in the way, please type the commands below
in the local chat field then press the enter key. So that you can control
several operations without clicking on the nose tip.
/100 menu----Open the setup dialog
/100 pose----proceed the standstill pose
If the standstill pose is already made, your AO will be stopped.
-----------------------------------------------------------------------------
【name / structure】
-------------------------------------------------------------------------------------------------
【Hierarchy of the dialog menu】
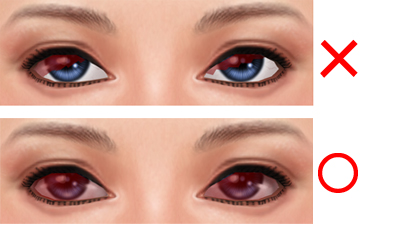
【color】Change your eye color (only color change version)
【photo】if you want to shoot the screen shot, you can force to move the direction of the eyes where you want.
※Prim eyes are covered with the base eyes. The rotation of the base eyes
could not be controlled. Therefore this is only an supplementary function.
【left up】 【up 】 【left】 【right】 【left down】 【down】 【right down】
You can rotate the eyes to the each direction.
【free】-----The eyes can be returned to the initial position.
【save load】The detail setting of the base eyes
【pos. save】----save the current setting (except color information)
【pos. load】----load the saved data
【eye】The detail setting of the base eyes
【angle】-------------vertical angle of the base eyes prims.
【shadow-deep】-----shadow density on the whites of the eyes
【shadow-angle】-----the position of the shadows of the eyelids on the whites of the eyes
【map size】----------texture size of the base eyes
【an oval】-----------rate of the flatness of the base eyes
【deps】--------------position of the depth of the base eyes prims
【reflection】The detail setting of the reflection
【deps】-----------position of the depth of the reflect-Unit.
【angle】----------vertical angle of the ref-Unit
【distance】-------space between left and right of the reflect-Unit
【prim size】-------size of the reflect-Unit
【hight】-----------hight of the reflect-Unit
【glow】-----------value of the glow of the light reflection
【in corner】The detail setting of the inner corner prims of the eyes
【deps】-------- ------position of the depth of the inner corner prims
【distance】-----------right and left interval of the inner corner prims
【prim size】-----------prim size of the inner corner prims
【hight】-------------- hight of the inner corner prims
【distance】-----------space between of the inner corner prims
【pose】Fix the body to make the fitting easy
【**manual**】Open the web manual
【**close**】Close the dialog box
-----------------------------------------------------------------------------
If you use Widows-OS, please press Ctrl+Alt+t
If you use Mac-OS, please press Ctrl (Cmd)+Option+t
So that you can see the transparent prims.
This helps your fitting operation, when you adjust the position of
the reflection-Unit.
-----------------------------------------------------------------------------
**Attention**
Ref-Unit adjust automatically the position of the "base Eyes" by
wearing. On this account a fault may occur, if you rez "Ref-unit" and
"base Eye" on the ground at the same time.
Please never put the products on the ground.
These eyes consist of 2 different types of the prims. One is the base
eyes, and the other is the parts of the highlight of the eyes.
Please wear the base eyes,"S@R 004 eye base unit (right)" and
"S@R 004 eye base unit (left)". (You can wear them, when you drag and
drop these eyes on your avatar.)
Next you will find the parts of the highlights prims named "S@R 004 eye Reflection-unit",which you can choose one of the 3 attachment positions
of (nose), (chin), or (mouth).
Please wear one of them to the available position of your avatar.
* The customer who bought the several uni color's eyes don't need
to change the "S@R 004 eye base unit (right)(left)" each time.
Because "S@R 004 eye Reflection-unit"controls the color change.
-----------------------------------------------------------------------------
【Adjustment / Customize】
After the preparation above, a transparent prim is attached on
the nose tip of your avatar.
If you "Left-mouse click FOR A LONG WHILE" on your avatar's nose tip,
the setup dialog will appear. If you cannot click on your nose tip, because
your hair or face light is in the way, please type the commands below
in the local chat field then press the enter key. So that you can control
several operations without clicking on the nose tip.
/100 menu----Open the setup dialog
/100 pose----proceed the standstill pose
If the standstill pose is already made, your AO will be stopped.
-----------------------------------------------------------------------------
【name / structure】

-------------------------------------------------------------------------------------------------
【Hierarchy of the dialog menu】
【color】Change your eye color (only color change version)
【photo】if you want to shoot the screen shot, you can force to move the direction of the eyes where you want.
※Prim eyes are covered with the base eyes. The rotation of the base eyes
could not be controlled. Therefore this is only an supplementary function.
【left up】 【up 】 【left】 【right】 【left down】 【down】 【right down】
You can rotate the eyes to the each direction.
【free】-----The eyes can be returned to the initial position.
【save load】The detail setting of the base eyes
【pos. save】----save the current setting (except color information)
【pos. load】----load the saved data
【eye】The detail setting of the base eyes
【angle】-------------vertical angle of the base eyes prims.
【shadow-deep】-----shadow density on the whites of the eyes
【shadow-angle】-----the position of the shadows of the eyelids on the whites of the eyes
【map size】----------texture size of the base eyes
【an oval】-----------rate of the flatness of the base eyes
【deps】--------------position of the depth of the base eyes prims
【reflection】The detail setting of the reflection
【deps】-----------position of the depth of the reflect-Unit.
【angle】----------vertical angle of the ref-Unit
【distance】-------space between left and right of the reflect-Unit
【prim size】-------size of the reflect-Unit
【hight】-----------hight of the reflect-Unit
【glow】-----------value of the glow of the light reflection
【in corner】The detail setting of the inner corner prims of the eyes
【deps】-------- ------position of the depth of the inner corner prims
【distance】-----------right and left interval of the inner corner prims
【prim size】-----------prim size of the inner corner prims
【hight】-------------- hight of the inner corner prims
【distance】-----------space between of the inner corner prims
【pose】Fix the body to make the fitting easy
【**manual**】Open the web manual
【**close**】Close the dialog box
-----------------------------------------------------------------------------
If you use Widows-OS, please press Ctrl+Alt+t
If you use Mac-OS, please press Ctrl (Cmd)+Option+t
So that you can see the transparent prims.
This helps your fitting operation, when you adjust the position of
the reflection-Unit.
-----------------------------------------------------------------------------
**Attention**
Ref-Unit adjust automatically the position of the "base Eyes" by
wearing. On this account a fault may occur, if you rez "Ref-unit" and
"base Eye" on the ground at the same time.
Please never put the products on the ground.
2009年07月26日
S@R Sparkling Eye Manual (J)
【特徴/装着】
この瞳は、ベースの瞳とハイライト部分を別のプリムとして作ってあります。
S@R 004 eye base unit (right) とS@R 004 eye base unit (left)を
それぞれ左右の瞳に装着してください。(アバターにドラッグすれば装着できます)
次に、ハイライト部分のパーツのS@R 004 eye Reflection-unitは
装着箇所が3箇所 (nose)/(chin)/(mouth)用意してあります。
いずれか1つを、あなたのアバターの空いている装着位置へ装着して下さい。
※単色の瞳を複数色購入して頂いたお客様は、色変更の際には
S@R 004 eye base unit (right)(left)
の付け替えの必要はありません。
色を制御しているのはS@R 004 eye Reflection-unitです。
-----------------------------------------------------------------------------
【調整/カスタマイズ】
あなたのアバターの鼻の頭には透明なプリムが装着されています。
アバターの鼻の頭を【左クリックで長押し】すると設定ダイアログが現れます。
髪の毛やフェイスライトなどが邪魔をして、鼻の頭がうまくクリックできない場合には、
チャット欄に以下のコマンドを打ち込んでEnterを押すといくつかの操作が出来ます。
/100 menu----設定ダイアログが開きます
/100 pose----フィッティングの為の静止ポーズを実行します。
既に静止ポーズが実行されている場合には、ポーズを中止します。
-----------------------------------------------------------------------------
【構造・名称】
-------------------------------------------------------------------------------------------------
【ダイアログのメニュー階層】
【color】瞳の色を選択します。(カラーチェンジバージョンのみ)
【photo】スクリーンショットを撮影する際などに、強制的に瞳の向きを回転させて
意図する方向に目線を移動させます。
※プリムアイはベースの瞳の上に被さっています。ベースの瞳の回転を制御する
ことはできないので、あくまでも補助的な機能と考えて下さい。
【left up】 【up 】 【left】 【right】 【left down】 【down】 【right down】
それぞれの方向に瞳の向きを回転させます。
【free】-----瞳の向きを初期状態に戻します。
【save load】ベース瞳の詳細設定
【pos. save】----現在の設定を保存(色情報以外)
【pos. load】----保存してあるセーブデータを読み込みます。
【eye】ベース瞳の詳細設定
【angle】---------ベースの瞳プリムの上下角度
【shadow-deep】-----白目の影の濃さ
【shadow-angle】----白目に落ちるまぶたの影の位置
【map size】--ベースの瞳のテクスチャーサイズ
【an oval】---------ベースの瞳の扁平率
【deps】---------ベースの瞳プリムの奥行き方向の位置
【reflection】反射の詳細設定
【deps】--------反射光ユニットプリムのの奥行き方向の位置
【angle】-------反射光ユニットプリムの上下角度
【distance】----反射光ユニットプリムの左右の間隔
【prim size】----反射光ユニットプリムのサイズ
【hight】----------反射光ユニットプリムの高さ位置
【glow】-----------反射光ユニットプリムのグロウの値
【in corner】涙腺パーツの詳細設定
【deps】--------涙腺パーツの奥行き方向の位置
【distance】----涙腺パーツの左右の間隔
【prim size】----涙腺パーツのプリムサイズ
【hight】------- 涙腺パーツのの高さ位置
【distance】-----涙腺パーツの左右の間隔
【pose】体を固定し、フィッティングを容易にします。
【**manual**】webマニュアルページを開きます
【**close**】ダイアログを閉じる
-----------------------------------------------------------------------------
お使いのOSがWindowsの方はCtrl+Alt+tを押して下さい。
Mac OSをお使いの方は Ctrl (Cmd)+Option+t を押してください。
透明Primが可視化できます。
S@R 004 Eye Sparkling-Unitの位置調整をする際に、これを行うと
あなたのフィッティング作業の手助けになるでしょう。
-----------------------------------------------------------------------------
注)Ref-Unit は、装着時に base Eye の位置調整を自動で行っています。このため
Ref-Unitとbase Eye を同時に地面にRezすると不具合を生じます。
商品は絶対に地面に置かないでください。
2009年07月26日
2008年10月26日
Separate Eye Ref-only E-Manual
【Adjustment / Customize】
After the preparation above, a transparent prim is attached on
the nose tip of your avatar.
If you "Left-mouse click FOR A LONG WHILE" on your avatar's nose tip,
the setup dialog will appear. If you cannot click on your nose tip, because
your hair or face light is in the way, please type the commands below
in the local chat field then press the enter key. So that you can control
several operations without clicking on the nose tip.
/100 menu----Open the setup dialog
/100 pose----proceed the standstill pose
If the standstill pose is already made,
the pose will be stopped.
-------------------------------------------------------------------------------------------------
At first you have to adjist the positions of each attached prim.
Because the SL-Viewer cannot deal with the change of the small value
in an instant, we setup the fitting of this product as follows:
First big movement of the prim's position by clicking the button.
Next return to the reserved position of the prim.
Despite of this device, we cannot avoid the slight lag of the prim's position.
So that please choose the prim once after the fitting.
At this moment your eyes and the reflextion unit will be placed to the correct
positions.
If you are used to handle the prims, you can adjust the prim's position
directly without the dialog.
Though you cannot select the each prim parts by the no-edit objects,
please operate the dialog to adjust "ref distance" which needs to move
left and right separately.
If you use Widows-OS, please press Ctrl+Alt+t
If you use Mac-OS, please press Ctrl (Cmd)+Option+t
So that you can see the transparant prims.
This helps your fitting operation, when you adjust the posiotion of
the reflection-Unit.
-------------------------------------------------------------------------------------------------
【Hierarchy of the dialog menu】
【fitting】Assistant tool for the adjustment of the position after the first wearing
【ref hight】------hight of the reflect-Unit
【ref distance 】--space between left and right of the reflect-Unit
【ref deps】-------positon of the depth of the reflect-Unit.
【refprim size】---size of the reflect-Unit
【ref angle】------vertical angle of the ref-Unit
【reflection】Details setting of the leflection and the shadow of the eyelids
【ref-map size】----texture size of the catoptric light・eyelids' shadow
【design】----------disign of the catoptric light・eyelids' shadow
【glow】-----------glow value of the catoptric light・eyelids' shadow
【Transparency】---Transparency of the catoptric light・eyelids' shadow
【pose】Fix the body to make the fitting easy
【**all reset**】All return to the default
【**close**】Close the dialog box
After the preparation above, a transparent prim is attached on
the nose tip of your avatar.
If you "Left-mouse click FOR A LONG WHILE" on your avatar's nose tip,
the setup dialog will appear. If you cannot click on your nose tip, because
your hair or face light is in the way, please type the commands below
in the local chat field then press the enter key. So that you can control
several operations without clicking on the nose tip.
/100 menu----Open the setup dialog
/100 pose----proceed the standstill pose
If the standstill pose is already made,
the pose will be stopped.
-------------------------------------------------------------------------------------------------
At first you have to adjist the positions of each attached prim.
Because the SL-Viewer cannot deal with the change of the small value
in an instant, we setup the fitting of this product as follows:
First big movement of the prim's position by clicking the button.
Next return to the reserved position of the prim.
Despite of this device, we cannot avoid the slight lag of the prim's position.
So that please choose the prim once after the fitting.
At this moment your eyes and the reflextion unit will be placed to the correct
positions.
If you are used to handle the prims, you can adjust the prim's position
directly without the dialog.
Though you cannot select the each prim parts by the no-edit objects,
please operate the dialog to adjust "ref distance" which needs to move
left and right separately.
If you use Widows-OS, please press Ctrl+Alt+t
If you use Mac-OS, please press Ctrl (Cmd)+Option+t
So that you can see the transparant prims.
This helps your fitting operation, when you adjust the posiotion of
the reflection-Unit.

-------------------------------------------------------------------------------------------------
【Hierarchy of the dialog menu】
【fitting】Assistant tool for the adjustment of the position after the first wearing
【ref hight】------hight of the reflect-Unit
【ref distance 】--space between left and right of the reflect-Unit
【ref deps】-------positon of the depth of the reflect-Unit.
【refprim size】---size of the reflect-Unit
【ref angle】------vertical angle of the ref-Unit
【reflection】Details setting of the leflection and the shadow of the eyelids
【ref-map size】----texture size of the catoptric light・eyelids' shadow
【design】----------disign of the catoptric light・eyelids' shadow
【glow】-----------glow value of the catoptric light・eyelids' shadow
【Transparency】---Transparency of the catoptric light・eyelids' shadow
【pose】Fix the body to make the fitting easy
【**all reset**】All return to the default
【**close**】Close the dialog box
2008年10月26日
Separate Eye Ref-only J-Manual
【調整/カスタマイズ】
あなたのアバターの鼻の頭には透明なプリムが装着されています。
アバターの鼻の頭を【左クリックで長押し】すると設定ダイアログが現れます。
髪の毛やフェイスライトなどが邪魔をして、鼻の頭がうまくクリックできない場合には、
チャット欄に以下のコマンドを打ち込んでEnterを押すといくつかの操作が出来ます。
/100 menu----設定ダイアログが開きます
/100 pose----フィッティングの為の静止ポーズを実行します。
既に静止ポーズが実行されている場合には、ポーズを中止します。
-------------------------------------------------------------------------------------------------
最初に、装着した各プリムの位置調整を行います。
セカンドライフのビューワは小さな値の変化に瞬時に対応できないので、
この製品のフィッティングはボタンを押すと大きくプリムが動いて
その後に指定した位置にプリムを戻す方法を採用しています。
ただ、そのような工夫をしても、微妙なプリムのずれは回避できないので、
フィッティングの終わりに、一度プリムを選択してみてください。
その瞬間に、ずれていたあなたの瞳と反射ユニットは正しい位置にセットされます。
あなたがもしプリムを扱うことに慣れているのであれば、ダイアログを
使用しないで、直接プリムの位置調整を行うことも可能です。
しかし、その際にも編集不可の状態で個別プリムを選択することは出来ないので
左右別々に移動させる必要のある【ref distance 】だけはダイアログ操作で
調整を行ってください。
お使いのOSがWindowsの方はCtrl+Alt+tを押して下さい。
Mac OSをお使いの方は Ctrl (Cmd)+Option+t を押してください。
透明Primが可視化できます。
reflection-Unitの位置調整をする際に、これを行うと
あなたのフィッティング作業の手助けになるでしょう。
-------------------------------------------------------------------------------------------------
【ダイアログのメニュー階層】
【fitting】初めて装着した際の位置調整補助ツール
【ref hight】------反射光ユニットプリムの高さ
【ref distance 】--反射光ユニットプリムの左右の間隔
【ref deps】-------反射光ユニットプリムのの奥行き方向の位置
【refprim size】---反射光ユニットプリムのサイズ
【ref angle】------反射光ユニットプリムの上下角度
【reflection】反射とまぶたの影の詳細設定
【ref-map size】----反射光・まぶたの影のテクスチャーサイズ
【design】----------反射光・まぶたの影のデザイン
【glow】-----------反射光・まぶたの影のグロウの値
【Transparency】---反射光・まぶたの影の透明度
【pose】体を固定し、フィッティングを容易にします。
【**all reset**】全てを出荷時の状態に戻す
【**close**】ダイアログを閉じる
2008年10月26日
Separate Eye English Manual
【Features / Attachment】
These eyes consist of 2 different types of the prims. One is the base
eyes, and the other is the parts of the highlight of the eyes.
Please wear the base eyes,S@R 003 base Eye (left) and
S@R 003 base Eye (right). (You can wear them, when you drag and
drop these eyes on your avatar.)
Next you will find the parts of the highlights prims named
S@R 003 Eye Ref-Unit, which you can choose one of the 3 attachment
positions of (nose), (chin), or (mouth).
Please wear one of them to the available position of your avatar.
* The customer who bought the several uni color's eyes don't need
to change the "S@R 003 base EYE" each time. Because
"S@R 003 Eye Ref-Unit" controls the color change.
-------------------------------------------------------------------------------------------------
【Adjustment / Customize】
After the preparation above, a transparent prim is attached on
the nose tip of your avatar.
If you "Left-mouse click FOR A LONG WHILE" on your avatar's nose tip,
the setup dialog will appear. If you cannot click on your nose tip, because
your hair or face light is in the way, please type the commands below
in the local chat field then press the enter key. So that you can control
several operations without clicking on the nose tip.
/100 menu----Open the setup dialog
/100 pose----proceed the standstill pose
If the standstill pose is already made,
the pose will be stopped.
-------------------------------------------------------------------------------------------------
At first you have to adjist the positions of each attached prim.
Because the SL-Viewer cannot deal with the change of the small value
in an instant, we setup the fitting of this product as follows:
First big movement of the prim's position by clicking the button.
Next return to the reserved position of the prim.
Despite of this device, we cannot avoid the slight lag of the prim's position.
So that please choose the prim once after the fitting.
At this moment your eyes and the reflextion unit will be placed to the correct
positions.
If you are used to handle the prims, you can adjust the prim's position
directly without the dialog.
Though you cannot select the each prim parts by the no-edit objects,
please operate the dialog to adjust "ref distance" which needs to move
left and right separately.
If you use Widows-OS, please press Ctrl+Alt+t
If you use Mac-OS, please press Ctrl (Cmd)+Option+t
So that you can see the transparant prims.
This helps your fitting operation, when you adjust the posiotion of
the reflection-Unit.
-------------------------------------------------------------------------------------------------
【Hierarchy of the dialog menu】
【fitting】Assistant tool for the adjustment of the position after the first wearing
【ref hight】------hight of the reflect-Unit
【ref distance 】--space between left and right of the reflect-Unit
【eye deps 】-----position of the depth of the base eyes prims
【eyeprim size】--size of the base eyes prims.
【eye angle】-----vertical angle of the base eyes prims.
【ref deps】-------positon of the depth of the reflect-Unit.
【refprim size】---size of the reflect-Unit
【ref angle】------vertical angle of the ref-Unit
【eye】Details Setting of the base eyes
【eye-map size】--texture size of the base eyes
【eye design】-----highlights of the base eyes / brightness of the whites
of the eyes
【an oval】---------rate of the flatness of the base eyes
【reflection】Details setting of the leflection and the shadow of the eyelids
【ref-map size】----texture size of the catoptric light・eyelids' shadow
【design】----------disign of the catoptric light・eyelids' shadow
【glow】-----------glow value of the catoptric light・eyelids' shadow
【Transparency】---Transparency of the catoptric light・eyelids' shadow
【pose】Fix the body to make the fitting easy
【**all reset**】All return to the default
【**close**】Close the dialog box
-------------------------------------------------------------------------------------------------
Below the menu only for the color change eye
【left color】--------change the color of the left eye
【right color】-------change the color of the right eye
【left&right】-------change the color of the right- and left eyes at the same time
【auto change】-----automatic change of the eye colors each 1 Min./ 10 Min.
-------------------------------------------------------------------------------------------------
**Attention**
Ref-Unit adjust automatically the position of the "base Eyes" by
wearing. On this account a fault may occur, if you rez "Ref-unit" and
"base Eye" on the ground at the same time.
Please never put the products on the ground.
2008年10月26日
Separate Eye Japanese Manual
【特徴/装着】
この瞳は、ベースの瞳とハイライト部分を別のプリムとして作ってあります。
べースの瞳S@R 003 base Eye (left) とS@R 003 base Eye (right)を
それぞれ左右の瞳に装着してください。(アバターにドラッグすれば装着できます)
次に、ハイライト部分のパーツのS@R 003 Eye Ref-Unitは
装着箇所が3箇所 (nose)/(chin)/(mouth)用意してあります。
いずれか1つを、あなたのアバターの空いている装着位置へ装着して下さい。
※単色の瞳を複数色購入して頂いたお客様は、色変更の際にはS@R 003 base Eye
の付け替えの必要はありません。色を制御しているのはS@R 003 Eye Ref-Unitです。
-------------------------------------------------------------------------------------------------
【調整/カスタマイズ】
あなたのアバターの鼻の頭には透明なプリムが装着されています。
アバターの鼻の頭を【左クリックで長押し】すると設定ダイアログが現れます。
髪の毛やフェイスライトなどが邪魔をして、鼻の頭がうまくクリックできない場合には、
チャット欄に以下のコマンドを打ち込んでEnterを押すといくつかの操作が出来ます。
/100 menu----設定ダイアログが開きます
/100 pose----フィッティングの為の静止ポーズを実行します。
既に静止ポーズが実行されている場合には、ポーズを中止します。
-------------------------------------------------------------------------------------------------
最初に、装着した各プリムの位置調整を行います。
セカンドライフのビューワは小さな値の変化に瞬時に対応できないので、
この製品のフィッティングはボタンを押すと大きくプリムが動いて
その後に指定した位置にプリムを戻す方法を採用しています。
ただ、そのような工夫をしても、微妙なプリムのずれは回避できないので、
フィッティングの終わりに、一度プリムを選択してみてください。
その瞬間に、ずれていたあなたの瞳と反射ユニットは正しい位置にセットされます。
あなたがもしプリムを扱うことに慣れているのであれば、ダイアログを
使用しないで、直接プリムの位置調整を行うことも可能です。
しかし、その際にも編集不可の状態で個別プリムを選択することは出来ないので
左右別々に移動させる必要のある【ref distance 】だけはダイアログ操作で
調整を行ってください。
お使いのOSがWindowsの方はCtrl+Alt+tを押して下さい。
Mac OSをお使いの方は Ctrl (Cmd)+Option+t を押してください。
透明Primが可視化できます。
reflection-Unitの位置調整をする際に、これを行うと
あなたのフィッティング作業の手助けになるでしょう。
-------------------------------------------------------------------------------------------------
【ダイアログのメニュー階層】
【fitting】初めて装着した際の位置調整補助ツール
【ref hight】------反射光ユニットプリムの高さ
【ref distance 】--反射光ユニットプリムの左右の間隔
【eye deps 】-----ベースの瞳プリムの奥行き方向の位置
【eyeprim size】--ベースの瞳プリムのサイズ
【eye angle】-----ベースの瞳プリムの上下角度
【ref deps】-------反射光ユニットプリムのの奥行き方向の位置
【refprim size】---反射光ユニットプリムのサイズ
【ref angle】------反射光ユニットプリムの上下角度
【eye】ベース瞳の詳細設定
【eye-map size】--ベースの瞳のテクスチャーサイズ
【eye design】-----ベースの瞳のハイライト/白目の明るさ
【an oval】---------ベースの瞳の扁平率
【reflection】反射とまぶたの影の詳細設定
【ref-map size】----反射光・まぶたの影のテクスチャーサイズ
【design】----------反射光・まぶたの影のデザイン
【glow】-----------反射光・まぶたの影のグロウの値
【Transparency】---反射光・まぶたの影の透明度
【pose】体を固定し、フィッティングを容易にします。
【**all reset**】全てを出荷時の状態に戻す
【**close**】ダイアログを閉じる
-------------------------------------------------------------------------------------------------
以下color change eye のみのメニュー
【left color】--------左目の色変更
【right color】-------右目の色変更
【left&right】-------左右の瞳の色を同時に変更
【auto change】1分/10分ごとに瞳の色が自動変更
-------------------------------------------------------------------------------------------------
注)Ref-Unit は、装着時に base Eye の位置調整を自動で行っています。このため
Ref-Unitとbase Eye を同時に地面にRezすると不具合を生じます。
商品は絶対に地面に置かないでください。
2008年10月26日
S@R 003 Separate Eye Manual
S@R 003 Separate Eye English Manual
S@R 003 Separate Eye Japanese Manual
Separate Eye Ref-only English Manual
Separate Eye Ref-only Japanese Manual
2008年10月13日
S@R Camera Controller Manual E
【Contents】
S@R Camera Controller ( E ) ( J )
Update Card S@R Camera Controller
S@R Photo Studio Users Manual ( E ) ( J )
How to use S@R Update Card ( E ) ( J )
---------------------------------------------------------------------------------------------------
Tutorial
Once you experience how to use as below, it would be easy to operate
this product.Please read through from top in order. In case you don't
know how to use later, please check the necessary related heading.
If you don't know how to control by using our prouct, Please click the
"Camera Control" button. Then this page will be automatically opened.
Please check how to use the product.
---------------------------------------------------------------------------------------------------
【C1.Basic knowledge about the Camera in Second Life】
There are two kind of the viewpoint in the Second Life viewer.
One is the basic viewpoint from the upper back of the avatar, and
the other is the viewpoint that you can change actively with Alt-key.
Once you operate your avatar again, the viewer try to go back to the
former viewpoint because of its characteristic.
It testified that the basic viewpoint takes always priority once you start
to walk, when you e.g. look at the items in the store.
Please remember this characteristic of the SL-viewer, when your avatar
turn around despite of your intention by using this product.
Though this HUD has the function to control the viewpoint, the controllable
viewpoint is limited only when you looks from the basic viewpoint.
To go back from the active viewpoint to the basic viewpoint, please press
twice the Esc-key. (possibly only one time.)
【C2.Preparation(wear and initialize HUD)】
Before you use the HUD, please take a copy of "S@R Camera Controller
in your inventory by all means. So that you can repair easily the HUD,
in case the HUD is broken.
After you copied the HUD, Please drag and drop the "S@R Camera
Controller " on the avatar, then the HUD will be attached on the
left side of your display.
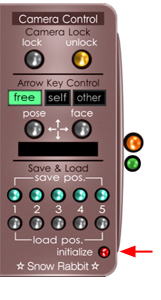
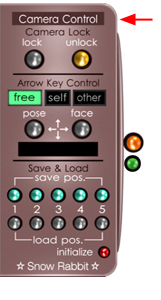
【C3.Simple camera control】
If you press the "Lock" button, the position of the camera and the
viewpoint direction will be locked. When you would like to go back
to the initial cameraposition, please press twice the Esc-key
(possibly once).
※the camera information is fixed based on your avatar's position
and rotation. On this account the camera position may move
together with your avatar, if the avatar move after you saved the
camera information. If you press the "Unlock" button, the camera
position information will be canceled.Please press this button at
the end of the operation by all means.Otherwise you may have
trouble to the regular operations at the viewer.

【C4.memorize and call five cameras】
If you press one of the "save pos." button, the camera position and
the viewpoint direction at the moment will be saved. There are five
buttons, and you can save the different camera informations each of them.
If you would like to overwrite the camera information in the button, please
press "save pos." button again.
If you would like to call the camera information saved in each 1-5
"save pos." button, please press the equivalent number of the "load pos."
button to the "save pos" button.
If the camera information is already saved the color of the button turns
yellow.If the camera information has not saved yet, the color of the
button remains grey. Every time if you click each button, in which
information is saved, the cameras will switch in a flash.

【C5.Clear the camera information】
When you press the "Initializ" button, and choose "Clear" from the
dialog box, the all saved camera information will be cleared,
thus the all "load pos." buttons will turn grey, which shows they
are initialized now.

【C6.Support mode and Silent mode】
When you press the "initializ" button, a dialog box will appear.
Please choose"Support", when you need the explanations for
each operation.We recommend you to use this mode until
you are used to the operations.The same as above please
press the "Inizializ" button, then choose "Silent" in the dialog
box, the explanation messages will not appear. If you are
already used to the operations or bothers you these operations,
please try this mode.
If you use the silent mode, you will find "Support" in the dialog box,
and if you use the support mode, you will find "Silent" in the
dialog box.
【C7.Choose the avatar that you control】
You can give the poses or expressions to yourself or even the another
avatar. If you would like to control yourself, please press "self" button.
if you would like to control the other avatar, please press the "other"
button.When you choose "other", the 9 nearest abatars from you will
be shown on the right to of your display. Once you choose a random
avatar, the person, who are chosen from you, will receive a message
whether he or she accept the control of the avatar by you in the
dialog box. If the person accept your control, The "other" button in
your HUD will blink, and you can now control the other avatar.
If the person does not accept it, the button will not blink and you
cannot control the other avatar.

【C8.strike a pose for the avatar】
After choosing which avatar you want to control 【pl. see C7】,
the "pose" button will be active. If you press the up or down index key,
the pose of the avatar will be changed. Furthermore if you press the
PageUp or PageDown key, you can skip every 4 poses that you
saved in the HUD.
(Please use this function, if you have a lot of poses in the HUD.)
The name of each pose will be shown in the black frame in the middle.
【C9.Expression on the avatar's face】
With choosing the avatar, you want to control 【pl. see C7】, please
press "face" button, then the color of the button turns yellow.
During the button turns on, please select a expression which you like.
The expression will change by pressing the left/right key. If you repeat
the same expression, please press up/down key.
Though it is depend of the expression, the expression will keep showing
during you press the up/down key. Please use this function to take SS
(Snapshot).
(Attention) If the camera does not fixed, the avatar may turn back without
any intention when you press the left/right button. Please choose your
expression after you fix your viewpoint with the camera lock button.
The name of the expression will be shown in the black frame in the middle.
The above-mentioned operation is not appropriated to the smile linked
eyelashes
of our "Snow Rabbit Beauty HUD Series" If you choose smile or grin
by using "Snow Rabbit Beauty HUD Series", please press
Page UP/Down key on your keyboard.
Allocation of the function for the a.m. eyelashes are as follows:
Page UP key → grin + move eyelashes
Page Down key → smile + move eyelashes
【C10.Change your avatar's direction】
If you press the left/right button on your keyboard during you control
your avatar and pose button is in current (chosen), you can chage
the direction of your avatar. But you cannot rotate the avatar exactly.
So please use the photo Studio that I describe later, if you would like to
rotate your avatar with a numerical value.
【C11.release the avatar control】
If you click the "unlock" button, the fixed camera position information
and all avatar's control will be released, and return to the normal viewer
function as usual.
Please press the button at the end of the all operation by all means.
Please be informed that the avatar controled by you cannot be free,
as long as you don't press the "unlock" key
【C12.Add the poses】
Please rez your HUD on the ground and select edit by clicking the
right-mouse button then add your favorite pose after opening the
contents tab.
Next please take the HUD, and wear it then please initialize the HUD.
The pose you added will be first reflected after the initialization.
The number of the added pose name will be issued automatically by the
HUD, so no need to include the number in the pose name.
(Attention)Pose name will be shown max. 8 letters with a half-size font
character.

【C13.minimize the HUD】
You can minimize the HUD in an instant by clicking the button in orange on
the right side of the HUD. If you want to show the entire HUD, please click
the same button in orange again.
【C14.mini HUD】
You can change the HUD to mini HUD specialized only for the camera control
by clicking the button in light-blue on the right side of the HUD.
● enable to save the camera information to keep pressing the button
number 1-5.
● enable to reload the camera information by short clicking the button
number 1-5.
● press the button number 1-5 for a while, if you want to overwrite the
camera info.
● To release the avatar, please click "unlock" button.
● Please click the button in light-blue to back to the default HUD.
※ If the avatar's pose and expression control has already started,
you can change the pose and expression despite you are
using the mini-HUD.

【C15.Adjust the position of the HUD】
If you want to adjust the position of the HUD, please go to edit menu
with right-mouse click then initialize the HUD after you adjust the position.
If you don't initialize the HUD, the HUD will return to the default position
when you expand/minimize the HUD.
【C16.Change your HUD color】
the dialog box to change the HUD color will appear to keep clicking
the left-mouse button for a while. Please your favorite color from the
five different color below.
【C17. Rename of the HUD】
If you would like to change the name of the HUD for your convenience,
please rez the HUD on the ground, and go to
edit menu by right-mouse clicking on the HUD. Then go to
general tab. There you can rename the name of the HUD.
Please note that you cannot rename the HUD directly from
the inventory folder.
Posted by Shirousagi Noel at
14:57
│Comments(0)
2008年10月13日
S@R Camera Controller (J)
【主な機能】
・5通りまでの視点をワンタッチで記憶・再現
・自 / 他アバターの制御
自分のアバターだけでなく、他人のアバターにポーズや表情を与える事が可能
・簡単操作
ユーザーにわかり難いチャットコマンド操作は必要とせず、全ての操作を
HUDのボタンで行うことが出来ます。
・常時装着 / 多目的活用
撮影などの特殊時だけでなくHUDを常時装着しクリエイティブワーク中の多角度確認や
コンサートやカフェなどでカメラを切り替えて楽しむなど、使い方は自由自在。
(フェイスライト、AO等と違い、負荷のかかるスクリプトは一切使用していません。
また、未使用時には最小表示にすることができます)
【画像つきマニュアル】 詳細はこちらでご確認ください
・Manual Japanese
Posted by Shirousagi Noel at
14:44
│Comments(0)
2008年10月13日
S@R Camera Controller (E)
【Main functions】
・Save and reappear the viewpoints up to five
・Control your own avatar or the others
You can change not only the pose and the expression of your avatar,
but also the other avatar's.
・Easy control
No need the difficult chat commands for the users' conveniences.
You cancontrol almost all operations with the buttons, that you find
in HUD .
・Always attached / All-purpose applier
You can use this HUD not only for the special purpose like photo
shooting but also for the corroboration from the different angle for
your creative work, or enjoy to switch the camera at the cafe or in
the concert. You can utilize the HUD at will!
(We don't use any heavy scripts like the Face Lights or AO at all.
Moreover You can minimize the appearance of the HUD when you
don't use.)
【Manual with the pictures】 Please check the details here.
・Manual in English
Posted by Shirousagi Noel at
14:40
│Comments(0)
2008年10月13日
S@R Photo Studio (E)
【Main functions】
・Save and reappear the viewpoints and/or a Light-Set up to five
※We call the information of the 6 sources of lights (e.g. Position, Intensity
Color, Radius, Falloff, ON/OFF) "Light-Set" for convenience's sake.
・Permanent save of the Light-Set
With saving the Light-Set in the note card, you can load more than one
of your favorite Light-Sets anytime. No need to set up the Lights
each time.
・Control your own avatar or the others
You can change not only the pose and the expression of your avatar,
but also the other avatar's.
・Easy control
No need the difficult chat commands for the users' conveniences.
You cancontrol almost all operations with the buttons, that you find
in HUD and the Photo Studio.
・Always attached / All-purpose applier
You can use this HUD not only for the special purpose like photo
shooting but also for the corroboration from the different angle for
your creative work, or enjoy to switch the camera at the cafe or in
the concert. You can utilize the HUD at will!
(We don't use any heavy scripts like the Face Lights or AO at all.
Moreover You can minimize the appearance of the HUD when you
don't use.)
・Deal with the pictures with the various ratio
You can switch 4 kinds of the appearance of the background
pictures to your Photo Stand as below:
Full size / square / 4:3 / 16:9
・Possible to adjust up and down the position of your avatar or
the background picture.
・Possible to control to rotate your avatar (every 45° / 5°)
・Enclosed two kinds of Photo Stand which called Pro ver.
and Standard ver.
That you can choose for your needs Furthermore 3 kinds of stands
form are enclosed in the Standard ver.
【Manual with the pictures】 Please check the details here.
・Manual in English
2008年07月16日
S@R Camera Controller Manual J
【内容物】
S@R Camera Controller ( E ) ( J )
Update Card S@R Camera Controller
S@R Photo Studio Users Manual ( E ) ( J )
How to use S@R Update Card ( E ) ( J )
---------------------------------------------------------------------------------------------------
チュートリアル
以下のご使用方法を一度経験して頂ければ、その操作は容易になると思います。
上から順に一度目を通して頂き、使用方法がわからない場合に必要項目を
ごらん頂くようにお願いします。
製品をご使用になられていて、操作方法がわからなくなりましたら、
HUD上部の【Camera Control】ボタンを押してください。このHPが
開きますので、操作方法のご確認をお願いします。
---------------------------------------------------------------------------------------------------
【C1.Second Lifeのカメラの基礎知識】
セカンドライフのビューワの視点にはアバターの後ろ上方からアバター
ごしに前方を見る基本視点と、能動的にAltキーなどを併用してユーザー
が変更する視点の2種類があります。
アバターを操作する際には、前者の視点に戻ろうとする特性が働きます。
お店で商品を眺めていても、一旦歩き出すと基本視点が優先することが、
これを証明しています。
あなたがこの商品をご使用される際に、あなたの意図に反してアバターが
回転するような動きをした場合には、この特性を思い出してください。
また、当HUDは視点を制御する機能を持っていますが、制御できるのは
基本視点の場合に限ります。能動的な視点から基本視点に戻すには
キーボードのEscキーを2回(1回の場合もあります)押す必要があります。
【C2.使用準備(HUDの装着)】
まず、必ずイベンタリーの中のS@R Camera Controller Proの
コピーを取ってからご使用ください。コピーがあると、万が一HUDが損傷を
受けた場合でも容易に復旧できます。
コピーが済みましたら、次にS@R Camera Controller Proをアバターに
ドラッグすると、画面左に装着されます。

【C3.簡易カメラコントロール】
『Lock』ボタンを押すと、その時点のカメラの位置と視点方向がロック
されます。再度記憶したカメラ位置に戻したい場合には、キーボードの
Escキーを2回(1回の場合もあります)押してください。
※カメラ情報はアバターの位置と回転を基準に記憶されます。
カメラの情報を記憶した後にアバターが移動すると、
カメラ位置もアバターに連動して移動することになります。
『Un Lock』ボタンを押すと、ロックされたカメラ位置情報が解除されます。
必ず全ての操作の最後に押すようにしてください。
カメラが固定されたままですと、通常のビューワ操作に支障をきたします。
【C4.5つのカメラの記憶と呼び出し】
『save pos.』ボタンを押すと、その時点のカメラの位置と視点方向が記憶
されます。ボタンは5つあります。それぞれに別のカメラ情報を記憶すること
ができます。ボタンに記憶されているカメラ情報を上書きしたい場合には、
再度『save pos.』ボタンを押してください。
1~5の『save pos.』ボタンに記憶された、カメラ情報を呼び出すときには
それぞれの番号に対応する『load pos.』ボタンを押してください。
位置情報が記憶されている場合にはボタンの色は黄色に変わります。
カメラ情報が記憶されていない場合には、グレーのままです。
カメラ情報が記憶されているボタンを押すごとに、瞬時にカメラが切り替わり
ます。
【C5.カメラ情報のクリアー】
『Initializ』ボタンを押して、現れたダイアログから『クリアー』を
選択すると、『save pos.』ボタンに記憶されたカメラ位置情報は消え、
『load pos.』ボタンは初期状態のグレーに戻ります。
【C6.サポートモードとサイレントモード】
『Initializ』ボタンを押して、現れたダイアログから『サポート』を
選択すると、各操作時に解説メッセージが流れます。
操作に慣れるまでの間は、このモードでご使用ください。
同様に、『Initializ』ボタンを押して、現れたダイアログから『サイレント』を
選択すると、解説メッセージは出なくなります。操作に慣れてきて
解説メッセージがうるさく感じましたら、このモードをお試しください。
サイレンとモード使用時にはダイアログには『サポート』が、
サポートモード使用時にはダイアログには『サイレント』表示されます。
【C7.制御するアバターの選択】
当製品は、自分もしくは他人のアバターにポーズや表情を
与えるこが出来ます。自分のアバターを制御したい場合には
『self』ボタン、他人のアバターを制御したい場合には
『other』ボタンを押してください。
『other』ボタンを選択すると、画面右上に制御可能な距離にいるアバターが
近い順に9人まで表示されます。任意のアバターを選択すると選択された
人の画面にはアバターの制御を許すかどうかのダイアログが出ますので、
相手が了承すると、あなたのHUD上の『Other』ボタンが点灯して制御が
可能となります。相手がOKを出さないと、ボタンは点灯せず制御も出来ません。
【C8.アバターにポーズをつける】
制御したいアバターの選択【C7参照】が終わると、『pose』ボタンが
カレントになります。この状態でキーボードの上下矢印キーを押すと、
アバターのポーズが変化します。また、PageUP,PageDownキーを押すと、
記憶されているポーズの順番を、4つ飛ばしでポーズが変化します。
(ポーズ数が多い時にご利用ください)
ポーズの名称は中央の黒いスペースに表示されます。
【C9.アバターに表情をつける】
制御したいアバターの選択【C7参照】がされた状態で、『face』
ボタンを押すと、ボタンの色が黄色く変化します。このボタンが点灯
しているときに、あなたのキーボードの左右キーを押すとアバターの
表情が変化しますので、お好きな表情を選択してください。選択した
表情を繰り返したい場合には、上矢印キーを押してください。
表情の種類にもよりますが、上矢印キーを押し込んでいる間、
表情が維持されます。スナップショットの撮影などにお使いください。
(注)カメラが固定されていないと、左右矢印キーを押した瞬間に、
意図していないのにアバターが後ろ向きに回転してしまうことがあります。
基本的にカメラ位置固定ボタンで視点を固定してからお使いください。
表情の名称は中央の黒いスペースに表示されます。
上記の操作はSnow Rabbit Beauty HUD Series の笑顔連動のまつげに
対応していません。Snow Rabbit Beauty HUD Series をお使いの方で、
笑顔・微笑を選択されたい方は、キーボードのPage UP /Page Downキーを
お使いください。
Page UP キー → 笑顔+まつげ移動
Page Downキー → 微笑+まつげ移動
と割り当てられています
【C10.自分のアバターの向きを変える】
自分のアバターの制御をしていて、『pose』ボタンがカレントのとき、
キーボードの左右矢印キーを押すと、アバターの向きを大まかに
変えることが出来ます。
【C11.アバターの制御を解放する】
『Un Lock』ボタンを押すと、ロックされたカメラ位置情報とアバターの
全制御が解放され、通常ビューワの機能に戻ります。
必ず全ての操作の最後に押すようにしてください。
あなたがunlockキーを押さないと、制御されているアバターは
自由になることが出来ませんので、ご注意ください。
【C12.ポーズの追加】
HUDを地面にRezして右クリックで編集を選び、コンテンツタブ開いて
追加したいポーズを入れてください。
次にHUDをtakeし、装着して初期化を行ってください。
初期化を行うことで、追加されたポーズが反映されます
ポーズ名称の頭の番号は、HUDが自動的に表示しますので名称には加え
なくて結構です。
(注)ポーズ名称は半角8文字までしか表示されません。
【C13.HUDの最小化】
右端のオレンジ色のボタンを押すことで、瞬時にHUDを最小表示にすることが
できます。再度全体表示をさせたい場合にはもう一度オレンジボタンを押して
ください。
【C14.mini HUD】
右端の水色のボタンを押すことで、カメラ操作に特化したmini HUDに変更する
ことが出来ます。
● 1~5のボタンを長押しすることにより、カメラ情報の記憶が出来ます。
● 1~5のボタンを短くクリックすることで、カメラ情報を再現することが出来ます。
● カメラ情報を上書きしたい場合には、1~5のボタンを再度長押しをしてください。
● アバターを解放する際には、un lockボタンを押してください。
● 再度標準のHUDに戻すときには、横の青いボタンを押してください。
※ mini HUD状態でも、既にアバターのポーズ・表情の制御が
開始されている状態であれば、ポーズ・表情の変更は可能です。
【C15.HUDの位置調整】
HUDの位置を微調整したい場合には、HUDを右クリックで選択し編集に入り、
位置を調整した後に初期化を行ってください。初期化を行わないと、HUDの
拡縮時にHUDが移動前の位置に戻ってしまいます。
【C16.HUDの色変更】
HUD本体を左クリック長押しすることにより、HUDの色変更のダイアログが
出ます。5色のカラーよりお好きな色をお選びください。
【C17.HUDの名前変更】
使い分けなどの理由で、HUDの名前を変更したい場合には、
HUDを地面にRezして右クリックから編集メニューに入り、
一般タブの名前を変更してください。
イベンタリーから直接名称を変更することは出来ません。
2008年07月16日
S@R Camera Controller (J)
【主な機能】
・5通りまでのカメラ情報(視点)をワンタッチで記憶・再現
・自 / 他アバターの制御
自分のアバターだけでなく、他人のアバターにポーズや表情を与える事が可能
※当社製品のIntelligent Beauty HUDの動くまつげに対応しています。
・簡単操作
ユーザーにわかり難いチャットコマンド操作は必要とせず、全ての操作を
HUDのボタンから行うことが出来ます。
・常時装着 / 多目的活用
撮影などの特殊時だけでなくHUDを常時装着しクリエイティブワーク中の多角度確認や
コンサートやカフェなどでカメラを切り替えて楽しむなど、使い方は自由自在。
(フェイスライト、AO等と違い、負荷のかかるスクリプトは一切使用していません。
また、未使用時には最小表示にすることができます)
・背景画像 / アバター位置の上下微調整が可能
【画像つきマニュアル】 詳細はこちらでご確認ください
・Manual Japanese
2008年07月16日
2008年07月16日
2008年07月16日
S@R Photo Studio (J)
【主な機能】
・視点 / ライトセットを5通りまでワンタッチで記憶・再現
※当製品では6つの光源の情報(位置・強度・色・半径・減衰・ON/OFF)を
便宜上ライトセットと呼びます。
・ライトセットの永久保存
ライトセットをノートに保存することで、複数の気に入ったライトセットをいつでも
読み込むことが出来ます。毎回1からライトを設定する労力はもう必要ありません。
・自 / 他アバターの制御
自分のアバターだけでなく、他人のアバターにポーズや表情を与える事が可能
・簡単操作
ユーザーにわかり難いチャットコマンド操作は必要とせず、ほとんどの操作を
HUDとPhoto Studioのボタンで行うことが出来ます。
・常時装着 / 多目的活用
撮影などの特殊時だけでなくHUDを常時装着しクリエイティブワーク中の多角度確認や
コンサートやカフェなどでカメラを切り替えて楽しむなど、使い方は自由自在。
(フェイスライト、AO等と違い、負荷のかかるスクリプトは一切使用していません。
また、未使用時には最小表示にすることができます)
・様々な比率の画像に対応
Photo Standの背景画像は、フルサイズ / 正方形 / 4:3 / 16:9 の
4種類の画面比率の表示切り替えが可能。
・背景画像 / アバター位置の上下微調整が可能
・アバターの回転を制御可能 (45度 / 5度毎)
・使い分けが出来るPro ver / Standard ver の2種類のPhoto Stand を同封
さらにStandard ver には3種類のスタンド形状が付属します。
・Standard ver のスタンドは3種類の大きさ変更 / 完全透明化も可能
【画像つきマニュアル】 詳細はこちらでご確認ください
・Manual Japanese
2008年07月16日
S@R Photo Studio Manual (E)
S@R Photo Studio
【Contents】
S@R Camera Controller Pro ( E ) ( J )----------------HUD
S@R Photo Studio Pro ( E ) ( J )-----------------------Pro Studio
S@R Photo Studio Standard Box ----------Standard Studio
S@R Photo Studio Standard Cylinder -----Standard Studio
S@R Photo Studio Standard Plane --------Standard Studio
Update Card S@R Photo Studio
S@R Photo Studio Users Manual ( E ) ( J )
How to use S@R Update Card ( E ) ( J )
---------------------------------------------------------------------------------------------------
Tutorial
Once you experience how to use as below, it would be easy to operate
this product.Please read through from top in order. In case you don't
know how to use later, please check the necessary related heading.
If you don't know how to control by using our prouct, Please click the
"Camera Control" button. Then this page will be automatically opened.
Please check how to use the product.

---------------------------------------------------------------------------------------------------
【Index of this page】
●Operations with the HUD only
Camera (Avatar) Control Panel 【Body of the HUD】
●Operations both with the Photo Studio and HUD
Studio Control Panel 【Panel 1 which appears under the HUD】
(Concerning the common operations both for Pro ver and Standard ver)
Light Control Panel 【Panel 2 which appears under the HUD】
(Operations only for S@R Photo Studio Pro)
Studio Control Panel 【Panel 1 which appears under the HUD】
(Concerning the operations for S@R Photo Studio Standard ver)
---------------------------------------------------------------------------------------------------
●Operations with the HUD only
Camera (Avatar) Control Panel【Body of the HUD】
【C1.Basic knowledge about the Camera in Second Life】
There are two kind of the viewpoint in the Second Life viewer.
One is the basic viewpoint from the upper back of the avatar, and
the other is the viewpoint that you can change actively with Alt-key.
Once you operate your avatar again, the viewer try to go back to the
former viewpoint because of its characteristic.
It testified that the basic viewpoint takes always priority once you start
to walk, when you e.g. look at the items in the store.
Please remember this characteristic of the SL-viewer, when your avatar
turn around despite of your intention by using this product.
Though this HUD has the function to control the viewpoint, the controllable
viewpoint is limited only when you looks from the basic viewpoint.
To go back from the active viewpoint to the basic viewpoint, please press
twice the Esc-key. (possibly only one time.)
【C2.Preparation(wear and initialize HUD)】
Before you use the HUD, please take a copy of "S@R Camera Controller Pro
in your inventory by all means. So that you can repair easily the HUD,
in case the HUD is broken.
After you copied the HUD, Please drag and drop the "S@R Camera
Controller Pro" on the avatar, then the HUD will be attached on the
left side of your display.

【C3.Simple camera control】
If you press the "Lock" button, the position of the camera and the
viewpoint direction will be locked. When you would like to go back
to the initial cameraposition, please press twice the Esc-key
(possibly once).
※the camera information is fixed based on your avatar's position
and rotation. On this account the camera position may move
together with your avatar, if the avatar move after you saved the
camera information. If you press the "Unlock" button, the camera
position information will be canceled.Please press this button at
the end of the operation by all means.Otherwise you may have
trouble to the regular operations at the viewer.

【C4.memorize and call five cameras】
If you press one of the "save pos." button, the camera position and
the viewpoint direction at the moment will be saved. There are five
buttons, and you can save the different camera informations each of them.
If you would like to overwrite the camera information in the button, please
press "save pos." button again.
If you would like to call the camera information saved in each 1-5
"save pos." button, please press the equivalent number of the "load pos."
button to the "save pos" button.
If the camera information is already saved the color of the button turns
yellow.If the camera information has not saved yet, the color of the
button remains grey. Every time if you click each button, in which
information is saved, the cameras will switch in a flash.

【C5.Clear the camera information】
When you press the "Initializ" button, and choose "Clear" from the
dialog box, the all saved camera information will be cleared,
thus the all "load pos." buttons will turn grey, which shows they
are initialized now.

【C6.Support mode and Silent mode】
When you press the "initializ" button, a dialog box will appear.
Please choose"Support", when you need the explanations for
each operation.We recommend you to use this mode until
you are used to the operations.The same as above please
press the "Inizializ" button, then choose "Silent" in the dialog
box, the explanation messages will not appear. If you are
already used to the operations or bothers you these operations,
please try this mode.
If you use the silent mode, you will find "Support" in the dialog box,
and if you use the support mode, you will find "Silent" in the
dialog box.
【C7.Choose the avatar that you control】
You can give the poses or expressions to yourself or even the another
avatar. If you would like to control yourself, please press "self" button.
if you would like to control the other avatar, please press the "other"
button.When you choose "other", the 9 nearest abatars from you will
be shown on the right to of your display. Once you choose a random
avatar, the person, who are chosen from you, will receive a message
whether he or she accept the control of the avatar by you in the
dialog box. If the person accept your control, The "other" button in
your HUD will blink, and you can now control the other avatar.
If the person does not accept it, the button will not blink and you
cannot control the other avatar.

【C8.strike a pose for the avatar】
After choosing which avatar you want to control 【pl. see C7】,
the "pose" button will be active. If you press the up or down index key,
the pose of the avatar will be changed. Furthermore if you press the
PageUp or PageDown key, you can skip every 4 poses that you
saved in the HUD.
(Please use this function, if you have a lot of poses in the HUD.)
The name of each pose will be shown in the black frame in the middle.

【C9.Expression on the avatar's face】
With choosing the avatar, you want to control 【pl. see C7】, please
press "face" button, then the color of the button turns yellow.
During the button turns on, please select a expression which you like.
The expression will change by pressing the left/right key. If you repeat
the same expression, please press up/down key.
Though it is depend of the expression, the expression will keep showing
during you press the up/down key. Please use this function to take SS
(Snapshot).
(Attention) If the camera does not fixed, the avatar may turn back without
any intention when you press the left/right button. Please choose your
expression after you fix your viewpoint with the camera lock button.
The name of the expression will be shown in the black frame in the middle.
The above-mentioned operation is not appropriated to the smile linked
eyelashes
of our "Snow Rabbit Beauty HUD Series" If you choose smile or grin
by using "Snow Rabbit Beauty HUD Series", please press
Page UP/Down key on your keyboard.
Allocation of the function for the a.m. eyelashes are as follows:
Page UP key → grin + move eyelashes
Page Down key → smile + move eyelashes

【C10.Change your avatar's direction】
If you press the left/right button on your keyboard during you control
your avatar and pose button is in current (chosen), you can chage
the direction of your avatar. But you cannot rotate the avatar exactly.
So please use the photo Studio that I describe later, if you would like to
rotate your avatar with a numerical value.

【C11.release the avatar control】
If you click the "unlock" button, the fixed camera position information
and all avatar's control will be released, and return to the normal viewer
function as usual.
Please press the button at the end of the all operation by all means.
Please be informed that the avatar controled by you cannot be free,
as long as you don't press the "unlock" key

【C12.Add the poses】
Please rez your HUD on the ground and select edit by clicking the
right-mouse button then add your favorite pose after opening the
contents tab.
Next please take the HUD, and wear it then please initialize the HUD.
The pose you added will be first reflected after the initialization.
The number of the added pose name will be issued automatically by the
HUD, so no need to include the number in the pose name.
(Attention)Pose name will be shown max. 8 letters with a half-size font
character.

【C13.minimize the HUD】
You can minimize the HUD in an instant by clicking the button in orange on
the right side of the HUD. If you want to show the entire HUD, please click
the same button in orange again.

【C14.mini HUD】
You can change the HUD to mini HUD specialized only for the camera control
by clicking the button in light-blue on the right side of the HUD.
● enable to save the camera information to keep pressing the button
number 1-5.
● enable to reload the camera information by short clicking the button
number 1-5.
● press the button number 1-5 for a while, if you want to overwrite the
camera info.
● To release the avatar, please click "unlock" button.
● Please click the button in light-blue to back to the default HUD.
※ If the avatar's pose and expression control has already started,
you can change the pose and expression despite you are
using the mini-HUD.

【C15.Adjust the position of the HUD】
If you want to adjust the position of the HUD, please go to edit menu
with right-mouse click then initialize the HUD after you adjust the position.
If you don't initialize the HUD, the HUD will return to the default position
when you expand/minimize the HUD.
【C16.Change your HUD color】
the dialog box to change the HUD color will appear to keep clicking
the left-mouse button for a while. Please your favorite color from the
five different color below.

【C17. Rename of the HUD】
If you would like to change the name of the HUD for your convenience,
please rez the HUD on the ground, and go to
edit menu by right-mouse clicking on the HUD. Then go to
general tab. There you can rename the name of the HUD.
Please note that you cannot rename the HUD directly from
the inventory folder.
---------------------------------------------------------------------------------------------------
●Operation by using the Photo Studio and HUD
Studio Control Panel 【Panel 1 which appears under the HUD】
(regarding the common operations for both of Pro ver and Standard ver)
【S1.Open the Standard control panel of the HUD】
Please click the little orange button on the lower part of the HUD.
The control panel for the photo studio will appear. You can control
the photostudio with this panel and the buttons in front of the body
of the Photo Studio.

【S2.Stand on the Studio】
Please right-mouse click on the rezzed studio, then choose pose
from the pie menu. So that the avatar can stand on the photo stand.
Please turn your AO off all by means.
【S3.Strike Pose / expression】
choose the avatar 【pl. see C7】
strike the pose 【pl see C8】
expressions 【pl. see C9】
【S4.change the background】
The background picture will be changed by clicking "Texture" button.
The name of the background picture will be shown in the black
frame below.
【S5.Change avatar's direction】
You can do two kinds of exact rotation with 45° and 5° by
clicking "Rotate" button.

【S6.Add the background picture】
Please right mouse click on the HUD, then go to edit menu.
Please add any picture that you have into the contents tab.
Please note that the picture should be with the full permission.
Otherwise an error will be occur.
Next please take back the HUD and wear and initialize it.
When you initialize the HUD, the added picture will be reflected.
Studio Control Panel
(Regarding the operation of S@R Photo Studio Pro)
【SP1.Change the aspect(length and width) ratio of the background】
Each time you click on the "Texture Size" button in fron of the body
of the "Photo Studio Pro", the aspect ratio of the background screen
will be switched as follows:
Full size → square → 4:3 → 16:9

【SP2.Adjust the hight of the background】
By the clicking『▲』『▼』button on the left side of the front panel
of the Photo Studio Pro's Body, the background picture will move
up and down. This is the fine tuning function, so that the
adjustment will made within the remitted range.

【SP3.adjust the hight of the avatar's position】
By clicking the 『▲』『▼』button on the right side of the front
panel of the Photo Studio Pro's body, the avatar's stand position
will move up and down.
【SP4.change the default screen】
At first you rez the Photo Studio Pro, you will find a logo of
S@R Photo Studio Pro as the default screen. If the avatar
sit on the stand, the background picture will be switched to
the preparated one. if you want to change the texture on
your default screen to the other one, please go to edit with
right-mouse clicking on the Photo Studio Pro, and replace
the picture named "S@R Photo Studio Pro" in the contents
tab to any picture you like.
You have the option to name the picture, but the picture
name should be within 12 letters with the half-size font
character, nad the picture in the contents tab should be only one.
If the several pictures in the contetns tab, the Studio may get trouble.
(Please remain the other files as they are.)
The ratio of the picture should be as below.
If the width of the picture is 512 pix, the hight should be 288 pix.
The Illustration/logo should be within 163 pix hight from the middle,
and the picture/texture will be finished nicely,
if the upper and lower part of the picture is in black.
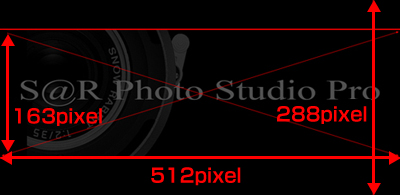
【SP5.Change the default pose】
Please replace the pose in the contents folder of the Photo Studio Pro
to any pose that you have. The pose which is replaced will be the first
pose, when the avatar stands on the photo stands. Please do not place
2 poses and over in the contents folder of Photo Studio Pro to avoid any
trouble with the Photo Studio.
Light Control Panel 【the panel 2 appears under the HUD】
(Function only for the S@R Photo Studio Pro)
【L1.Knowledge about the Light source】
Because of the characteristic of OpenGL, which is used for the SL Viewer,
the number of the lights that can be reflected at the same time is up to 6
(excluding sun and moon) on your viewer.
For this reason we prepares only 6 light-source prims for this product.
If you use face lights, the all lights in the photo stand may not be reflected.
The priority of the lights will be ordered from the strength of the lights, that
reached to the avatar.
Please seehear
【L2.Open the stand control panel of the HUD】
Please click the button in pink lower part of the HUD.
A operation panel of the photo studio will appear. You can control
the photo studio with this panel and the buttons in front of the body
of the photo studio.

【L3.Set up the Light-set】
The prims in 6 different colors are the light sources. These light sources
are linked as the parts of the photo stand in advance.
To set up the position, Intensity, Color, Radius, Falloff, and ON/OFF,
please go to edit by right-mouse clicking on the Photo Studio, and check
"edit the linked parts" then choose the lights separetely to fix the position.
Regarding the Intensity, color, radius, falloff of the lights, please set up in
the features tab.
How to move the prims and set up the light sources are the same as the
ordinal prim edit.
We call the convination of the 6 light sources (inclueint the lights turned off)
【Light-set】for the convenience.


【L4.Save the Light-set】
After you set up the lights (Light-set), please press the button "save light".
Once you press "save light" button, the position of the lights and viewpoint
at that time will be saved, and the "load light." button correspondence to
the number which you want to load will turn yellow.
If nothing saved, the button stays in grey.
There are 5 buttons in the HUD, and you can save the different Light-set
in the each button.
If you want to overwrite the already saved light set, please press the
"save light" button once more.
In order to load the saved Light-set, please press the "load light" button
which youwish to load. If the button is pressed, the lights will switch
in an instant.
【L5.Turn off the lights temporary】
If you press "on/off" button, the lights will be turned off temporary.
The information of the lights will not be deleted. So that the light will
be turned on, if you click the button once again.
【L6.make the lights invisible / Show the color of the light source】
The prim colors of the attached lights is only for distinguishment, and
they are not the color of the light source.
When you press『Hide/Show』button, the color of these prims will
switch bellow:
The color to distinguish(default)→ true color of the light source
→make the light invisible
Please make the lights invisible, when you finished all setting to start
the shooting.
The color of the light source will reflect immediately, but the color of
the prims will change only you click on the button again.
Please kindly understand that this is the specifications to ease the
burden.

【L7.permanent save the light set(write the note card3)】
We used to keep the Light-Set for long, if you could setup it beautifully.
Now you don't need to make any exertion fot the Light Setting each time.
You can save your own Light-Setting forever with the below-mentioned
method.
Please click the "initiariz" button, then choose "export" button in the
dialog box.Now you will be asked which light information from the button
1 to 5 should be exported. Once you choose a Light-Set button which
you want to save, the lightinformation will appear in the local chat field.
Please copy the all exported information (pls. s. e.g. below), and
right-mouse click on the HUD. Next please go to edit and open the
contents tab. There you will find the note cards named "Light 1" to
"Light 12" saved as default. Please open one of them and overwrite
the information that you have just copied. After please rename
the note card for your convenience, (You can name the note card
up to 24 half-size font characters. Though the name will be shown
only up to 8 characters in the dialog box for the information loading.)
then save the note card. In the "Light1" to "Light12" the particular
Light-Sets are already saved in advance.
Please load and try them if you like.
※You can save or load Light-Set Notes max. twelve in the contents tab
in the HUD.
Please save the note cards more than 12 in your inventory folder.

【A exemplar the exported Light-Set information】

※Please copy the contents in the line from--------Start Light Pos---------
to --------End Light Pos--------- including time.
【L8.load the saved Light-Set in the note card】
Please press "initiariz" button and choose "load" from the dialog box.
Now you will see the list of the available Light-Sets.
If you choose one of them that you want to load, you will find a dialog
box and be asked in which button from 1 to 5 do you want to load.
Please choose a button which you like, then the Light-Set will be
switched to the loaded one.
※The change may not reflected immediately because of the
characteristic of the SL-Viewer. It is a phenomenon that
the light is actually moved (incl. the other information reflected)
but it does not seem to change on the viewer. That means the light
is already reflected, but the prims don't seem to be moved.
In such case please move the camera position a little.
Then you will see also the light source prims on the correct position.
【L9.Initialize the light information】
Please press the "initiariz" button, and choose "Clear" on the
dialog box. The lights will be initialized to the initial setting.
【L10.change the initial information of the light】
When initializing the lights, they will go back to the upper right of the
default position and the setting of the Intensity, Color, Radius, Falloff,
and ON/OFF will be reurned to the initial setting.
These information excluding the position is written in the note card
named "light config" in the contents tab of the Photo Stand Pro.
Please right-mouse click on the Photo Stand Pro and go to edit to
open the note card, then overwrite
its contents. So that you can customize the initial setting.
例)LIGHT1_COLOR=<1.0,1.0,1.0>
LIGHT1_INTENSITY=0.5
LIGHT1_RADIUS=1.0
LIGHT1_FALLOFF=0.5
LIGHT1_ON=1
LIGHT1_COLOR is the color of the light source.
According to the color change value please see hear
(Please write the RGB value of the second life on the top
in the note card.)
LIGHT1means the first light which is placed on the left side
by the order of the default setting.
LIGHT1_INTENSITY=0.5 means the light intensity is 0.5.
LIGHT1_RADIUS=1.0 means the light radius is 1m.
LIGHT1_FALLOFF=0.5 means the light falls off (gets weak) 0.5.
LIGHT1_ON=1 means the light which you want to turn on
by the originate state is 1, the light
which you want to turn off is 0.
【L11.recovery of the studio】
You may accidentally move the part of the Photo Studio's Body
because the lights must be set up directly in the partial edit mode.
In such case please left-mouse click for a while on the Stand's body.
the parts of the stand will go back to thier initial position.
(If you changed the information other than the positon, rotation, or size,
the studio cannnot be recovered. So that please take a original copy
by all means.)
Studio Control panel 【a panel1appears lower part of the HUD】
(Regarding the operations of S@R Photo Studio Standard)
【SL1.Features and Forms of the Stand】
Photo Studio Standard is consists of 2 to 3 prims. Please use them,
if you want to save the prim number. Some functions are left out compere
to the Pro Version. Though they have the function to change the Studio's
size, which you cannnot find in the Pro Version.
There are three kind of the form of the Standard Verson Studio, they
are boxed, cylindar, and flat. Please use them for your utility purpose.
【SL2.change the size of the Stand / make the Stand invisible】
If you choos hide / small / medium / large from the HUD of the
Photo Studio Control Panel, the size of the studio will be changed.
If you choose "Hide", the studio will be completely invisible.
Moreover you can move up and down the standing position of the avatar
according to the size of the stand.


【SL3. The functions left off compare with Pro Version】
1.All lightning functions
2.Change of the aspect ratio (width, height) of the background picture.
3.The function to move up and down the background picture.
4.The function to move up and down the avatar.
5.The function to show the initial screen.
【Contents】
S@R Camera Controller Pro ( E ) ( J )----------------HUD
S@R Photo Studio Pro ( E ) ( J )-----------------------Pro Studio
S@R Photo Studio Standard Box ----------Standard Studio
S@R Photo Studio Standard Cylinder -----Standard Studio
S@R Photo Studio Standard Plane --------Standard Studio
Update Card S@R Photo Studio
S@R Photo Studio Users Manual ( E ) ( J )
How to use S@R Update Card ( E ) ( J )
---------------------------------------------------------------------------------------------------
Tutorial
Once you experience how to use as below, it would be easy to operate
this product.Please read through from top in order. In case you don't
know how to use later, please check the necessary related heading.
If you don't know how to control by using our prouct, Please click the
"Camera Control" button. Then this page will be automatically opened.
Please check how to use the product.
---------------------------------------------------------------------------------------------------
【Index of this page】
●Operations with the HUD only
Camera (Avatar) Control Panel 【Body of the HUD】
●Operations both with the Photo Studio and HUD
Studio Control Panel 【Panel 1 which appears under the HUD】
(Concerning the common operations both for Pro ver and Standard ver)
Light Control Panel 【Panel 2 which appears under the HUD】
(Operations only for S@R Photo Studio Pro)
Studio Control Panel 【Panel 1 which appears under the HUD】
(Concerning the operations for S@R Photo Studio Standard ver)
---------------------------------------------------------------------------------------------------
●Operations with the HUD only
Camera (Avatar) Control Panel【Body of the HUD】
【C1.Basic knowledge about the Camera in Second Life】
There are two kind of the viewpoint in the Second Life viewer.
One is the basic viewpoint from the upper back of the avatar, and
the other is the viewpoint that you can change actively with Alt-key.
Once you operate your avatar again, the viewer try to go back to the
former viewpoint because of its characteristic.
It testified that the basic viewpoint takes always priority once you start
to walk, when you e.g. look at the items in the store.
Please remember this characteristic of the SL-viewer, when your avatar
turn around despite of your intention by using this product.
Though this HUD has the function to control the viewpoint, the controllable
viewpoint is limited only when you looks from the basic viewpoint.
To go back from the active viewpoint to the basic viewpoint, please press
twice the Esc-key. (possibly only one time.)
【C2.Preparation(wear and initialize HUD)】
Before you use the HUD, please take a copy of "S@R Camera Controller Pro
in your inventory by all means. So that you can repair easily the HUD,
in case the HUD is broken.
After you copied the HUD, Please drag and drop the "S@R Camera
Controller Pro" on the avatar, then the HUD will be attached on the
left side of your display.
【C3.Simple camera control】
If you press the "Lock" button, the position of the camera and the
viewpoint direction will be locked. When you would like to go back
to the initial cameraposition, please press twice the Esc-key
(possibly once).
※the camera information is fixed based on your avatar's position
and rotation. On this account the camera position may move
together with your avatar, if the avatar move after you saved the
camera information. If you press the "Unlock" button, the camera
position information will be canceled.Please press this button at
the end of the operation by all means.Otherwise you may have
trouble to the regular operations at the viewer.
【C4.memorize and call five cameras】
If you press one of the "save pos." button, the camera position and
the viewpoint direction at the moment will be saved. There are five
buttons, and you can save the different camera informations each of them.
If you would like to overwrite the camera information in the button, please
press "save pos." button again.
If you would like to call the camera information saved in each 1-5
"save pos." button, please press the equivalent number of the "load pos."
button to the "save pos" button.
If the camera information is already saved the color of the button turns
yellow.If the camera information has not saved yet, the color of the
button remains grey. Every time if you click each button, in which
information is saved, the cameras will switch in a flash.

【C5.Clear the camera information】
When you press the "Initializ" button, and choose "Clear" from the
dialog box, the all saved camera information will be cleared,
thus the all "load pos." buttons will turn grey, which shows they
are initialized now.

【C6.Support mode and Silent mode】
When you press the "initializ" button, a dialog box will appear.
Please choose"Support", when you need the explanations for
each operation.We recommend you to use this mode until
you are used to the operations.The same as above please
press the "Inizializ" button, then choose "Silent" in the dialog
box, the explanation messages will not appear. If you are
already used to the operations or bothers you these operations,
please try this mode.
If you use the silent mode, you will find "Support" in the dialog box,
and if you use the support mode, you will find "Silent" in the
dialog box.
【C7.Choose the avatar that you control】
You can give the poses or expressions to yourself or even the another
avatar. If you would like to control yourself, please press "self" button.
if you would like to control the other avatar, please press the "other"
button.When you choose "other", the 9 nearest abatars from you will
be shown on the right to of your display. Once you choose a random
avatar, the person, who are chosen from you, will receive a message
whether he or she accept the control of the avatar by you in the
dialog box. If the person accept your control, The "other" button in
your HUD will blink, and you can now control the other avatar.
If the person does not accept it, the button will not blink and you
cannot control the other avatar.
【C8.strike a pose for the avatar】
After choosing which avatar you want to control 【pl. see C7】,
the "pose" button will be active. If you press the up or down index key,
the pose of the avatar will be changed. Furthermore if you press the
PageUp or PageDown key, you can skip every 4 poses that you
saved in the HUD.
(Please use this function, if you have a lot of poses in the HUD.)
The name of each pose will be shown in the black frame in the middle.
【C9.Expression on the avatar's face】
With choosing the avatar, you want to control 【pl. see C7】, please
press "face" button, then the color of the button turns yellow.
During the button turns on, please select a expression which you like.
The expression will change by pressing the left/right key. If you repeat
the same expression, please press up/down key.
Though it is depend of the expression, the expression will keep showing
during you press the up/down key. Please use this function to take SS
(Snapshot).
(Attention) If the camera does not fixed, the avatar may turn back without
any intention when you press the left/right button. Please choose your
expression after you fix your viewpoint with the camera lock button.
The name of the expression will be shown in the black frame in the middle.
The above-mentioned operation is not appropriated to the smile linked
eyelashes
of our "Snow Rabbit Beauty HUD Series" If you choose smile or grin
by using "Snow Rabbit Beauty HUD Series", please press
Page UP/Down key on your keyboard.
Allocation of the function for the a.m. eyelashes are as follows:
Page UP key → grin + move eyelashes
Page Down key → smile + move eyelashes
【C10.Change your avatar's direction】
If you press the left/right button on your keyboard during you control
your avatar and pose button is in current (chosen), you can chage
the direction of your avatar. But you cannot rotate the avatar exactly.
So please use the photo Studio that I describe later, if you would like to
rotate your avatar with a numerical value.
【C11.release the avatar control】
If you click the "unlock" button, the fixed camera position information
and all avatar's control will be released, and return to the normal viewer
function as usual.
Please press the button at the end of the all operation by all means.
Please be informed that the avatar controled by you cannot be free,
as long as you don't press the "unlock" key
【C12.Add the poses】
Please rez your HUD on the ground and select edit by clicking the
right-mouse button then add your favorite pose after opening the
contents tab.
Next please take the HUD, and wear it then please initialize the HUD.
The pose you added will be first reflected after the initialization.
The number of the added pose name will be issued automatically by the
HUD, so no need to include the number in the pose name.
(Attention)Pose name will be shown max. 8 letters with a half-size font
character.

【C13.minimize the HUD】
You can minimize the HUD in an instant by clicking the button in orange on
the right side of the HUD. If you want to show the entire HUD, please click
the same button in orange again.

【C14.mini HUD】
You can change the HUD to mini HUD specialized only for the camera control
by clicking the button in light-blue on the right side of the HUD.
● enable to save the camera information to keep pressing the button
number 1-5.
● enable to reload the camera information by short clicking the button
number 1-5.
● press the button number 1-5 for a while, if you want to overwrite the
camera info.
● To release the avatar, please click "unlock" button.
● Please click the button in light-blue to back to the default HUD.
※ If the avatar's pose and expression control has already started,
you can change the pose and expression despite you are
using the mini-HUD.
【C15.Adjust the position of the HUD】
If you want to adjust the position of the HUD, please go to edit menu
with right-mouse click then initialize the HUD after you adjust the position.
If you don't initialize the HUD, the HUD will return to the default position
when you expand/minimize the HUD.
【C16.Change your HUD color】
the dialog box to change the HUD color will appear to keep clicking
the left-mouse button for a while. Please your favorite color from the
five different color below.
【C17. Rename of the HUD】
If you would like to change the name of the HUD for your convenience,
please rez the HUD on the ground, and go to
edit menu by right-mouse clicking on the HUD. Then go to
general tab. There you can rename the name of the HUD.
Please note that you cannot rename the HUD directly from
the inventory folder.
---------------------------------------------------------------------------------------------------
●Operation by using the Photo Studio and HUD
Studio Control Panel 【Panel 1 which appears under the HUD】
(regarding the common operations for both of Pro ver and Standard ver)
【S1.Open the Standard control panel of the HUD】
Please click the little orange button on the lower part of the HUD.
The control panel for the photo studio will appear. You can control
the photostudio with this panel and the buttons in front of the body
of the Photo Studio.

【S2.Stand on the Studio】
Please right-mouse click on the rezzed studio, then choose pose
from the pie menu. So that the avatar can stand on the photo stand.
Please turn your AO off all by means.
【S3.Strike Pose / expression】
choose the avatar 【pl. see C7】
strike the pose 【pl see C8】
expressions 【pl. see C9】
【S4.change the background】
The background picture will be changed by clicking "Texture" button.
The name of the background picture will be shown in the black
frame below.

【S5.Change avatar's direction】
You can do two kinds of exact rotation with 45° and 5° by
clicking "Rotate" button.

【S6.Add the background picture】
Please right mouse click on the HUD, then go to edit menu.
Please add any picture that you have into the contents tab.
Please note that the picture should be with the full permission.
Otherwise an error will be occur.
Next please take back the HUD and wear and initialize it.
When you initialize the HUD, the added picture will be reflected.
Studio Control Panel
(Regarding the operation of S@R Photo Studio Pro)
【SP1.Change the aspect(length and width) ratio of the background】
Each time you click on the "Texture Size" button in fron of the body
of the "Photo Studio Pro", the aspect ratio of the background screen
will be switched as follows:
Full size → square → 4:3 → 16:9

【SP2.Adjust the hight of the background】
By the clicking『▲』『▼』button on the left side of the front panel
of the Photo Studio Pro's Body, the background picture will move
up and down. This is the fine tuning function, so that the
adjustment will made within the remitted range.

【SP3.adjust the hight of the avatar's position】
By clicking the 『▲』『▼』button on the right side of the front
panel of the Photo Studio Pro's body, the avatar's stand position
will move up and down.

【SP4.change the default screen】
At first you rez the Photo Studio Pro, you will find a logo of
S@R Photo Studio Pro as the default screen. If the avatar
sit on the stand, the background picture will be switched to
the preparated one. if you want to change the texture on
your default screen to the other one, please go to edit with
right-mouse clicking on the Photo Studio Pro, and replace
the picture named "S@R Photo Studio Pro" in the contents
tab to any picture you like.
You have the option to name the picture, but the picture
name should be within 12 letters with the half-size font
character, nad the picture in the contents tab should be only one.
If the several pictures in the contetns tab, the Studio may get trouble.
(Please remain the other files as they are.)
The ratio of the picture should be as below.
If the width of the picture is 512 pix, the hight should be 288 pix.
The Illustration/logo should be within 163 pix hight from the middle,
and the picture/texture will be finished nicely,
if the upper and lower part of the picture is in black.

【SP5.Change the default pose】
Please replace the pose in the contents folder of the Photo Studio Pro
to any pose that you have. The pose which is replaced will be the first
pose, when the avatar stands on the photo stands. Please do not place
2 poses and over in the contents folder of Photo Studio Pro to avoid any
trouble with the Photo Studio.
Light Control Panel 【the panel 2 appears under the HUD】
(Function only for the S@R Photo Studio Pro)
【L1.Knowledge about the Light source】
Because of the characteristic of OpenGL, which is used for the SL Viewer,
the number of the lights that can be reflected at the same time is up to 6
(excluding sun and moon) on your viewer.
For this reason we prepares only 6 light-source prims for this product.
If you use face lights, the all lights in the photo stand may not be reflected.
The priority of the lights will be ordered from the strength of the lights, that
reached to the avatar.
Please seehear
【L2.Open the stand control panel of the HUD】
Please click the button in pink lower part of the HUD.
A operation panel of the photo studio will appear. You can control
the photo studio with this panel and the buttons in front of the body
of the photo studio.

【L3.Set up the Light-set】
The prims in 6 different colors are the light sources. These light sources
are linked as the parts of the photo stand in advance.
To set up the position, Intensity, Color, Radius, Falloff, and ON/OFF,
please go to edit by right-mouse clicking on the Photo Studio, and check
"edit the linked parts" then choose the lights separetely to fix the position.
Regarding the Intensity, color, radius, falloff of the lights, please set up in
the features tab.
How to move the prims and set up the light sources are the same as the
ordinal prim edit.
We call the convination of the 6 light sources (inclueint the lights turned off)
【Light-set】for the convenience.


【L4.Save the Light-set】
After you set up the lights (Light-set), please press the button "save light".
Once you press "save light" button, the position of the lights and viewpoint
at that time will be saved, and the "load light." button correspondence to
the number which you want to load will turn yellow.
If nothing saved, the button stays in grey.
There are 5 buttons in the HUD, and you can save the different Light-set
in the each button.
If you want to overwrite the already saved light set, please press the
"save light" button once more.
In order to load the saved Light-set, please press the "load light" button
which youwish to load. If the button is pressed, the lights will switch
in an instant.

【L5.Turn off the lights temporary】
If you press "on/off" button, the lights will be turned off temporary.
The information of the lights will not be deleted. So that the light will
be turned on, if you click the button once again.

【L6.make the lights invisible / Show the color of the light source】
The prim colors of the attached lights is only for distinguishment, and
they are not the color of the light source.
When you press『Hide/Show』button, the color of these prims will
switch bellow:
The color to distinguish(default)→ true color of the light source
→make the light invisible
Please make the lights invisible, when you finished all setting to start
the shooting.
The color of the light source will reflect immediately, but the color of
the prims will change only you click on the button again.
Please kindly understand that this is the specifications to ease the
burden.

【L7.permanent save the light set(write the note card3)】
We used to keep the Light-Set for long, if you could setup it beautifully.
Now you don't need to make any exertion fot the Light Setting each time.
You can save your own Light-Setting forever with the below-mentioned
method.
Please click the "initiariz" button, then choose "export" button in the
dialog box.Now you will be asked which light information from the button
1 to 5 should be exported. Once you choose a Light-Set button which
you want to save, the lightinformation will appear in the local chat field.
Please copy the all exported information (pls. s. e.g. below), and
right-mouse click on the HUD. Next please go to edit and open the
contents tab. There you will find the note cards named "Light 1" to
"Light 12" saved as default. Please open one of them and overwrite
the information that you have just copied. After please rename
the note card for your convenience, (You can name the note card
up to 24 half-size font characters. Though the name will be shown
only up to 8 characters in the dialog box for the information loading.)
then save the note card. In the "Light1" to "Light12" the particular
Light-Sets are already saved in advance.
Please load and try them if you like.
※You can save or load Light-Set Notes max. twelve in the contents tab
in the HUD.
Please save the note cards more than 12 in your inventory folder.

【A exemplar the exported Light-Set information】

※Please copy the contents in the line from--------Start Light Pos---------
to --------End Light Pos--------- including time.
【L8.load the saved Light-Set in the note card】
Please press "initiariz" button and choose "load" from the dialog box.
Now you will see the list of the available Light-Sets.
If you choose one of them that you want to load, you will find a dialog
box and be asked in which button from 1 to 5 do you want to load.
Please choose a button which you like, then the Light-Set will be
switched to the loaded one.
※The change may not reflected immediately because of the
characteristic of the SL-Viewer. It is a phenomenon that
the light is actually moved (incl. the other information reflected)
but it does not seem to change on the viewer. That means the light
is already reflected, but the prims don't seem to be moved.
In such case please move the camera position a little.
Then you will see also the light source prims on the correct position.
【L9.Initialize the light information】
Please press the "initiariz" button, and choose "Clear" on the
dialog box. The lights will be initialized to the initial setting.
【L10.change the initial information of the light】
When initializing the lights, they will go back to the upper right of the
default position and the setting of the Intensity, Color, Radius, Falloff,
and ON/OFF will be reurned to the initial setting.
These information excluding the position is written in the note card
named "light config" in the contents tab of the Photo Stand Pro.
Please right-mouse click on the Photo Stand Pro and go to edit to
open the note card, then overwrite
its contents. So that you can customize the initial setting.
例)LIGHT1_COLOR=<1.0,1.0,1.0>
LIGHT1_INTENSITY=0.5
LIGHT1_RADIUS=1.0
LIGHT1_FALLOFF=0.5
LIGHT1_ON=1
LIGHT1_COLOR is the color of the light source.
According to the color change value please see hear
(Please write the RGB value of the second life on the top
in the note card.)
LIGHT1means the first light which is placed on the left side
by the order of the default setting.
LIGHT1_INTENSITY=0.5 means the light intensity is 0.5.
LIGHT1_RADIUS=1.0 means the light radius is 1m.
LIGHT1_FALLOFF=0.5 means the light falls off (gets weak) 0.5.
LIGHT1_ON=1 means the light which you want to turn on
by the originate state is 1, the light
which you want to turn off is 0.
【L11.recovery of the studio】
You may accidentally move the part of the Photo Studio's Body
because the lights must be set up directly in the partial edit mode.
In such case please left-mouse click for a while on the Stand's body.
the parts of the stand will go back to thier initial position.
(If you changed the information other than the positon, rotation, or size,
the studio cannnot be recovered. So that please take a original copy
by all means.)
Studio Control panel 【a panel1appears lower part of the HUD】
(Regarding the operations of S@R Photo Studio Standard)
【SL1.Features and Forms of the Stand】
Photo Studio Standard is consists of 2 to 3 prims. Please use them,
if you want to save the prim number. Some functions are left out compere
to the Pro Version. Though they have the function to change the Studio's
size, which you cannnot find in the Pro Version.
There are three kind of the form of the Standard Verson Studio, they
are boxed, cylindar, and flat. Please use them for your utility purpose.

【SL2.change the size of the Stand / make the Stand invisible】
If you choos hide / small / medium / large from the HUD of the
Photo Studio Control Panel, the size of the studio will be changed.
If you choose "Hide", the studio will be completely invisible.
Moreover you can move up and down the standing position of the avatar
according to the size of the stand.


【SL3. The functions left off compare with Pro Version】
1.All lightning functions
2.Change of the aspect ratio (width, height) of the background picture.
3.The function to move up and down the background picture.
4.The function to move up and down the avatar.
5.The function to show the initial screen.
2008年07月16日
S@R Photo Studio Manual (J)
【内容物】
S@R Camera Controller Pro ( E ) ( J )----------------HUD
S@R Photo Studio Pro ( E ) ( J )-----------------------Pro Studio
S@R Photo Studio Standard Box ----------Standard Studio
S@R Photo Studio Standard Cylinder -----Standard Studio
S@R Photo Studio Standard Plane --------Standard Studio
Update Card S@R Photo Studio
S@R Photo Studio Users Manual ( E ) ( J )
How to use S@R Update Card ( E ) ( J )
---------------------------------------------------------------------------------------------------
チュートリアル
以下のご使用方法を一度経験して頂ければ、その操作は容易になると思います。
上から順に一度目を通して頂き、使用方法がわからない場合に必要項目を
ごらん頂くようにお願いします。
製品をご使用になられていて、操作方法がわからなくなりましたら、
HUD上部の【Camera Control】ボタンを押してください。このHPが
開きますので、操作方法のご確認をお願いします。
---------------------------------------------------------------------------------------------------
【本ページ目次】
●HUD単体で出来る操作
カメラ(アバター)コントロールパネル 【HUDの本体部分】
●Photo Studio と HUD を使って出来る操作
スタジオコントロールパネル 【HUDの下に現れるパネル1】
(Pro ver・Standard ver共通操作に関して)
ライトコントロールパネル 【HUDの下に現れるパネル2】
(S@R Photo Studio Pro のみの機能です)
スタジオコントロールパネル 【HUDの下に現れるパネル1】
(S@R Photo Studio Standard の操作に関して)
---------------------------------------------------------------------------------------------------
●HUD単体で出来る操作
カメラ(アバター)コントロールパネル 【HUDの本体部分】
【C1.Second Lifeのカメラの基礎知識】
セカンドライフのビューワの視点にはアバターの後ろ上方からアバター
ごしに前方を見る基本視点と、能動的にAltキーなどを併用してユーザー
が変更する視点の2種類があります。
アバターを操作する際には、前者の視点に戻ろうとする特性が働きます。
お店で商品を眺めていても、一旦歩き出すと基本視点が優先することが、
これを証明しています。
あなたがこの商品をご使用される際に、あなたの意図に反してアバターが
回転するような動きをした場合には、この特性を思い出してください。
また、当HUDは視点を制御する機能を持っていますが、制御できるのは
基本視点の場合に限ります。能動的な視点から基本視点に戻すには
キーボードのEscキーを2回(1回の場合もあります)押す必要があります。
【C2.使用準備(HUDの装着)】
まず、必ずイベンタリーの中のS@R Camera Controller Proの
コピーを取ってからご使用ください。コピーがあると、万が一HUDが損傷を
受けた場合でも容易に復旧できます。
コピーが済みましたら、次にS@R Camera Controller Proをアバターに
ドラッグすると、画面左に装着されます。
【C3.簡易カメラコントロール】
『Lock』ボタンを押すと、その時点のカメラの位置と視点方向がロック
されます。再度記憶したカメラ位置に戻したい場合には、キーボードの
Escキーを2回(1回の場合もあります)押してください。
※カメラ情報はアバターの位置と回転を基準に記憶されます。
カメラの情報を記憶した後にアバターが移動すると、
カメラ位置もアバターに連動して移動することになります。
『Un Lock』ボタンを押すと、ロックされたカメラ位置情報が解除されます。
必ず全ての操作の最後に押すようにしてください。
カメラが固定されたままですと、通常のビューワ操作に支障をきたします。
【C4.5つのカメラの記憶と呼び出し】
『save pos.』ボタンを押すと、その時点のカメラの位置と視点方向が記憶
されます。ボタンは5つあります。それぞれに別のカメラ情報を記憶すること
ができます。ボタンに記憶されているカメラ情報を上書きしたい場合には、
再度『save pos.』ボタンを押してください。
1~5の『save pos.』ボタンに記憶された、カメラ情報を呼び出すときには
それぞれの番号に対応する『load pos.』ボタンを押してください。
位置情報が記憶されている場合にはボタンの色は黄色に変わります。
カメラ情報が記憶されていない場合には、グレーのままです。
カメラ情報が記憶されているボタンを押すごとに、瞬時にカメラが切り替わり
ます。
【C5.カメラ情報のクリアー】
『Initializ』ボタンを押して、現れたダイアログから『クリアー』を
選択すると、『save pos.』ボタンに記憶されたカメラ位置情報は消え、
『load pos.』ボタンは初期状態のグレーに戻ります。
【C6.サポートモードとサイレントモード】
『Initializ』ボタンを押して、現れたダイアログから『サポート』を
選択すると、各操作時に解説メッセージが流れます。
操作に慣れるまでの間は、このモードでご使用ください。
同様に、『Initializ』ボタンを押して、現れたダイアログから『サイレント』を
選択すると、解説メッセージは出なくなります。操作に慣れてきて
解説メッセージがうるさく感じましたら、このモードをお試しください。
サイレンとモード使用時にはダイアログには『サポート』が、
サポートモード使用時にはダイアログには『サイレント』表示されます。
【C7.制御するアバターの選択】
当製品は、自分もしくは他人のアバターにポーズや表情を
与えるこが出来ます。自分のアバターを制御したい場合には
『self』ボタン、他人のアバターを制御したい場合には
『other』ボタンを押してください。
『other』ボタンを選択すると、画面右上に制御可能な距離にいるアバターが
近い順から9人まで表示されます。任意のアバターを選択すると選択された
人の画面にはアバターの制御を許すかどうかのダイアログが出ますので、
相手が了承すると、あなたのHUD上の『Other』ボタンが点灯して制御が
可能となります。相手がOKを出さないと、ボタンは点灯せず制御も出来ません。
【C8.アバターにポーズをつける】
制御したいアバターの選択【C7参照】が終わると、『pose』ボタンが
カレントになります。この状態でキーボードの上下矢印キーを押すと、
アバターのポーズが変化します。また、PageUP,PageDownキーを押すと、
記憶されているポーズの順番を、4つ飛ばしでポーズが変化します。
(ポーズ数が多い時にご利用ください)
ポーズの名称は中央の黒いスペースに表示されます。
【C9.アバターに表情をつける】
制御したいアバターの選択【C7参照】がされた状態で、『face』
ボタンを押すと、ボタンの色が黄色く変化します。このボタンが点灯
しているときに、あなたのキーボードの左右キーを押すとアバターの
表情が変化しますので、お好きな表情を選択してください。選択した
表情を繰り返したい場合には、上矢印キーを押してください。
表情の種類にもよりますが、上矢印キーを押し込んでいる間、
表情が維持されます。スナップショットの撮影などにお使いください。
(注)カメラが固定されていないと、左右矢印キーを押した瞬間に、
意図していないのにアバターが後ろ向きに回転してしまうことがあります。
基本的にカメラ位置固定ボタンで視点を固定してからお使いください。
表情の名称は中央の黒いスペースに表示されます。
上記の操作はSnow Rabbit Beauty HUD Series の笑顔連動のまつげに
対応していません。Snow Rabbit Beauty HUD Series をお使いの方で、
笑顔・微笑を選択されたい方は、キーボードのPage UP /Page Downキーを
お使いください。
Page UP キー → 笑顔+まつげ移動
Page Downキー → 微笑+まつげ移動
と割り当てられています
【C10.自分のアバターの向きを変える】
自分のアバターの制御をしていて、『pose』ボタンがカレントのとき、
キーボードの左右矢印キーを押すと、アバターの向きを変えることが
出来ます。ただ正確な回転は出来ませんので、数値的に回転させたい
場合には、後述のPhoto Studio をご利用頂く様にお願いします。
【C11.アバターの制御を解放する】
『Un Lock』ボタンを押すと、ロックされたカメラ位置情報とアバターの
全制御が解放され、通常ビューワの機能に戻ります。
必ず全ての操作の最後に押すようにしてください。
あなたがunlockキーを押さないと、制御されているアバターは
自由になることが出来ませんので、ご注意ください。
【C12.ポーズの追加】
HUDを地面にRezして右クリックで編集を選び、コンテンツタブ開いて
追加したいポーズを入れてください。
次にHUDをtakeし、装着して初期化を行ってください。
初期化を行うことで、追加されたポーズが反映されます
ポーズ名称の頭の番号は、HUDが自動的に表示しますので名称には加え
なくて結構です。
(注)ポーズ名称は半角8文字までしか表示されません。
【C13.HUDの最小化】
右端のオレンジ色のボタンを押すことで、瞬時にHUDを最小表示にすることが
できます。再度全体表示をさせたい場合にはもう一度オレンジボタンを押して
ください。
【C14.mini HUD】
右端の水色のボタンを押すことで、カメラ操作に特化したmini HUDに変更する
ことが出来ます。
● 1~5のボタンを長押しすることにより、カメラ情報の記憶が出来ます。
● 1~5のボタンを短くクリックすることで、カメラ情報を再現することが出来ます。
● カメラ情報を上書きしたい場合には、1~5のボタンを再度長押しをしてください。
● アバターを解放する際には、un lockボタンを押してください。
● 再度標準のHUDに戻すときには、横の青いボタンを押してください。
※ mini HUD状態でも、既にアバターのポーズ・表情の制御が
開始されている状態であれば、ポーズ・表情の変更は可能です。
【C15.HUDの位置調整】
HUDの位置を微調整したい場合には、HUDを右クリックで選択し編集に入り、
位置を調整した後に初期化を行ってください。初期化を行わないと、HUDの
拡縮時にHUDが移動前の位置に戻ってしまいます。
【C16.HUDの色変更】
HUD本体を左クリック長押しすることにより、HUDの色変更のダイアログが
出ます。5色のカラーよりお好きな色をお選びください。
【C17.HUDの名前変更】
使い分けなどの理由で、HUDの名前を変更したい場合には、
HUDを地面にRezして右クリックから編集メニューに入り、
一般タブの名前を変更してください。
イベンタリーから直接名称を変更することは出来ません。
---------------------------------------------------------------------------------------------------
●Photo Studio と HUD を使って出来る操作
スタジオコントロールパネル 【HUDの下に現れるパネル1】
(Pro ver・Standard ver共通操作に関して)
【S1.HUDのスタンドコントロールパネルを開く】
HUDの下部にあるオレンジ色の小さなボタンを押してください。
フォトスタジオの操作パネルが現れます。フォトスタジオの制御は、
このパネルとフォトスタジオ本体前面についているボタンで行います。
【S2.スタジオに立つ】
Rezされたスタジオを右クリックし、パイメニューからposeを選択
するとアバターはスタンドに立ちます。AOは必ずOFFにしてください。
【S3.ポーズ / 表情をつける】
アバターの選択 【C7参照】
ポーズをつける 【C8参照】
表情をつける 【C9参照】
【S4.背景を変更する】
『Texture』ボタンを押すと、背景画像が切り替わります。
背景の画像の名称は、下の黒いスペースに表示されます。
【S5.アバターの向きを変える】
『Rotate』ボタンを押すと45度と5度の2通りの正確な回転を
させることが出来ます。
【S6.背景画像を追加する】
HUDを地面にRezして右クリックで編集を選び、コンテンツタブ開いて
お手持ちの画像を入れてください。
画像はフルパーミッションでないとエラーになりますのでご注意ください。
次にHUDをtakeし、装着して初期化を行ってください。
初期化を行うことで、追加された画像が反映されます。
スタジオコントロールパネル
(S@R Photo Studio Pro の操作に関して)
【SP1.背景のアスペクト比(縦横比)を変える】
Photo Studio Pro本体の前面パネルの『Texture Size』ボタンを押すごとに
背景画面の縦横比率が切り替わります。
フルサイズ → 正方形 → 4:3 → 16:9
【SP2.背景の高さを微調整する】
Photo Studio Pro本体の前面パネルの左側の『▲』『▼』ボタンを
押すごとに背景画像が上下します。微調整機能ですので、
調整範囲にはある一定の範囲に留まります。
【SP3.アバターの高さを微調整する】
Photo Studio Pro本体の前面パネルの右側の『▲』『▼』ボタンを
押すごとにアバター位置が上下します
【SP4.初期画面を変更する】
Photo Studio ProをRezすると、本体の初期画面には
S@R Photo Studio Proのロゴが出ています。アバターがスタントに立つと、
背景画像は用意されたものに切り替わります。
初期画面のテクスチャーを、別画像にしたい場合には、Photo Studio Proを
右クリックして編集に入り、コンテンツタブの中にあるS@R Photo Studio Pro
という画像を、あなたのお好みの画像に入れ替えてください。
画像の名称は任意で構いませんが、半角12文字以内の名称にし、
コンテンツタブの中には画像は1枚だけになるようにしてください。
複数画像がコンテンツタブの中にあるとトラブルが発生します。
(他の種類のファイルはそのまま残してください)
画像の比率は以下の図の大きさでお願いします。
横512pixの場合、縦は288pixのサイズの画像を用意し、縦は中央163pixまで
に留めて、上下部分は黒のままにしたほうが綺麗に仕上がります。
【SP5.初期ポーズを変更する】
Photo Studio Proのコンテンツフォルダーの中に入っているポーズを、お手持ちの
ポーズに入れ替えてください。
入れ替えたポーズが、アバターがフォトスタンドに立った時の最初の基本ポーズになります。
トラブルの原因になりますので、Photo Studio Proのコンテンツには、2つ以上のポーズを
入れないでください。
ライトコントロールパネル 【HUDの下に現れるパネル2】
(S@R Photo Studio Pro のみの機能です)
【L1.Second Lifeの光源の知識】
SLのビューワが使用しているOpenGLの特性上、あなたのビューワ上で、
同時に反映させることの出来るライトの数は(太陽と月を除き)6つまでです。
その理由から、当製品には光源プリムは6つしか用意してありません。
フェイスライト等を使用している場合には、フォトスタンドのライトの全てが
再現できない場合があります。ライトの優先順位は、アバター表面に届く光の
強さの順番で決まります。
詳しくはこちらをご覧下さい。
【L2.HUDのスタンドコントロールパネルを開く】
HUDの下部にあるピンク色の小さなボタンを押してください。
フォトスタジオの操作パネルが現れます。フォトスタジオの制御は、
このパネルとフォトスタジオ本体前面についているボタンで行います。
【L3.ライトセットを設定する】
フォトスタンド右上にある6つの色のついたプリムが光源です。光源は
あらかじめフォトスタンドの一部としてリンクされています。
位置・明るさ・色・半径・減衰・ON/OFFを設定するには、フォトスタジオを
右クリック選択し編集に入り、『リンク部位の編集』にチェックをいれ、
ライトを個別選択し位置を決め、ライトの明るさ・色・半径・減衰に関しては、
特徴タブを開いて設定してください。
移動方法・光源設定方法に関しては通常のプリム編集と同じです。
本製品では、設定された6光源(OFFのライトも含め)の組み合わせを、
便宜上【ライトセット】と呼びます。
【L4.ライトセットを記憶する】
ライトの設定(ライトセット)が決まりましたら、『save light』ボタンを押してください。
『save light』ボタンを押すと、その時点の全てのライトの位置と視点方向が記憶
され、対応する番号の『load light.』ボタンの色が黄色に変わります。
記憶されていない場合には、グレーのままです。
ボタンは5つあります。それぞれに別のライトセットを記憶することができます。
ボタンに記憶されているライトセットを上書きしたい場合には、
もう一度『save light.』ボタンを押してください。
『save light』ボタンに記憶された、ライトセットを呼び出すときには
呼び出したい番号に対応する『load light.』ボタンを押してください。
ボタンが押されると、瞬時にライトが切り替わります。
【L5.ライトを一時的にOFFにする】
『ON・OFF』ボタンを押すと、一時的にライトの光が消えます。
ライト情報は消えないので、再度ボタンを押すとライトは光ります。
【L6.ライトを透明にする / 光源色で表示する】
付属ライトにあらかじめつけられているプリムの色は、識別のための
色で、本当の光源の色ではありません。『Hide/Show』ボタンを押すと、
識別の色(デフォルト)→ 本当の光源色 →ライトの透明化
と切り替わります。ライトの透明化は設定が全て終わり撮影を
するときにお使いください。
ライトの色を変更した際に、光源色は瞬時に反映されますが、
プリムの色はすぐには変わらず、再度ボタンを押した時に反映されます。
これは負荷対策の仕様ですのでご理解ください。
【L7.ライトセットを永久保存する(ノート書き出し)】
綺麗に設定出来たライトセットは、いつまでも残しておきたいもの
です。毎回ライトを1から設定する労力はもう必要ありません。
以下の方法で、ライト設定を永久に保存することが出来ます。
『initiariz』ボタンを押し、現れたダイアログから『書き出し』ボタンを
選択すると、1~5のどのボタンに記憶されているライト情報を書き出すか
を聞いてきます。記録したいライトセットのボタン選択すると、ライト情報が
周辺チャット欄に書き出されます。
書き出された全ての情報を(下記例参照)コピーし、HUDを右クリックして
編集に入りコンテンツタブを開くと、デフォルトに保存してある
『Light1』~『Light12』という12のノートのいずれかを開いて、
コピーした内容に上書きし、ご自分で分かりやすい任意の名前
(文字数は半角24文字までならエラーにはなりませんけど、
読み込みダイアログでは8文字までの表記となります)をつけて
保存してください。
『Light1』~『Light12』には、あらかじめ特徴的なライトセットが
記録されています。もし宜しければ、読み込んで一度お試しください。
※コンテンツタブ内に保存し、読み込めるライトセットノートは最大12枚まで
となります。それ以上の数のノートはイベンタリーに保管してください。
【書き出されたライトセット情報の例】
※--------Start Light Pos---------と書いてある行から、
--------End Light Pos---------と書いてある行までの
時刻も含めたすべての内容をコピーしてください。
【L8.ノートに保存したライトセットを読み込む】
『initiariz』ボタンを押し、現れたダイアログ『読み込み』を選択すると
読み込めるライトセットの一覧が表示されます。
読み込みたいライトセット選択すると、1~5のどのボタンに読み込むか
選択するダイアログが出ます。お好きなボタンを選択すると読み込
まれたライトセットに切り替わります。
※SLビューワの特性上、反映が瞬時にされない場合があります。
実際にはライトが移動(その他情報も反映)されているのに
ビューワ上では切り替わったように見えない現象です。
光は反映されているのですが、プリムが移動して見えないのです。
このような場合は、カメラ位置を少しだけ動かしてみてください。
光源プリムも本来の位置に移動して見えるはずです。
【L9.ライト情報を初期化する】
『initiariz』ボタンを押し、現れたダイアログ『クリアー』を選択すると
ライトは初期状態に戻ります。
【L10.ライトの初期化情報を変更する】
初期化したときに、ライトは右上の基本位置に戻り、明るさ・色・半径・
減衰・ON/OFFの設定も初期状態に戻ります。位置を除く情報は
Photo Stand Proを右クリックして開いたコンテンツタブの中の『light config』
ノートに書いてありますので、その内容を変更することで、
初期設定をカスタマイズできます。
例)LIGHT1_COLOR=<1.0,1.0,1.0>
LIGHT1_INTENSITY=0.5
LIGHT1_RADIUS=1.0
LIGHT1_FALLOFF=0.5
LIGHT1_ON=1
LIGHT1_COLORは光源の色です。
色の変更値に関しては、こちらを参考にすると良いでしょう
(一番上のセカンドライフRGBの値をノートに書き込んでください)
LIGHT1は、一番目のライトという意味です。初期状態の並びで一番左のもの。
LIGHT1_INTENSITY=0.5は、光の強さが0.5
LIGHT1_RADIUS=1.0は光の半径が1m
LIGHT1_FALLOFF=0.5は光の減衰(弱まり)が0.5
LIGHT1_ON=1は、所為状態でONにしたいライトは1、
OFFにしておきたいライトは0を入れてください。
【L11.スタジオのリカバリー】
当店のPhoto Studioは、スタジオ本体の部位編集に入り、ライト
設定を行うので、誤ってスタンド本体のパーツ部位を動かしてしまう
可能性があります。そのような場合には、スタンド本体を左クリック
長押ししてください。スタンドのパーツは、本来の自分の位置に戻ります。
(位置・回転・サイズ以外の情報を変更した場合には、元には戻りませんので、
必ず正常な状態のコピーを保存しておいてください)
スタジオコントロールパネル 【HUDの下に現れるパネル1】
(S@R Photo Studio Standard の操作に関して)
【SL1.スタンドの特徴・形状】
Photo Studio Standard は2~3プリムで構成されています。プリム数を節約
したい場合にお使いください。Proバージョンに比べていくつかの機能の
割愛はありますが、逆にProバージョンにはないスタジオの大きさの変更機能を
搭載しています。
Standardバージョンのスタジオの形状は、箱型/円筒形/平面の
3種類同封されています。ご使用目的に合わせて使い分けてください。
【SL2.スタンドの大きさを変更する / 透明にする】
HUDのフォトスタジオコントロールパネルからhide / small / medium /large
を選択するとスタジオの大きさが切り替わります。Hideを選択した時には
スタジオは完全に透明で見えなくなります。また、大きさに応じてアバターの
立ち位置も上下します。
【SL3. Proバージョンと比較して割愛された機能 】
1.ライト機能の全て
2.背景画像のアスペクト比(縦横比)の変更
3.背景画像の上下微調整機能
4.アバターの上下微調整機能
5.初期画面表示機能
2008年04月13日
The position of HUD
HUDの装着位置の変更方法
How to change the position of the HUD
Step 1
通常の装着位置
Below you see the default postion, when you wear your HUD.

HUDを一旦取り外し、イベンタリーの中のHUDを右クリックし、
【HUDに装着】から、希望の装着位置を選択します。
Please remove the HUD from you, and right-mouth click on the HUD in your
inventory, then please choose the wearing position as you wish from “Attach
to HUD”

上の絵は装着直後のスクリーンショットですが、装着したはずのHUDが見えていません。
Abobe is the screenshot just the HUD is attached, but you can’t see the HUD
that you worn.
Step 2
お使いのOSがWindowsの方はCtrl+Alt+tを押して下さい。
Mac OSをお使いの方は Ctrl+Option+t を押してください。
透明Primが可視化できます。
If you use Windows OS, please press Ctrl+Alt+t.
If you use Mac OS, please press Ctrl+Option+t.
So that you can see the transparent Prims in red.
上の絵は透明プリムを表示したスクリーンショットですが、装着したHUDはまだ見えません。
Above you will see the screenshot that the transparent prims are shown, but
you can’t still see the HUD that you worn.
Step 3
既に装着している別のHUDを右クリックして編集に入ります。
Windowsの場合はArtキー、Macの場合はOption キーを押してください。
マウスカーソルが+に変化します。この状態で、マウスを下へ移動させると
装着しているHUDが縮小表示されます。
先ほど装着位置を変更したHUDも画面の中に見えてきました。
Please right-mouse click on any other HUD that you already worn, then
go to “edit”. If you use Windows, please press alt key, and for Mac user press
option key. Now the mouse cursor is changed to “+”. Next please move the
mouse under. Then the HUDs that you worn shown in reduced-sized.
Therewith the HUD that you changed the position is also appeared.

Step 4
画面に見えてきたHUDは回転してしまっていて、裏面や側面が見えていることが多く、
裏面が透明なHUDもあります。先ほど透明プリムの表示を行ったのはこのためです。
見えてきたHUDを選択して、任意の場所に移動してください。
The HUD appeared is often rotated, therefore the wrong side could be shown
on the screen. Furthermore the wrong side of HUD could also transparent.
That’s why we set the transparent prims visible.
Please choose the appeared HUD, then place the HUD where you want to
attach.
Step 5
HUDを正しい向きに回転させれば移動操作は完了です。
Please rotate the HUD to the right direction. Now you finished to setup!
Step 6
お使いのOSがWindowsの方はCtrl+Alt+tを押して下さい。
Mac OSをお使いの方は Ctrl+Option+t を押してください。
透明プリムの表示がOFFになります。
If you use Windows OS, please press Ctrl+Alt+t.
If you use Mac OS, please press Ctrl+Option+t.
The shown transparent prims set now invisible.

* HUDの位置を微調整する際には、任意のHUDを選択し編集に入り、
表示された矢印を選択して移動させてください。
矢印はカレントにならないと移動できません。中途半端に選択すると編集ウィンドウが
閉じてしまいますので注意してください。
* To adjust the position of the HUD, please choose an appropriate HUD and
go to “edit”, then choose the shown arrow to move.
The arrow should be current to operate. Please be noticed that the edit
window would be closed, if the selection of the arrow would unfinished.
How to change the position of the HUD
Step 1
通常の装着位置
Below you see the default postion, when you wear your HUD.

HUDを一旦取り外し、イベンタリーの中のHUDを右クリックし、
【HUDに装着】から、希望の装着位置を選択します。
Please remove the HUD from you, and right-mouth click on the HUD in your
inventory, then please choose the wearing position as you wish from “Attach
to HUD”

上の絵は装着直後のスクリーンショットですが、装着したはずのHUDが見えていません。
Abobe is the screenshot just the HUD is attached, but you can’t see the HUD
that you worn.
Step 2
お使いのOSがWindowsの方はCtrl+Alt+tを押して下さい。
Mac OSをお使いの方は Ctrl+Option+t を押してください。
透明Primが可視化できます。
If you use Windows OS, please press Ctrl+Alt+t.
If you use Mac OS, please press Ctrl+Option+t.
So that you can see the transparent Prims in red.

上の絵は透明プリムを表示したスクリーンショットですが、装着したHUDはまだ見えません。
Above you will see the screenshot that the transparent prims are shown, but
you can’t still see the HUD that you worn.
Step 3
既に装着している別のHUDを右クリックして編集に入ります。
Windowsの場合はArtキー、Macの場合はOption キーを押してください。
マウスカーソルが+に変化します。この状態で、マウスを下へ移動させると
装着しているHUDが縮小表示されます。
先ほど装着位置を変更したHUDも画面の中に見えてきました。
Please right-mouse click on any other HUD that you already worn, then
go to “edit”. If you use Windows, please press alt key, and for Mac user press
option key. Now the mouse cursor is changed to “+”. Next please move the
mouse under. Then the HUDs that you worn shown in reduced-sized.
Therewith the HUD that you changed the position is also appeared.

Step 4

画面に見えてきたHUDは回転してしまっていて、裏面や側面が見えていることが多く、
裏面が透明なHUDもあります。先ほど透明プリムの表示を行ったのはこのためです。
見えてきたHUDを選択して、任意の場所に移動してください。
The HUD appeared is often rotated, therefore the wrong side could be shown
on the screen. Furthermore the wrong side of HUD could also transparent.
That’s why we set the transparent prims visible.
Please choose the appeared HUD, then place the HUD where you want to
attach.
Step 5

HUDを正しい向きに回転させれば移動操作は完了です。
Please rotate the HUD to the right direction. Now you finished to setup!
Step 6
お使いのOSがWindowsの方はCtrl+Alt+tを押して下さい。
Mac OSをお使いの方は Ctrl+Option+t を押してください。
透明プリムの表示がOFFになります。
If you use Windows OS, please press Ctrl+Alt+t.
If you use Mac OS, please press Ctrl+Option+t.
The shown transparent prims set now invisible.

* HUDの位置を微調整する際には、任意のHUDを選択し編集に入り、
表示された矢印を選択して移動させてください。
矢印はカレントにならないと移動できません。中途半端に選択すると編集ウィンドウが
閉じてしまいますので注意してください。
* To adjust the position of the HUD, please choose an appropriate HUD and
go to “edit”, then choose the shown arrow to move.
The arrow should be current to operate. Please be noticed that the edit
window would be closed, if the selection of the arrow would unfinished.

