2009年07月26日
S@R Sparkling Eye Manual (E)
【Features / Attachment】
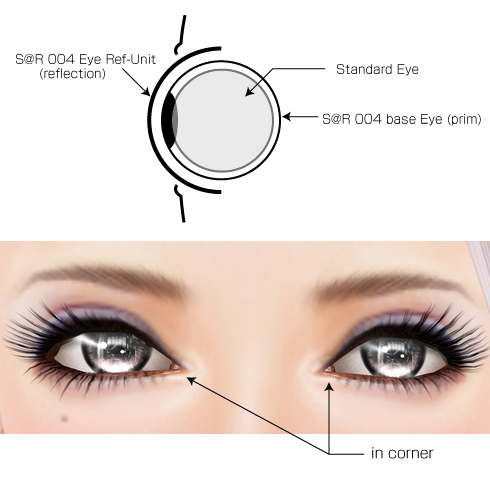
These eyes consist of 2 different types of the prims. One is the base
eyes, and the other is the parts of the highlight of the eyes.
Please wear the base eyes,"S@R 004 eye base unit (right)" and
"S@R 004 eye base unit (left)". (You can wear them, when you drag and
drop these eyes on your avatar.)
Next you will find the parts of the highlights prims named "S@R 004 eye Reflection-unit",which you can choose one of the 3 attachment positions
of (nose), (chin), or (mouth).
Please wear one of them to the available position of your avatar.
* The customer who bought the several uni color's eyes don't need
to change the "S@R 004 eye base unit (right)(left)" each time.
Because "S@R 004 eye Reflection-unit"controls the color change.
-----------------------------------------------------------------------------
【Adjustment / Customize】
After the preparation above, a transparent prim is attached on
the nose tip of your avatar.
If you "Left-mouse click FOR A LONG WHILE" on your avatar's nose tip,
the setup dialog will appear. If you cannot click on your nose tip, because
your hair or face light is in the way, please type the commands below
in the local chat field then press the enter key. So that you can control
several operations without clicking on the nose tip.
/100 menu----Open the setup dialog
/100 pose----proceed the standstill pose
If the standstill pose is already made, your AO will be stopped.
-----------------------------------------------------------------------------
【name / structure】
-------------------------------------------------------------------------------------------------
【Hierarchy of the dialog menu】
【color】Change your eye color (only color change version)
【photo】if you want to shoot the screen shot, you can force to move the direction of the eyes where you want.
※Prim eyes are covered with the base eyes. The rotation of the base eyes
could not be controlled. Therefore this is only an supplementary function.
【left up】 【up 】 【left】 【right】 【left down】 【down】 【right down】
You can rotate the eyes to the each direction.
【free】-----The eyes can be returned to the initial position.
【save load】The detail setting of the base eyes
【pos. save】----save the current setting (except color information)
【pos. load】----load the saved data
【eye】The detail setting of the base eyes
【angle】-------------vertical angle of the base eyes prims.
【shadow-deep】-----shadow density on the whites of the eyes
【shadow-angle】-----the position of the shadows of the eyelids on the whites of the eyes
【map size】----------texture size of the base eyes
【an oval】-----------rate of the flatness of the base eyes
【deps】--------------position of the depth of the base eyes prims
【reflection】The detail setting of the reflection
【deps】-----------position of the depth of the reflect-Unit.
【angle】----------vertical angle of the ref-Unit
【distance】-------space between left and right of the reflect-Unit
【prim size】-------size of the reflect-Unit
【hight】-----------hight of the reflect-Unit
【glow】-----------value of the glow of the light reflection
【in corner】The detail setting of the inner corner prims of the eyes
【deps】-------- ------position of the depth of the inner corner prims
【distance】-----------right and left interval of the inner corner prims
【prim size】-----------prim size of the inner corner prims
【hight】-------------- hight of the inner corner prims
【distance】-----------space between of the inner corner prims
【pose】Fix the body to make the fitting easy
【**manual**】Open the web manual
【**close**】Close the dialog box
-----------------------------------------------------------------------------
If you use Widows-OS, please press Ctrl+Alt+t
If you use Mac-OS, please press Ctrl (Cmd)+Option+t
So that you can see the transparent prims.
This helps your fitting operation, when you adjust the position of
the reflection-Unit.
-----------------------------------------------------------------------------
**Attention**
Ref-Unit adjust automatically the position of the "base Eyes" by
wearing. On this account a fault may occur, if you rez "Ref-unit" and
"base Eye" on the ground at the same time.
Please never put the products on the ground.
These eyes consist of 2 different types of the prims. One is the base
eyes, and the other is the parts of the highlight of the eyes.
Please wear the base eyes,"S@R 004 eye base unit (right)" and
"S@R 004 eye base unit (left)". (You can wear them, when you drag and
drop these eyes on your avatar.)
Next you will find the parts of the highlights prims named "S@R 004 eye Reflection-unit",which you can choose one of the 3 attachment positions
of (nose), (chin), or (mouth).
Please wear one of them to the available position of your avatar.
* The customer who bought the several uni color's eyes don't need
to change the "S@R 004 eye base unit (right)(left)" each time.
Because "S@R 004 eye Reflection-unit"controls the color change.
-----------------------------------------------------------------------------
【Adjustment / Customize】
After the preparation above, a transparent prim is attached on
the nose tip of your avatar.
If you "Left-mouse click FOR A LONG WHILE" on your avatar's nose tip,
the setup dialog will appear. If you cannot click on your nose tip, because
your hair or face light is in the way, please type the commands below
in the local chat field then press the enter key. So that you can control
several operations without clicking on the nose tip.
/100 menu----Open the setup dialog
/100 pose----proceed the standstill pose
If the standstill pose is already made, your AO will be stopped.
-----------------------------------------------------------------------------
【name / structure】

-------------------------------------------------------------------------------------------------
【Hierarchy of the dialog menu】
【color】Change your eye color (only color change version)
【photo】if you want to shoot the screen shot, you can force to move the direction of the eyes where you want.
※Prim eyes are covered with the base eyes. The rotation of the base eyes
could not be controlled. Therefore this is only an supplementary function.
【left up】 【up 】 【left】 【right】 【left down】 【down】 【right down】
You can rotate the eyes to the each direction.
【free】-----The eyes can be returned to the initial position.
【save load】The detail setting of the base eyes
【pos. save】----save the current setting (except color information)
【pos. load】----load the saved data
【eye】The detail setting of the base eyes
【angle】-------------vertical angle of the base eyes prims.
【shadow-deep】-----shadow density on the whites of the eyes
【shadow-angle】-----the position of the shadows of the eyelids on the whites of the eyes
【map size】----------texture size of the base eyes
【an oval】-----------rate of the flatness of the base eyes
【deps】--------------position of the depth of the base eyes prims
【reflection】The detail setting of the reflection
【deps】-----------position of the depth of the reflect-Unit.
【angle】----------vertical angle of the ref-Unit
【distance】-------space between left and right of the reflect-Unit
【prim size】-------size of the reflect-Unit
【hight】-----------hight of the reflect-Unit
【glow】-----------value of the glow of the light reflection
【in corner】The detail setting of the inner corner prims of the eyes
【deps】-------- ------position of the depth of the inner corner prims
【distance】-----------right and left interval of the inner corner prims
【prim size】-----------prim size of the inner corner prims
【hight】-------------- hight of the inner corner prims
【distance】-----------space between of the inner corner prims
【pose】Fix the body to make the fitting easy
【**manual**】Open the web manual
【**close**】Close the dialog box
-----------------------------------------------------------------------------
If you use Widows-OS, please press Ctrl+Alt+t
If you use Mac-OS, please press Ctrl (Cmd)+Option+t
So that you can see the transparent prims.
This helps your fitting operation, when you adjust the position of
the reflection-Unit.
-----------------------------------------------------------------------------
**Attention**
Ref-Unit adjust automatically the position of the "base Eyes" by
wearing. On this account a fault may occur, if you rez "Ref-unit" and
"base Eye" on the ground at the same time.
Please never put the products on the ground.
2009年07月26日
S@R Sparkling Eye Manual (J)
【特徴/装着】
この瞳は、ベースの瞳とハイライト部分を別のプリムとして作ってあります。
S@R 004 eye base unit (right) とS@R 004 eye base unit (left)を
それぞれ左右の瞳に装着してください。(アバターにドラッグすれば装着できます)
次に、ハイライト部分のパーツのS@R 004 eye Reflection-unitは
装着箇所が3箇所 (nose)/(chin)/(mouth)用意してあります。
いずれか1つを、あなたのアバターの空いている装着位置へ装着して下さい。
※単色の瞳を複数色購入して頂いたお客様は、色変更の際には
S@R 004 eye base unit (right)(left)
の付け替えの必要はありません。
色を制御しているのはS@R 004 eye Reflection-unitです。
-----------------------------------------------------------------------------
【調整/カスタマイズ】
あなたのアバターの鼻の頭には透明なプリムが装着されています。
アバターの鼻の頭を【左クリックで長押し】すると設定ダイアログが現れます。
髪の毛やフェイスライトなどが邪魔をして、鼻の頭がうまくクリックできない場合には、
チャット欄に以下のコマンドを打ち込んでEnterを押すといくつかの操作が出来ます。
/100 menu----設定ダイアログが開きます
/100 pose----フィッティングの為の静止ポーズを実行します。
既に静止ポーズが実行されている場合には、ポーズを中止します。
-----------------------------------------------------------------------------
【構造・名称】
-------------------------------------------------------------------------------------------------
【ダイアログのメニュー階層】
【color】瞳の色を選択します。(カラーチェンジバージョンのみ)
【photo】スクリーンショットを撮影する際などに、強制的に瞳の向きを回転させて
意図する方向に目線を移動させます。
※プリムアイはベースの瞳の上に被さっています。ベースの瞳の回転を制御する
ことはできないので、あくまでも補助的な機能と考えて下さい。
【left up】 【up 】 【left】 【right】 【left down】 【down】 【right down】
それぞれの方向に瞳の向きを回転させます。
【free】-----瞳の向きを初期状態に戻します。
【save load】ベース瞳の詳細設定
【pos. save】----現在の設定を保存(色情報以外)
【pos. load】----保存してあるセーブデータを読み込みます。
【eye】ベース瞳の詳細設定
【angle】---------ベースの瞳プリムの上下角度
【shadow-deep】-----白目の影の濃さ
【shadow-angle】----白目に落ちるまぶたの影の位置
【map size】--ベースの瞳のテクスチャーサイズ
【an oval】---------ベースの瞳の扁平率
【deps】---------ベースの瞳プリムの奥行き方向の位置
【reflection】反射の詳細設定
【deps】--------反射光ユニットプリムのの奥行き方向の位置
【angle】-------反射光ユニットプリムの上下角度
【distance】----反射光ユニットプリムの左右の間隔
【prim size】----反射光ユニットプリムのサイズ
【hight】----------反射光ユニットプリムの高さ位置
【glow】-----------反射光ユニットプリムのグロウの値
【in corner】涙腺パーツの詳細設定
【deps】--------涙腺パーツの奥行き方向の位置
【distance】----涙腺パーツの左右の間隔
【prim size】----涙腺パーツのプリムサイズ
【hight】------- 涙腺パーツのの高さ位置
【distance】-----涙腺パーツの左右の間隔
【pose】体を固定し、フィッティングを容易にします。
【**manual**】webマニュアルページを開きます
【**close**】ダイアログを閉じる
-----------------------------------------------------------------------------
お使いのOSがWindowsの方はCtrl+Alt+tを押して下さい。
Mac OSをお使いの方は Ctrl (Cmd)+Option+t を押してください。
透明Primが可視化できます。
S@R 004 Eye Sparkling-Unitの位置調整をする際に、これを行うと
あなたのフィッティング作業の手助けになるでしょう。
-----------------------------------------------------------------------------
注)Ref-Unit は、装着時に base Eye の位置調整を自動で行っています。このため
Ref-Unitとbase Eye を同時に地面にRezすると不具合を生じます。
商品は絶対に地面に置かないでください。
2009年07月26日
2008年10月26日
Separate Eye Ref-only E-Manual
【Adjustment / Customize】
After the preparation above, a transparent prim is attached on
the nose tip of your avatar.
If you "Left-mouse click FOR A LONG WHILE" on your avatar's nose tip,
the setup dialog will appear. If you cannot click on your nose tip, because
your hair or face light is in the way, please type the commands below
in the local chat field then press the enter key. So that you can control
several operations without clicking on the nose tip.
/100 menu----Open the setup dialog
/100 pose----proceed the standstill pose
If the standstill pose is already made,
the pose will be stopped.
-------------------------------------------------------------------------------------------------
At first you have to adjist the positions of each attached prim.
Because the SL-Viewer cannot deal with the change of the small value
in an instant, we setup the fitting of this product as follows:
First big movement of the prim's position by clicking the button.
Next return to the reserved position of the prim.
Despite of this device, we cannot avoid the slight lag of the prim's position.
So that please choose the prim once after the fitting.
At this moment your eyes and the reflextion unit will be placed to the correct
positions.
If you are used to handle the prims, you can adjust the prim's position
directly without the dialog.
Though you cannot select the each prim parts by the no-edit objects,
please operate the dialog to adjust "ref distance" which needs to move
left and right separately.
If you use Widows-OS, please press Ctrl+Alt+t
If you use Mac-OS, please press Ctrl (Cmd)+Option+t
So that you can see the transparant prims.
This helps your fitting operation, when you adjust the posiotion of
the reflection-Unit.
-------------------------------------------------------------------------------------------------
【Hierarchy of the dialog menu】
【fitting】Assistant tool for the adjustment of the position after the first wearing
【ref hight】------hight of the reflect-Unit
【ref distance 】--space between left and right of the reflect-Unit
【ref deps】-------positon of the depth of the reflect-Unit.
【refprim size】---size of the reflect-Unit
【ref angle】------vertical angle of the ref-Unit
【reflection】Details setting of the leflection and the shadow of the eyelids
【ref-map size】----texture size of the catoptric light・eyelids' shadow
【design】----------disign of the catoptric light・eyelids' shadow
【glow】-----------glow value of the catoptric light・eyelids' shadow
【Transparency】---Transparency of the catoptric light・eyelids' shadow
【pose】Fix the body to make the fitting easy
【**all reset**】All return to the default
【**close**】Close the dialog box
After the preparation above, a transparent prim is attached on
the nose tip of your avatar.
If you "Left-mouse click FOR A LONG WHILE" on your avatar's nose tip,
the setup dialog will appear. If you cannot click on your nose tip, because
your hair or face light is in the way, please type the commands below
in the local chat field then press the enter key. So that you can control
several operations without clicking on the nose tip.
/100 menu----Open the setup dialog
/100 pose----proceed the standstill pose
If the standstill pose is already made,
the pose will be stopped.
-------------------------------------------------------------------------------------------------
At first you have to adjist the positions of each attached prim.
Because the SL-Viewer cannot deal with the change of the small value
in an instant, we setup the fitting of this product as follows:
First big movement of the prim's position by clicking the button.
Next return to the reserved position of the prim.
Despite of this device, we cannot avoid the slight lag of the prim's position.
So that please choose the prim once after the fitting.
At this moment your eyes and the reflextion unit will be placed to the correct
positions.
If you are used to handle the prims, you can adjust the prim's position
directly without the dialog.
Though you cannot select the each prim parts by the no-edit objects,
please operate the dialog to adjust "ref distance" which needs to move
left and right separately.
If you use Widows-OS, please press Ctrl+Alt+t
If you use Mac-OS, please press Ctrl (Cmd)+Option+t
So that you can see the transparant prims.
This helps your fitting operation, when you adjust the posiotion of
the reflection-Unit.

-------------------------------------------------------------------------------------------------
【Hierarchy of the dialog menu】
【fitting】Assistant tool for the adjustment of the position after the first wearing
【ref hight】------hight of the reflect-Unit
【ref distance 】--space between left and right of the reflect-Unit
【ref deps】-------positon of the depth of the reflect-Unit.
【refprim size】---size of the reflect-Unit
【ref angle】------vertical angle of the ref-Unit
【reflection】Details setting of the leflection and the shadow of the eyelids
【ref-map size】----texture size of the catoptric light・eyelids' shadow
【design】----------disign of the catoptric light・eyelids' shadow
【glow】-----------glow value of the catoptric light・eyelids' shadow
【Transparency】---Transparency of the catoptric light・eyelids' shadow
【pose】Fix the body to make the fitting easy
【**all reset**】All return to the default
【**close**】Close the dialog box
2008年10月26日
Separate Eye Ref-only J-Manual
【調整/カスタマイズ】
あなたのアバターの鼻の頭には透明なプリムが装着されています。
アバターの鼻の頭を【左クリックで長押し】すると設定ダイアログが現れます。
髪の毛やフェイスライトなどが邪魔をして、鼻の頭がうまくクリックできない場合には、
チャット欄に以下のコマンドを打ち込んでEnterを押すといくつかの操作が出来ます。
/100 menu----設定ダイアログが開きます
/100 pose----フィッティングの為の静止ポーズを実行します。
既に静止ポーズが実行されている場合には、ポーズを中止します。
-------------------------------------------------------------------------------------------------
最初に、装着した各プリムの位置調整を行います。
セカンドライフのビューワは小さな値の変化に瞬時に対応できないので、
この製品のフィッティングはボタンを押すと大きくプリムが動いて
その後に指定した位置にプリムを戻す方法を採用しています。
ただ、そのような工夫をしても、微妙なプリムのずれは回避できないので、
フィッティングの終わりに、一度プリムを選択してみてください。
その瞬間に、ずれていたあなたの瞳と反射ユニットは正しい位置にセットされます。
あなたがもしプリムを扱うことに慣れているのであれば、ダイアログを
使用しないで、直接プリムの位置調整を行うことも可能です。
しかし、その際にも編集不可の状態で個別プリムを選択することは出来ないので
左右別々に移動させる必要のある【ref distance 】だけはダイアログ操作で
調整を行ってください。
お使いのOSがWindowsの方はCtrl+Alt+tを押して下さい。
Mac OSをお使いの方は Ctrl (Cmd)+Option+t を押してください。
透明Primが可視化できます。
reflection-Unitの位置調整をする際に、これを行うと
あなたのフィッティング作業の手助けになるでしょう。
-------------------------------------------------------------------------------------------------
【ダイアログのメニュー階層】
【fitting】初めて装着した際の位置調整補助ツール
【ref hight】------反射光ユニットプリムの高さ
【ref distance 】--反射光ユニットプリムの左右の間隔
【ref deps】-------反射光ユニットプリムのの奥行き方向の位置
【refprim size】---反射光ユニットプリムのサイズ
【ref angle】------反射光ユニットプリムの上下角度
【reflection】反射とまぶたの影の詳細設定
【ref-map size】----反射光・まぶたの影のテクスチャーサイズ
【design】----------反射光・まぶたの影のデザイン
【glow】-----------反射光・まぶたの影のグロウの値
【Transparency】---反射光・まぶたの影の透明度
【pose】体を固定し、フィッティングを容易にします。
【**all reset**】全てを出荷時の状態に戻す
【**close**】ダイアログを閉じる
2008年10月26日
Separate Eye English Manual
【Features / Attachment】
These eyes consist of 2 different types of the prims. One is the base
eyes, and the other is the parts of the highlight of the eyes.
Please wear the base eyes,S@R 003 base Eye (left) and
S@R 003 base Eye (right). (You can wear them, when you drag and
drop these eyes on your avatar.)
Next you will find the parts of the highlights prims named
S@R 003 Eye Ref-Unit, which you can choose one of the 3 attachment
positions of (nose), (chin), or (mouth).
Please wear one of them to the available position of your avatar.
* The customer who bought the several uni color's eyes don't need
to change the "S@R 003 base EYE" each time. Because
"S@R 003 Eye Ref-Unit" controls the color change.
-------------------------------------------------------------------------------------------------
【Adjustment / Customize】
After the preparation above, a transparent prim is attached on
the nose tip of your avatar.
If you "Left-mouse click FOR A LONG WHILE" on your avatar's nose tip,
the setup dialog will appear. If you cannot click on your nose tip, because
your hair or face light is in the way, please type the commands below
in the local chat field then press the enter key. So that you can control
several operations without clicking on the nose tip.
/100 menu----Open the setup dialog
/100 pose----proceed the standstill pose
If the standstill pose is already made,
the pose will be stopped.
-------------------------------------------------------------------------------------------------
At first you have to adjist the positions of each attached prim.
Because the SL-Viewer cannot deal with the change of the small value
in an instant, we setup the fitting of this product as follows:
First big movement of the prim's position by clicking the button.
Next return to the reserved position of the prim.
Despite of this device, we cannot avoid the slight lag of the prim's position.
So that please choose the prim once after the fitting.
At this moment your eyes and the reflextion unit will be placed to the correct
positions.
If you are used to handle the prims, you can adjust the prim's position
directly without the dialog.
Though you cannot select the each prim parts by the no-edit objects,
please operate the dialog to adjust "ref distance" which needs to move
left and right separately.
If you use Widows-OS, please press Ctrl+Alt+t
If you use Mac-OS, please press Ctrl (Cmd)+Option+t
So that you can see the transparant prims.
This helps your fitting operation, when you adjust the posiotion of
the reflection-Unit.
-------------------------------------------------------------------------------------------------
【Hierarchy of the dialog menu】
【fitting】Assistant tool for the adjustment of the position after the first wearing
【ref hight】------hight of the reflect-Unit
【ref distance 】--space between left and right of the reflect-Unit
【eye deps 】-----position of the depth of the base eyes prims
【eyeprim size】--size of the base eyes prims.
【eye angle】-----vertical angle of the base eyes prims.
【ref deps】-------positon of the depth of the reflect-Unit.
【refprim size】---size of the reflect-Unit
【ref angle】------vertical angle of the ref-Unit
【eye】Details Setting of the base eyes
【eye-map size】--texture size of the base eyes
【eye design】-----highlights of the base eyes / brightness of the whites
of the eyes
【an oval】---------rate of the flatness of the base eyes
【reflection】Details setting of the leflection and the shadow of the eyelids
【ref-map size】----texture size of the catoptric light・eyelids' shadow
【design】----------disign of the catoptric light・eyelids' shadow
【glow】-----------glow value of the catoptric light・eyelids' shadow
【Transparency】---Transparency of the catoptric light・eyelids' shadow
【pose】Fix the body to make the fitting easy
【**all reset**】All return to the default
【**close**】Close the dialog box
-------------------------------------------------------------------------------------------------
Below the menu only for the color change eye
【left color】--------change the color of the left eye
【right color】-------change the color of the right eye
【left&right】-------change the color of the right- and left eyes at the same time
【auto change】-----automatic change of the eye colors each 1 Min./ 10 Min.
-------------------------------------------------------------------------------------------------
**Attention**
Ref-Unit adjust automatically the position of the "base Eyes" by
wearing. On this account a fault may occur, if you rez "Ref-unit" and
"base Eye" on the ground at the same time.
Please never put the products on the ground.
2008年10月26日
Separate Eye Japanese Manual
【特徴/装着】
この瞳は、ベースの瞳とハイライト部分を別のプリムとして作ってあります。
べースの瞳S@R 003 base Eye (left) とS@R 003 base Eye (right)を
それぞれ左右の瞳に装着してください。(アバターにドラッグすれば装着できます)
次に、ハイライト部分のパーツのS@R 003 Eye Ref-Unitは
装着箇所が3箇所 (nose)/(chin)/(mouth)用意してあります。
いずれか1つを、あなたのアバターの空いている装着位置へ装着して下さい。
※単色の瞳を複数色購入して頂いたお客様は、色変更の際にはS@R 003 base Eye
の付け替えの必要はありません。色を制御しているのはS@R 003 Eye Ref-Unitです。
-------------------------------------------------------------------------------------------------
【調整/カスタマイズ】
あなたのアバターの鼻の頭には透明なプリムが装着されています。
アバターの鼻の頭を【左クリックで長押し】すると設定ダイアログが現れます。
髪の毛やフェイスライトなどが邪魔をして、鼻の頭がうまくクリックできない場合には、
チャット欄に以下のコマンドを打ち込んでEnterを押すといくつかの操作が出来ます。
/100 menu----設定ダイアログが開きます
/100 pose----フィッティングの為の静止ポーズを実行します。
既に静止ポーズが実行されている場合には、ポーズを中止します。
-------------------------------------------------------------------------------------------------
最初に、装着した各プリムの位置調整を行います。
セカンドライフのビューワは小さな値の変化に瞬時に対応できないので、
この製品のフィッティングはボタンを押すと大きくプリムが動いて
その後に指定した位置にプリムを戻す方法を採用しています。
ただ、そのような工夫をしても、微妙なプリムのずれは回避できないので、
フィッティングの終わりに、一度プリムを選択してみてください。
その瞬間に、ずれていたあなたの瞳と反射ユニットは正しい位置にセットされます。
あなたがもしプリムを扱うことに慣れているのであれば、ダイアログを
使用しないで、直接プリムの位置調整を行うことも可能です。
しかし、その際にも編集不可の状態で個別プリムを選択することは出来ないので
左右別々に移動させる必要のある【ref distance 】だけはダイアログ操作で
調整を行ってください。
お使いのOSがWindowsの方はCtrl+Alt+tを押して下さい。
Mac OSをお使いの方は Ctrl (Cmd)+Option+t を押してください。
透明Primが可視化できます。
reflection-Unitの位置調整をする際に、これを行うと
あなたのフィッティング作業の手助けになるでしょう。
-------------------------------------------------------------------------------------------------
【ダイアログのメニュー階層】
【fitting】初めて装着した際の位置調整補助ツール
【ref hight】------反射光ユニットプリムの高さ
【ref distance 】--反射光ユニットプリムの左右の間隔
【eye deps 】-----ベースの瞳プリムの奥行き方向の位置
【eyeprim size】--ベースの瞳プリムのサイズ
【eye angle】-----ベースの瞳プリムの上下角度
【ref deps】-------反射光ユニットプリムのの奥行き方向の位置
【refprim size】---反射光ユニットプリムのサイズ
【ref angle】------反射光ユニットプリムの上下角度
【eye】ベース瞳の詳細設定
【eye-map size】--ベースの瞳のテクスチャーサイズ
【eye design】-----ベースの瞳のハイライト/白目の明るさ
【an oval】---------ベースの瞳の扁平率
【reflection】反射とまぶたの影の詳細設定
【ref-map size】----反射光・まぶたの影のテクスチャーサイズ
【design】----------反射光・まぶたの影のデザイン
【glow】-----------反射光・まぶたの影のグロウの値
【Transparency】---反射光・まぶたの影の透明度
【pose】体を固定し、フィッティングを容易にします。
【**all reset**】全てを出荷時の状態に戻す
【**close**】ダイアログを閉じる
-------------------------------------------------------------------------------------------------
以下color change eye のみのメニュー
【left color】--------左目の色変更
【right color】-------右目の色変更
【left&right】-------左右の瞳の色を同時に変更
【auto change】1分/10分ごとに瞳の色が自動変更
-------------------------------------------------------------------------------------------------
注)Ref-Unit は、装着時に base Eye の位置調整を自動で行っています。このため
Ref-Unitとbase Eye を同時に地面にRezすると不具合を生じます。
商品は絶対に地面に置かないでください。
2008年10月26日
S@R 003 Separate Eye Manual
S@R 003 Separate Eye English Manual
S@R 003 Separate Eye Japanese Manual
Separate Eye Ref-only English Manual
Separate Eye Ref-only Japanese Manual
2008年04月13日
The position of HUD
HUDの装着位置の変更方法
How to change the position of the HUD
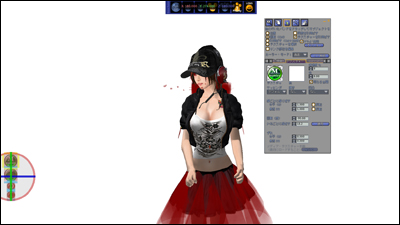
Step 1
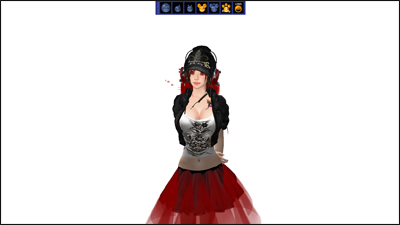
通常の装着位置
Below you see the default postion, when you wear your HUD.

HUDを一旦取り外し、イベンタリーの中のHUDを右クリックし、
【HUDに装着】から、希望の装着位置を選択します。
Please remove the HUD from you, and right-mouth click on the HUD in your
inventory, then please choose the wearing position as you wish from “Attach
to HUD”

上の絵は装着直後のスクリーンショットですが、装着したはずのHUDが見えていません。
Abobe is the screenshot just the HUD is attached, but you can’t see the HUD
that you worn.
Step 2
お使いのOSがWindowsの方はCtrl+Alt+tを押して下さい。
Mac OSをお使いの方は Ctrl+Option+t を押してください。
透明Primが可視化できます。
If you use Windows OS, please press Ctrl+Alt+t.
If you use Mac OS, please press Ctrl+Option+t.
So that you can see the transparent Prims in red.
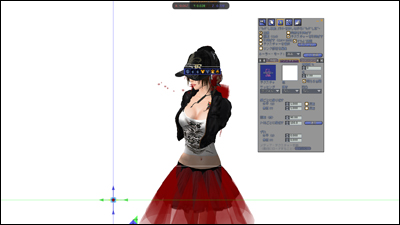
上の絵は透明プリムを表示したスクリーンショットですが、装着したHUDはまだ見えません。
Above you will see the screenshot that the transparent prims are shown, but
you can’t still see the HUD that you worn.
Step 3
既に装着している別のHUDを右クリックして編集に入ります。
Windowsの場合はArtキー、Macの場合はOption キーを押してください。
マウスカーソルが+に変化します。この状態で、マウスを下へ移動させると
装着しているHUDが縮小表示されます。
先ほど装着位置を変更したHUDも画面の中に見えてきました。
Please right-mouse click on any other HUD that you already worn, then
go to “edit”. If you use Windows, please press alt key, and for Mac user press
option key. Now the mouse cursor is changed to “+”. Next please move the
mouse under. Then the HUDs that you worn shown in reduced-sized.
Therewith the HUD that you changed the position is also appeared.

Step 4
画面に見えてきたHUDは回転してしまっていて、裏面や側面が見えていることが多く、
裏面が透明なHUDもあります。先ほど透明プリムの表示を行ったのはこのためです。
見えてきたHUDを選択して、任意の場所に移動してください。
The HUD appeared is often rotated, therefore the wrong side could be shown
on the screen. Furthermore the wrong side of HUD could also transparent.
That’s why we set the transparent prims visible.
Please choose the appeared HUD, then place the HUD where you want to
attach.
Step 5
HUDを正しい向きに回転させれば移動操作は完了です。
Please rotate the HUD to the right direction. Now you finished to setup!
Step 6
お使いのOSがWindowsの方はCtrl+Alt+tを押して下さい。
Mac OSをお使いの方は Ctrl+Option+t を押してください。
透明プリムの表示がOFFになります。
If you use Windows OS, please press Ctrl+Alt+t.
If you use Mac OS, please press Ctrl+Option+t.
The shown transparent prims set now invisible.

* HUDの位置を微調整する際には、任意のHUDを選択し編集に入り、
表示された矢印を選択して移動させてください。
矢印はカレントにならないと移動できません。中途半端に選択すると編集ウィンドウが
閉じてしまいますので注意してください。
* To adjust the position of the HUD, please choose an appropriate HUD and
go to “edit”, then choose the shown arrow to move.
The arrow should be current to operate. Please be noticed that the edit
window would be closed, if the selection of the arrow would unfinished.
How to change the position of the HUD
Step 1
通常の装着位置
Below you see the default postion, when you wear your HUD.

HUDを一旦取り外し、イベンタリーの中のHUDを右クリックし、
【HUDに装着】から、希望の装着位置を選択します。
Please remove the HUD from you, and right-mouth click on the HUD in your
inventory, then please choose the wearing position as you wish from “Attach
to HUD”

上の絵は装着直後のスクリーンショットですが、装着したはずのHUDが見えていません。
Abobe is the screenshot just the HUD is attached, but you can’t see the HUD
that you worn.
Step 2
お使いのOSがWindowsの方はCtrl+Alt+tを押して下さい。
Mac OSをお使いの方は Ctrl+Option+t を押してください。
透明Primが可視化できます。
If you use Windows OS, please press Ctrl+Alt+t.
If you use Mac OS, please press Ctrl+Option+t.
So that you can see the transparent Prims in red.

上の絵は透明プリムを表示したスクリーンショットですが、装着したHUDはまだ見えません。
Above you will see the screenshot that the transparent prims are shown, but
you can’t still see the HUD that you worn.
Step 3
既に装着している別のHUDを右クリックして編集に入ります。
Windowsの場合はArtキー、Macの場合はOption キーを押してください。
マウスカーソルが+に変化します。この状態で、マウスを下へ移動させると
装着しているHUDが縮小表示されます。
先ほど装着位置を変更したHUDも画面の中に見えてきました。
Please right-mouse click on any other HUD that you already worn, then
go to “edit”. If you use Windows, please press alt key, and for Mac user press
option key. Now the mouse cursor is changed to “+”. Next please move the
mouse under. Then the HUDs that you worn shown in reduced-sized.
Therewith the HUD that you changed the position is also appeared.

Step 4

画面に見えてきたHUDは回転してしまっていて、裏面や側面が見えていることが多く、
裏面が透明なHUDもあります。先ほど透明プリムの表示を行ったのはこのためです。
見えてきたHUDを選択して、任意の場所に移動してください。
The HUD appeared is often rotated, therefore the wrong side could be shown
on the screen. Furthermore the wrong side of HUD could also transparent.
That’s why we set the transparent prims visible.
Please choose the appeared HUD, then place the HUD where you want to
attach.
Step 5

HUDを正しい向きに回転させれば移動操作は完了です。
Please rotate the HUD to the right direction. Now you finished to setup!
Step 6
お使いのOSがWindowsの方はCtrl+Alt+tを押して下さい。
Mac OSをお使いの方は Ctrl+Option+t を押してください。
透明プリムの表示がOFFになります。
If you use Windows OS, please press Ctrl+Alt+t.
If you use Mac OS, please press Ctrl+Option+t.
The shown transparent prims set now invisible.

* HUDの位置を微調整する際には、任意のHUDを選択し編集に入り、
表示された矢印を選択して移動させてください。
矢印はカレントにならないと移動できません。中途半端に選択すると編集ウィンドウが
閉じてしまいますので注意してください。
* To adjust the position of the HUD, please choose an appropriate HUD and
go to “edit”, then choose the shown arrow to move.
The arrow should be current to operate. Please be noticed that the edit
window would be closed, if the selection of the arrow would unfinished.

