2008年10月13日
S@R Camera Controller Manual E
【Contents】
S@R Camera Controller ( E ) ( J )
Update Card S@R Camera Controller
S@R Photo Studio Users Manual ( E ) ( J )
How to use S@R Update Card ( E ) ( J )
---------------------------------------------------------------------------------------------------
Tutorial
Once you experience how to use as below, it would be easy to operate
this product.Please read through from top in order. In case you don't
know how to use later, please check the necessary related heading.
If you don't know how to control by using our prouct, Please click the
"Camera Control" button. Then this page will be automatically opened.
Please check how to use the product.
---------------------------------------------------------------------------------------------------
【C1.Basic knowledge about the Camera in Second Life】
There are two kind of the viewpoint in the Second Life viewer.
One is the basic viewpoint from the upper back of the avatar, and
the other is the viewpoint that you can change actively with Alt-key.
Once you operate your avatar again, the viewer try to go back to the
former viewpoint because of its characteristic.
It testified that the basic viewpoint takes always priority once you start
to walk, when you e.g. look at the items in the store.
Please remember this characteristic of the SL-viewer, when your avatar
turn around despite of your intention by using this product.
Though this HUD has the function to control the viewpoint, the controllable
viewpoint is limited only when you looks from the basic viewpoint.
To go back from the active viewpoint to the basic viewpoint, please press
twice the Esc-key. (possibly only one time.)
【C2.Preparation(wear and initialize HUD)】
Before you use the HUD, please take a copy of "S@R Camera Controller
in your inventory by all means. So that you can repair easily the HUD,
in case the HUD is broken.
After you copied the HUD, Please drag and drop the "S@R Camera
Controller " on the avatar, then the HUD will be attached on the
left side of your display.
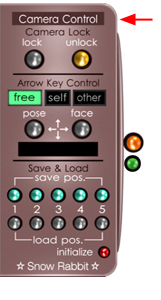
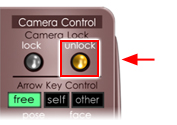
【C3.Simple camera control】
If you press the "Lock" button, the position of the camera and the
viewpoint direction will be locked. When you would like to go back
to the initial cameraposition, please press twice the Esc-key
(possibly once).
※the camera information is fixed based on your avatar's position
and rotation. On this account the camera position may move
together with your avatar, if the avatar move after you saved the
camera information. If you press the "Unlock" button, the camera
position information will be canceled.Please press this button at
the end of the operation by all means.Otherwise you may have
trouble to the regular operations at the viewer.

【C4.memorize and call five cameras】
If you press one of the "save pos." button, the camera position and
the viewpoint direction at the moment will be saved. There are five
buttons, and you can save the different camera informations each of them.
If you would like to overwrite the camera information in the button, please
press "save pos." button again.
If you would like to call the camera information saved in each 1-5
"save pos." button, please press the equivalent number of the "load pos."
button to the "save pos" button.
If the camera information is already saved the color of the button turns
yellow.If the camera information has not saved yet, the color of the
button remains grey. Every time if you click each button, in which
information is saved, the cameras will switch in a flash.

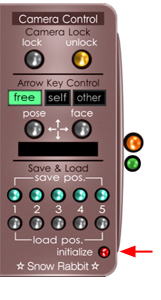
【C5.Clear the camera information】
When you press the "Initializ" button, and choose "Clear" from the
dialog box, the all saved camera information will be cleared,
thus the all "load pos." buttons will turn grey, which shows they
are initialized now.

【C6.Support mode and Silent mode】
When you press the "initializ" button, a dialog box will appear.
Please choose"Support", when you need the explanations for
each operation.We recommend you to use this mode until
you are used to the operations.The same as above please
press the "Inizializ" button, then choose "Silent" in the dialog
box, the explanation messages will not appear. If you are
already used to the operations or bothers you these operations,
please try this mode.
If you use the silent mode, you will find "Support" in the dialog box,
and if you use the support mode, you will find "Silent" in the
dialog box.
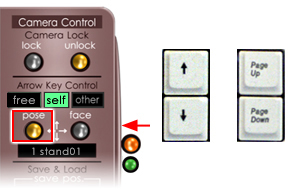
【C7.Choose the avatar that you control】
You can give the poses or expressions to yourself or even the another
avatar. If you would like to control yourself, please press "self" button.
if you would like to control the other avatar, please press the "other"
button.When you choose "other", the 9 nearest abatars from you will
be shown on the right to of your display. Once you choose a random
avatar, the person, who are chosen from you, will receive a message
whether he or she accept the control of the avatar by you in the
dialog box. If the person accept your control, The "other" button in
your HUD will blink, and you can now control the other avatar.
If the person does not accept it, the button will not blink and you
cannot control the other avatar.

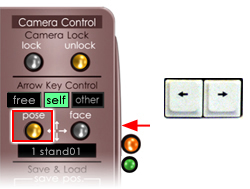
【C8.strike a pose for the avatar】
After choosing which avatar you want to control 【pl. see C7】,
the "pose" button will be active. If you press the up or down index key,
the pose of the avatar will be changed. Furthermore if you press the
PageUp or PageDown key, you can skip every 4 poses that you
saved in the HUD.
(Please use this function, if you have a lot of poses in the HUD.)
The name of each pose will be shown in the black frame in the middle.
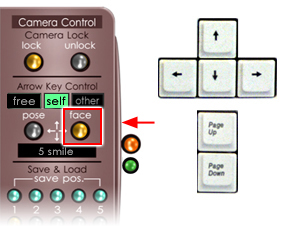
【C9.Expression on the avatar's face】
With choosing the avatar, you want to control 【pl. see C7】, please
press "face" button, then the color of the button turns yellow.
During the button turns on, please select a expression which you like.
The expression will change by pressing the left/right key. If you repeat
the same expression, please press up/down key.
Though it is depend of the expression, the expression will keep showing
during you press the up/down key. Please use this function to take SS
(Snapshot).
(Attention) If the camera does not fixed, the avatar may turn back without
any intention when you press the left/right button. Please choose your
expression after you fix your viewpoint with the camera lock button.
The name of the expression will be shown in the black frame in the middle.
The above-mentioned operation is not appropriated to the smile linked
eyelashes
of our "Snow Rabbit Beauty HUD Series" If you choose smile or grin
by using "Snow Rabbit Beauty HUD Series", please press
Page UP/Down key on your keyboard.
Allocation of the function for the a.m. eyelashes are as follows:
Page UP key → grin + move eyelashes
Page Down key → smile + move eyelashes
【C10.Change your avatar's direction】
If you press the left/right button on your keyboard during you control
your avatar and pose button is in current (chosen), you can chage
the direction of your avatar. But you cannot rotate the avatar exactly.
So please use the photo Studio that I describe later, if you would like to
rotate your avatar with a numerical value.
【C11.release the avatar control】
If you click the "unlock" button, the fixed camera position information
and all avatar's control will be released, and return to the normal viewer
function as usual.
Please press the button at the end of the all operation by all means.
Please be informed that the avatar controled by you cannot be free,
as long as you don't press the "unlock" key
【C12.Add the poses】
Please rez your HUD on the ground and select edit by clicking the
right-mouse button then add your favorite pose after opening the
contents tab.
Next please take the HUD, and wear it then please initialize the HUD.
The pose you added will be first reflected after the initialization.
The number of the added pose name will be issued automatically by the
HUD, so no need to include the number in the pose name.
(Attention)Pose name will be shown max. 8 letters with a half-size font
character.

【C13.minimize the HUD】
You can minimize the HUD in an instant by clicking the button in orange on
the right side of the HUD. If you want to show the entire HUD, please click
the same button in orange again.
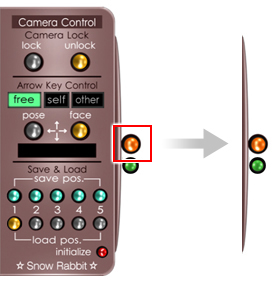
【C14.mini HUD】
You can change the HUD to mini HUD specialized only for the camera control
by clicking the button in light-blue on the right side of the HUD.
● enable to save the camera information to keep pressing the button
number 1-5.
● enable to reload the camera information by short clicking the button
number 1-5.
● press the button number 1-5 for a while, if you want to overwrite the
camera info.
● To release the avatar, please click "unlock" button.
● Please click the button in light-blue to back to the default HUD.
※ If the avatar's pose and expression control has already started,
you can change the pose and expression despite you are
using the mini-HUD.

【C15.Adjust the position of the HUD】
If you want to adjust the position of the HUD, please go to edit menu
with right-mouse click then initialize the HUD after you adjust the position.
If you don't initialize the HUD, the HUD will return to the default position
when you expand/minimize the HUD.
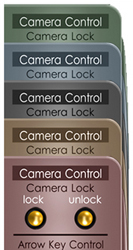
【C16.Change your HUD color】
the dialog box to change the HUD color will appear to keep clicking
the left-mouse button for a while. Please your favorite color from the
five different color below.
【C17. Rename of the HUD】
If you would like to change the name of the HUD for your convenience,
please rez the HUD on the ground, and go to
edit menu by right-mouse clicking on the HUD. Then go to
general tab. There you can rename the name of the HUD.
Please note that you cannot rename the HUD directly from
the inventory folder.
Posted by Shirousagi Noel at 14:57│Comments(0)
※このブログではブログの持ち主が承認した後、コメントが反映される設定です。

