2008年04月01日
Coordinate
最近お店に飾ってあるpopの問い合わせが増えてきました。
大抵は使用している髪の毛が、どこで売ってるの?という問い合わせです。
Recently I get a lot of questions about the pop that you can see
in the Snow Rabbit Shops. Question e.g. the wigs which are used
for the pop or where can you buy them.
個別に対応していましたが、外国の方からの問い合わせも多いので、
英語が苦手な私にはリアルタイムでの対応が難しく、時間もかかるので
こちらのページで対応していきます。
Until now I answered each question. But it takes about
really a long time, and it is difficult to deal with
these question quickly because I am not good at English.
So that I will corresponde these themes in this page.
Hair INFLUENCE

Hair Collar Me Sexy! Silks
Hair ARMIDI
Hair SHOP SEU

Hair Celestial City
Hair bijou
大抵は使用している髪の毛が、どこで売ってるの?という問い合わせです。
Recently I get a lot of questions about the pop that you can see
in the Snow Rabbit Shops. Question e.g. the wigs which are used
for the pop or where can you buy them.
個別に対応していましたが、外国の方からの問い合わせも多いので、
英語が苦手な私にはリアルタイムでの対応が難しく、時間もかかるので
こちらのページで対応していきます。
Until now I answered each question. But it takes about
really a long time, and it is difficult to deal with
these question quickly because I am not good at English.
So that I will corresponde these themes in this page.

Hair INFLUENCE

Hair Collar Me Sexy! Silks

Hair ARMIDI

Hair SHOP SEU

Hair Celestial City

Hair bijou
2008年03月09日
Another Skin is not necessary
Snow Rabbitのw002スキンに関して、
Another Skinを使っているのでは?というお問い合わせを頂きました。
しろうさぎはドーピングをしたと、某匿名掲示板でも噂になっている(た?)ようです。
(その後は見ないようにしてるので、わかりません)
買っていただく方に不安を与えたくないので、ここでお答えします。
答えは、Noです!一片たりとも使っていませんし、参考にしたこともありません。
これに関しては理由も含めてhttp://shirousagi.slmame.com/e132071.htmlの
コメント返答でお話させていただいてます。
私には絵描きとしてのプライドがありますし、楽しんでSLを続けています。
他人の描いたものの一部でも利用することは屈辱以外の何ものでもなく、
そんなことをしても楽しくありません。
作ったものが売れることは励みにもなりますし、うれしく思いますけど、
それが一義ではないと思っています。
でも、言葉で言うだけでは伝わりにくいと感じました。
これは描いた本人にしか解らない事で、全ての人が絵の判断ができる訳ではありません。
少しは使っているのでは?、、とか、、この部分は似てるのでは、、とか”きり”がないです。
ですので、スキン屋は自己防衛の為に、絵でご判断いただきます。
特に社会的な主張をする訳ではありませんけど、このような形で
新作を発表するのは、自分にとってとても悲しいことだと感じています。
前作の発表の時は、純粋に楽しかった。でも、今回は複雑な思いが絡みます。
安く上質なスキン提供が始まって、誰でも気軽にスキンを描けるようになったのですけど、
最近起こった様々な出来事を振り返ると、私にとっては、Another Skinのない数ヶ月前の
SLの方が楽しかったと感じてもいます。
どちらかというと、私は『リンゴのない楽園』の方が好きです。
ご意見は様々だと思いますので、ご不快に思われた方がいらっしゃいましたらお詫びいたします。
まず最初に、アナザーさんの規約の直訳を青字で、、(英語苦手です、すごい日本語でごめんなさい)
翻訳が得意なスタッフもいますけど、この記事の文責はShirousagi Noelにあるので、
他のスタッフ2人の力を借りることはやめておきます。
私の皮膚のライセンス合法性に入ることを避けたいのと同じくらい非常に、
私は私が澄んで、より詳細にさらにライセンスことばの権利と規制を説明
する必要があるのを感じます。
私の皮膚は、BSD Licenseの下で認可されます。BSD許可によって与えられる使用権が
パブリックドメイン権利に等しい間、皮膚はパブリックドメインではありません
−私は私の皮膚を捨てませんでした、そして、私はまだ私の著作権の彼らで生活を維持します。
そこで、著作権と与えること間の少しの矛盾も、修正しておよび/または再配布する権利
ではありません。著作権は、ちょうど私に私の皮膚[1]を修正して、再配布するためにそれらの
権利を配る — BSD Licenseを通して — 能力を提供する法的ツールとして用いられます。
しかし、これらの修正と再分配権は無条件で提供されません−私がそのような権利を与えるのを
許している間、私の著作権はまた、私が彼らを制限するのを許します:あなたが若干の基本的な
規則(BSD Licenseによって明記されて)に従うならば、あなたはこれらの権利を得るだけです:
私の最初の著作権と許可通知をあなたの再分配で無傷のままにしてください。この通知は、
あなたには私の皮膚を修正して、再配布する法的権利があるとはっきり述べることによって、
実際にあなたを保護します(あなたが何かを妨害することを盗んだとして訴えられる場合に備えて、...)。
もちろん、あなたが私の許可を得ない限り、私をあなたの再分配のどんな承認でもまたは
昇進から省いてください。これは、実はちょうど私自身の利益に賛成です。私は、注意^^を憎みます;;
それで、あなたがこれらの規則に従うことなくあなたの修正/再分配権利を行使するならば、
何がありますか?何も!私には、あなたに対して何もするために、本当に関心、資源または
悪意がありません。それは言いました、素晴らしくしてください、そして、あなたはあなたが
お返しに得るkarmicな報酬を持っています!^^
(P.S. Iは戻ります!私は、再び徳Internetsを持ちます!/然り)
[1]著作権と再分配が金融補償に関してとても絡み合う間、彼らはこの場合いくぶん二分した
実体になります、そこで、そのような補償は名ばかりです、そして、著作権の範囲はかなりunrestrictiveです。
ブログ上にMap前の原画を載せてはいけないとは書いてないですね。
それでは始めます。
まずAnotherさんの原画です。
眉毛がないのは、Anotherさんのスキンは眉毛をアルファで抜いてSL上で
色を変更できるようにしてあるからです)
cf0
fe

ff0
le

lf0y

re
se
lf0
私が間違っていなければ、Another Skinは以上のはずです。
全て512pixの大きさでした。この中から、lf0yは男性スキンのようですから対象から外すとして、
cf0とleを選ばせていただいて比較させて頂きます。
(あまりに色が違ったり、そばかすがあるとちゃんとした判断が出来ませんので)
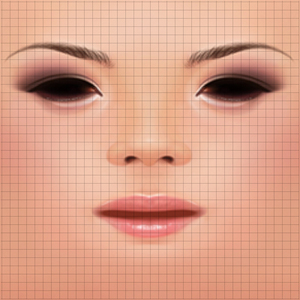
次はSnow Rabbit w002 2月3日当時(疑惑浮上の日)の原画と発売バージョンの原画です。
ブログにも描きましたけど、目元が気になっていたので変更しています。上下比較でご覧ください。
少し指摘を頂いたこともあり、色調も微妙に変更してあります。
他にも多少細部いじりましたけど、どこをいじったのか、、自分で上下を比較しても思い出せませんw
私の原画サイズは2048pixで描いています(もちろんUP時に縮小です)。
S@R02-03
S@R Finish

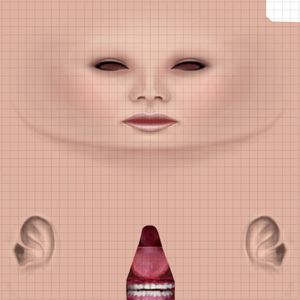
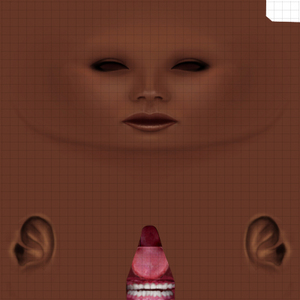
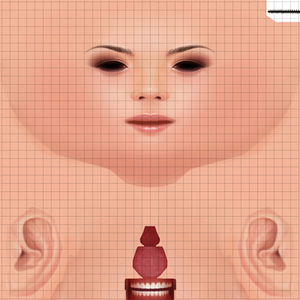
さて、細部を見て行く前にスキン製作の制約について少し、、、
下の画像をご覧ください。
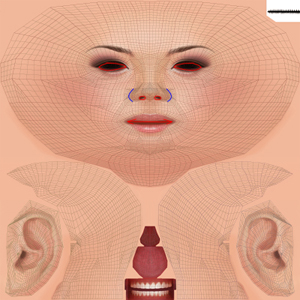
この画像で赤いラインはシェイプの制約ラインです。
例えば目、、このラインから内側は目の入る穴になりますので、これ以上
目を小さく描く訳にもいきませんし、逆に大きく書いた場合も、それが意図的な
ものでない限り、おかしく見えてしまいます。
鼻の穴も同じです。勝手に位置を変更する訳にはいきません。
口も同様、特にうちのスキンのように笑顔を売りにしている場合、
開いて変形した口が、如何に綺麗に見えるかに気を使いながら、
アップロードとスキン描画を繰り返しながら煮詰めていきます。
鼻の横の青ラインは微妙です。
多少の変更は目立ちません。このあとの画像でAnotherさんの鼻に対して
日本人を意識したS@Rの鼻が小さく描かれていることがお解り頂けると
思います。リアルを追求しないスキンの場合、ここをぼかして柔らかく見せている
スキンも多いですね。
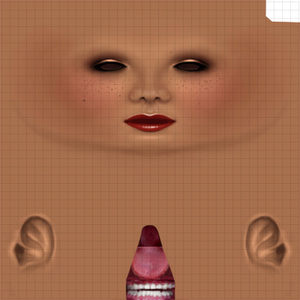
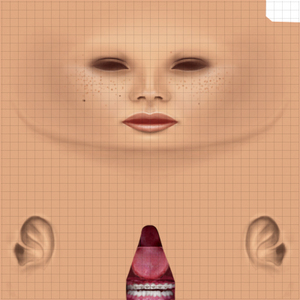
それでは、顔のUPでご覧ください。
本当はもう少しUPでご覧頂きたいのですけど、Anotherさんの原画が小さいので
これ以上UPしてもぼけてしまいます。
Another cf0

Another le
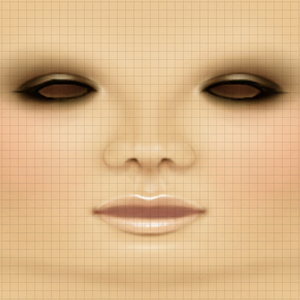
S@R w002 02-03
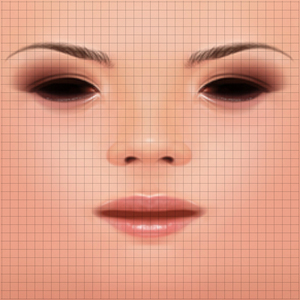
S@R w002 Finish
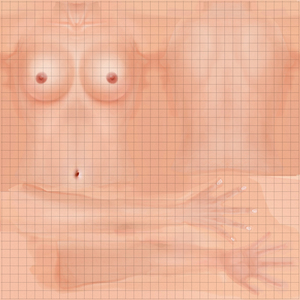
次はBodyです。私はこれまでブログ上で局部を出すことは避けてきましたけど、
今回は特別です。修正なしでご覧ください。
Bodyは2月3日時点ではブログに紹介していないので、製品版のみでご覧頂きます。
Top
Another cf0

Another le

S@R w002
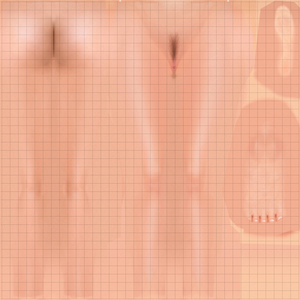
Buttom
Another cf0

Another le

S@R w002
さて、あなたの目にはどのように映ったでしょうか?
繰り返しますけど、私はAnother Skinを一片たりとも使用していませんし、
2月3日時点までは、興味がなかったので、参考どころかちゃんと
見ることもしていませんでした。
私は、他の作家さんたちの作品に無関心ではありません。
逆に誰かが素晴らしいものを世に出すと、私もがんばらなきゃ、、
と発奮したりもします。もちろんDEMOとか頂いてきて、ぼけ~っと
眺めてることもあります。
でも、真似はしません。ああ、この人がこういう表現してるなら、
こっちはこれでいこう!なんて考えたりします。
でも、誰も描こうとしてるのは同じ、、、綺麗な顔や味のある『人の顔』・・・
目は二つで、鼻や口はひとつ・・・・尚且つリンデン様のシェイプは
あまり良い出来ではなくて、制約も少なくない。
(上に書いた制約は解りやすくて可愛いものww、
複雑なので書きませんけど、別にもっと根が深くて悩む問題が多いのです)
そのような条件で、誤解を恐れずに言えば、、
(揚げ足取る人、、ここですよww)
SLに無数にあるスキンの中で、どこか一部の形が別の商品に
似てくるのはありえることです。
事実、この前行ったスキンフェアでは、見たことないスキンの
目白押し・・・・どんどん新作出てくるし、そんなのいちいちチェックできる訳もないです。
でも、私にとって形の起こし方なんて、大した問題じゃないの。
(ここも突っ込みどころ、、しろうさぎは自信家だとでも書いてください。
ここでは正直な気持書かないと意味ないので、、オブラートには包みません)
それよりも、雰囲気とか、、そういったものがとても難しい・・・・
私の持っていないものを持っている作家さんはたくさんいます。
正直そういうものが羨ましく感じるときもあります。
でも、真似はしない・・刺激をもらうだけで十分です。
”それ”を使えば、力のない人でもみんなが注目する素晴らしいスキンが描ける・・・
そんな夢のようなものは世の中にありません。
そんな”それ”の為にいろんな人が辛い思いをしたり、誘惑に負けたりする・・
それはとても悲しいことだと思います。
私にAnotherは必要ありません。
文末ではありますが、Another Skinの作者様には、今回の比較で画像を使用させて頂いたことを
深く感謝いたします。一部、私の個人的な感想を述べましたが、一般的な意味でAnother Skinの
品質を否定するものではありません。
2008/3/9 神田本店Open と w002 Skin 発売日
Snow Rabbit Owner
Shirousagi Noel 文責はShirousagi Noel ひとりにあります。
※親切な人からの忠告で、画像にグリッドを入れさせていただきました。
ダメですねww、その辺が私は抜けています。
Another Skinを使っているのでは?というお問い合わせを頂きました。
しろうさぎはドーピングをしたと、某匿名掲示板でも噂になっている(た?)ようです。
(その後は見ないようにしてるので、わかりません)
買っていただく方に不安を与えたくないので、ここでお答えします。
答えは、Noです!一片たりとも使っていませんし、参考にしたこともありません。
これに関しては理由も含めてhttp://shirousagi.slmame.com/e132071.htmlの
コメント返答でお話させていただいてます。
私には絵描きとしてのプライドがありますし、楽しんでSLを続けています。
他人の描いたものの一部でも利用することは屈辱以外の何ものでもなく、
そんなことをしても楽しくありません。
作ったものが売れることは励みにもなりますし、うれしく思いますけど、
それが一義ではないと思っています。
でも、言葉で言うだけでは伝わりにくいと感じました。
これは描いた本人にしか解らない事で、全ての人が絵の判断ができる訳ではありません。
少しは使っているのでは?、、とか、、この部分は似てるのでは、、とか”きり”がないです。
ですので、スキン屋は自己防衛の為に、絵でご判断いただきます。
特に社会的な主張をする訳ではありませんけど、このような形で
新作を発表するのは、自分にとってとても悲しいことだと感じています。
前作の発表の時は、純粋に楽しかった。でも、今回は複雑な思いが絡みます。
安く上質なスキン提供が始まって、誰でも気軽にスキンを描けるようになったのですけど、
最近起こった様々な出来事を振り返ると、私にとっては、Another Skinのない数ヶ月前の
SLの方が楽しかったと感じてもいます。
どちらかというと、私は『リンゴのない楽園』の方が好きです。
ご意見は様々だと思いますので、ご不快に思われた方がいらっしゃいましたらお詫びいたします。
まず最初に、アナザーさんの規約の直訳を青字で、、(英語苦手です、すごい日本語でごめんなさい)
翻訳が得意なスタッフもいますけど、この記事の文責はShirousagi Noelにあるので、
他のスタッフ2人の力を借りることはやめておきます。
私の皮膚のライセンス合法性に入ることを避けたいのと同じくらい非常に、
私は私が澄んで、より詳細にさらにライセンスことばの権利と規制を説明
する必要があるのを感じます。
私の皮膚は、BSD Licenseの下で認可されます。BSD許可によって与えられる使用権が
パブリックドメイン権利に等しい間、皮膚はパブリックドメインではありません
−私は私の皮膚を捨てませんでした、そして、私はまだ私の著作権の彼らで生活を維持します。
そこで、著作権と与えること間の少しの矛盾も、修正しておよび/または再配布する権利
ではありません。著作権は、ちょうど私に私の皮膚[1]を修正して、再配布するためにそれらの
権利を配る — BSD Licenseを通して — 能力を提供する法的ツールとして用いられます。
しかし、これらの修正と再分配権は無条件で提供されません−私がそのような権利を与えるのを
許している間、私の著作権はまた、私が彼らを制限するのを許します:あなたが若干の基本的な
規則(BSD Licenseによって明記されて)に従うならば、あなたはこれらの権利を得るだけです:
私の最初の著作権と許可通知をあなたの再分配で無傷のままにしてください。この通知は、
あなたには私の皮膚を修正して、再配布する法的権利があるとはっきり述べることによって、
実際にあなたを保護します(あなたが何かを妨害することを盗んだとして訴えられる場合に備えて、...)。
もちろん、あなたが私の許可を得ない限り、私をあなたの再分配のどんな承認でもまたは
昇進から省いてください。これは、実はちょうど私自身の利益に賛成です。私は、注意^^を憎みます;;
それで、あなたがこれらの規則に従うことなくあなたの修正/再分配権利を行使するならば、
何がありますか?何も!私には、あなたに対して何もするために、本当に関心、資源または
悪意がありません。それは言いました、素晴らしくしてください、そして、あなたはあなたが
お返しに得るkarmicな報酬を持っています!^^
(P.S. Iは戻ります!私は、再び徳Internetsを持ちます!/然り)
[1]著作権と再分配が金融補償に関してとても絡み合う間、彼らはこの場合いくぶん二分した
実体になります、そこで、そのような補償は名ばかりです、そして、著作権の範囲はかなりunrestrictiveです。
ブログ上にMap前の原画を載せてはいけないとは書いてないですね。
それでは始めます。
まずAnotherさんの原画です。
眉毛がないのは、Anotherさんのスキンは眉毛をアルファで抜いてSL上で
色を変更できるようにしてあるからです)
cf0

fe

ff0

le

lf0y

re
se

lf0

私が間違っていなければ、Another Skinは以上のはずです。
全て512pixの大きさでした。この中から、lf0yは男性スキンのようですから対象から外すとして、
cf0とleを選ばせていただいて比較させて頂きます。
(あまりに色が違ったり、そばかすがあるとちゃんとした判断が出来ませんので)
次はSnow Rabbit w002 2月3日当時(疑惑浮上の日)の原画と発売バージョンの原画です。
ブログにも描きましたけど、目元が気になっていたので変更しています。上下比較でご覧ください。
少し指摘を頂いたこともあり、色調も微妙に変更してあります。
他にも多少細部いじりましたけど、どこをいじったのか、、自分で上下を比較しても思い出せませんw
私の原画サイズは2048pixで描いています(もちろんUP時に縮小です)。
S@R02-03

S@R Finish

さて、細部を見て行く前にスキン製作の制約について少し、、、
下の画像をご覧ください。

この画像で赤いラインはシェイプの制約ラインです。
例えば目、、このラインから内側は目の入る穴になりますので、これ以上
目を小さく描く訳にもいきませんし、逆に大きく書いた場合も、それが意図的な
ものでない限り、おかしく見えてしまいます。
鼻の穴も同じです。勝手に位置を変更する訳にはいきません。
口も同様、特にうちのスキンのように笑顔を売りにしている場合、
開いて変形した口が、如何に綺麗に見えるかに気を使いながら、
アップロードとスキン描画を繰り返しながら煮詰めていきます。
鼻の横の青ラインは微妙です。
多少の変更は目立ちません。このあとの画像でAnotherさんの鼻に対して
日本人を意識したS@Rの鼻が小さく描かれていることがお解り頂けると
思います。リアルを追求しないスキンの場合、ここをぼかして柔らかく見せている
スキンも多いですね。
それでは、顔のUPでご覧ください。
本当はもう少しUPでご覧頂きたいのですけど、Anotherさんの原画が小さいので
これ以上UPしてもぼけてしまいます。
Another cf0

Another le

S@R w002 02-03

S@R w002 Finish

次はBodyです。私はこれまでブログ上で局部を出すことは避けてきましたけど、
今回は特別です。修正なしでご覧ください。
Bodyは2月3日時点ではブログに紹介していないので、製品版のみでご覧頂きます。
Top
Another cf0

Another le

S@R w002

Buttom
Another cf0

Another le

S@R w002

さて、あなたの目にはどのように映ったでしょうか?
繰り返しますけど、私はAnother Skinを一片たりとも使用していませんし、
2月3日時点までは、興味がなかったので、参考どころかちゃんと
見ることもしていませんでした。
私は、他の作家さんたちの作品に無関心ではありません。
逆に誰かが素晴らしいものを世に出すと、私もがんばらなきゃ、、
と発奮したりもします。もちろんDEMOとか頂いてきて、ぼけ~っと
眺めてることもあります。
でも、真似はしません。ああ、この人がこういう表現してるなら、
こっちはこれでいこう!なんて考えたりします。
でも、誰も描こうとしてるのは同じ、、、綺麗な顔や味のある『人の顔』・・・
目は二つで、鼻や口はひとつ・・・・尚且つリンデン様のシェイプは
あまり良い出来ではなくて、制約も少なくない。
(上に書いた制約は解りやすくて可愛いものww、
複雑なので書きませんけど、別にもっと根が深くて悩む問題が多いのです)
そのような条件で、誤解を恐れずに言えば、、
(揚げ足取る人、、ここですよww)
SLに無数にあるスキンの中で、どこか一部の形が別の商品に
似てくるのはありえることです。
事実、この前行ったスキンフェアでは、見たことないスキンの
目白押し・・・・どんどん新作出てくるし、そんなのいちいちチェックできる訳もないです。
でも、私にとって形の起こし方なんて、大した問題じゃないの。
(ここも突っ込みどころ、、しろうさぎは自信家だとでも書いてください。
ここでは正直な気持書かないと意味ないので、、オブラートには包みません)
それよりも、雰囲気とか、、そういったものがとても難しい・・・・
私の持っていないものを持っている作家さんはたくさんいます。
正直そういうものが羨ましく感じるときもあります。
でも、真似はしない・・刺激をもらうだけで十分です。
”それ”を使えば、力のない人でもみんなが注目する素晴らしいスキンが描ける・・・
そんな夢のようなものは世の中にありません。
そんな”それ”の為にいろんな人が辛い思いをしたり、誘惑に負けたりする・・
それはとても悲しいことだと思います。
私にAnotherは必要ありません。
文末ではありますが、Another Skinの作者様には、今回の比較で画像を使用させて頂いたことを
深く感謝いたします。一部、私の個人的な感想を述べましたが、一般的な意味でAnother Skinの
品質を否定するものではありません。
2008/3/9 神田本店Open と w002 Skin 発売日
Snow Rabbit Owner
Shirousagi Noel 文責はShirousagi Noel ひとりにあります。
※親切な人からの忠告で、画像にグリッドを入れさせていただきました。
ダメですねww、その辺が私は抜けています。
2008年02月19日
2008年01月22日
Intelligent 2in1 HUD

商品のご説明
Product Manual
【HUDが情報を記憶】
Intelligent 2in1 HUDではHUDに記憶機能を搭載させることにより、
リログなどで再装着された際に、フェイスライトの強さや
スマイルの設定を直前の状態に自動調整します。
毎回手動でライトの強さや笑顔の状態を再設定する必要はなくなりました。
【HUD remember your information】
Memorize function consists in the Intelligent 2in1 HUD. If you reattach
your HUD when you re-logon to the SL-Viewer, the HUD will adjust
automatically the strength of the face light and the setting of the smile
as you set up just before.
No need the manual setting for your strength of the face light or the
smile thanks to this new function!
-----------------------------------------------------------------------------------
内容物説明
●Intelligent 2in1 HUD
・S@R Intelligent 2in1 HUD (JY) 日本語版横タイプ(装着位置Top)
・S@R Intelligent 2in1 HUD (JT) 日本語版縦タイプ(装着位置Top Left)
・S@R Intelligent 2in1 HUD (EV) 英語版横タイプ (装着位置Top)
・S@R Intelligent 2in1 HUD (EH) 英語版縦タイプ(装着位置Top Left)
・S@R FL 2in1 on chin (装着位置-あご)
・S@R FL 2in1 on mouth (装着位置-口)
・Manual (取り扱い説明書)
Contents
●Intelligent 2in1 HUD
・S@R Intelligent 2in1 HUD (JY) Japanese horizontal
(Setting Position: Top)
・S@R Intelligent 2in1 HUD (JT) Japanese vertical
(Setting Position: Top Left)
・S@R Intelligent 2in1 HUD (EV) English horizontal
(Setting Position: Top)
・S@R Intelligent 2in1 HUD (EH) English vertical
(Setting Position: Top Left)
・S@R FL 2in1 on chin Face Light(attached to chin)
・S@R FL 2in1 on mouth Face Light(attached to mouth)
・Manual (Product Manual)-----------------------------------------------------------------------------------
装着方法
この製品はHUDユニットFLユニットの2つで構成されています。
必ずS@R Intelligent 2in1 HUD と
S@R FL 2in1 の両方を装着してください。
S@R Intelligent 2in1 HUD は、画面Topに装着するものと、
Top Leftに装着するものがあります。
S@R FL 2in1 の装着位置も、口(on mouth)とあご(on chin)の2種類があります。
どちらか片方だけをお使いください。
【How to attach】
This Products consists of two different units. They are HUD-Unit
and FL-Unit.
Please be sure to attach the both S@R FL 2in1 and
S@R Intelligent 2in1 HUD.
There are the S@R FL 2in1 attached to mouth and attached to chin.
Also there are two type of S@R Intelligent 2in1 HUD.
One is horizontal layout and the other is vertical layout.
Please choose each one of them which is suitable for you.
-----------------------------------------------------------------------------------
【使用方法】
【How to use】

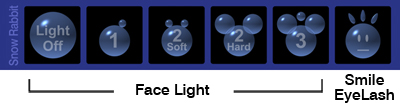
●FaceLight
・HUDボタン左から
ライトOFF→ライト一灯→ライト2灯(弱)→ライト2灯(強)→ライト3灯
選択されているボタンは黄色に変わります。
ライト3灯に関しては、オプションと考えておりますので、選択時にメッセージ
ダイアログが出ます。詳細は以下のURLでご確認ください。
http://snowrabbit.slmame.com/e44524.html
●FaceLight
・HUD button from left:
Light OFF→One Light→Two Lights(Soft)→Two Lights(Strong)→
Three Lights
The button selected will be turned on yellow
The strongest three lightning is intended only as an option, so t
hat you will see the dialog window when you choose the Three
lights. Further information please see my website below:
http://snowrabbit.slmame.com/e44524.html
●Smile
HUDの顔マークのボタンを押してください。
開いたダイアログから『笑顔』を選択すると、更にダイアログが開きます。
8種類の笑顔から、お好きなものを選択してください。
選択されているボタンは黄色に変わります。
【ボタンの説明】
(S)-----頻繁に笑います。
(L)------笑顔の間隔が広くなります。
☆-------十字のパーティクル
☆☆----飛び散るパーティクル
●Smile
Please push the button with the face icon.
The dialog box will appear. If you choose the button “smile”
in the dialog box,
the further dialog box will pop up.
Please choose your preference from 8 kinds of smiles.
The button selected will be turned on yellow
【Explanation of the button】
(S)-----you smile often
(L)------the interval of the smile is longer than smile (S)
☆-------cross particle
☆☆----Sparkling particle
稀にテレポートなどでボタンの一部が消えてしまうことがあります。
(HUDベースが完全に消えることはありませんが、選択されているはずの
ボタンが黄色く表示されないことがあります)
これはSLのプログラムの不具合ですので、完全な解決方法はありません。
このような場合の緊急回避方法として、見えているHUDのパーツを
右クリック選択すると消えていたHUDが現れます。
On the occasion of the teleport a part of the HUD button
may seldom disappear. (The foundation of the HUD will not
completely disappear, but the selected button could not be shown in
yellow.) This caused by the bug of the SL program, so that we cannot
avoid this problem completely.
If you would like to avoid this problem, Please right-mouse-click a part
of HUD, that you can still see. Then the part of HUD will turn out again
●HUD位置の変更に関しまして
諸事情により、ユーザーがHUDの装着位置を変更なされる場合があると思います。
イベンタリーからHUDを右クリックしてHUDに添付で装着位置を変更すると、
HUDプリムが裏返ってしまい、画面上に現れなくなる可能性があります。
そのような際は、お使いのOSがWindowsの方はCtrl+Alt+tを押して下さい。
Mac OSをお使いの方は Ctrl+Option+t を押してください。
透明Primが可視化できます。可視化されたプリムを選択し、
Z方向に180度回転させれば、HUDの表面が現れます。
位置調整をした後にもう一度同じキーを押して不可視プリムの表示を消してください。
●changing the position of HUD
According to the various reasons some user change the position
of HUD. If you change the position from inventory by the
right-mouse-clicking, the HUD may not appear on your SL-Viewer,
because the HUD turned inside out according to theposition change.
Under such circumstances Please press Ctrl+Alt+t, if you are a
windows-user. If you use Mac OS, please press Ctrl+Option+t.
Then transparent prim will be visible. Please choose the visible prim,
and turn 180° to Z-direction. Now the surface of the HUD will turn out.
After adjusting the HUD-Position, Please press the same keys that
you pressed before,
so that you can turn off the shown invisible prims.
-----------------------------------------------------------------------------------
【免責事項】
フェイスライトに関しては、現時点でもスクリプト禁止区域ではライトの選択機能は
使えません。(たとえば2-Softのライト設定で、スクリプト禁止区域に入った場合は、
2-Softの設定のままの点灯になります。このような区域でリログした場合も
同じ結果になります)
SIMに負荷がかかった条件ではパーティクルの動作が正常にされない場合があります。
SL世界の諸条件の中で正確を期すのは難しいということを、ご理解頂けますよう
お願いします。
また、2008/2/10現在、ごく稀ではありますけど、テレポート直後に
以下のようなメッセージが出ることがありますが、特に不具合はないのでご安心ください。
【Exemption clause】
Referring to the face light you cannot change the setting of the
face light, if you are in the script forbidden area.
(e.g. If you enter to the script forbidden area with the two face
light setting, your setting stays the setting 2 Lights (Soft).
it is also the same, if you re-login such area.)
Moreover the particle might not work correctly by the bad
conditions e.g. overload of the SIM. In this regards please
kindly understand that it is difficult to be perfect under divers
conditions of SL (In-World).
Furthermore you may see the message below after the teleport
(status: 10. Feb. 08), but we found no problem concerning the
message. So please have no anxiety in this regards.
Thank you.
2008年01月19日
S@R Intelligent Beauty HUD
現在発売しているのは、FreeのIntelligent 2in1 HUDのみです。
他の製品はもう暫くお待ちください。

商品のご説明
Product Manual
●新搭載のインテリジェント機能とは?
●What is Intelligent function?
Snow RabbitのHUDが新たにインテリジェント機能を搭載して使いやすくなりました。
S@R Intelligent Beauty HUDシリーズは、HUDユニットとFLユニットの2つの
ユニットから構成されており、HUDユニットが様々な情報を記憶し、FLユニットを制御します。
FLユニットとは、フェイスライト、プリムまつ毛、スマイルスクリプト・
タイピングスクリプトなどが含まれたユニットです。
Brand new HUD from Snow Rabbit is now much easier to use thanks to its Intelligent Function.
S@R Intelligent Beauty HUD Series consists of HUD-Unit and FL-Units.
HUD-Units memorize various informations, and control the FL-Unit.
※FL-Unit means a unit consists of the face light, smile script, and/or Prim Eyelashes, Typing Animation script.
【HUDが位置情報等を記憶】
S@R Intelligent Beauty HUDシリーズはHUDに記憶機能を搭載させることにより、
リログなどで再装着された際に、フェイスライトの強さ、まつ毛の位置や、
スマイル・タイピングの設定を直前の状態に自動調整します。
毎回手動でライトの強さや笑顔の状態などを再設定する必要はなくなりました。
【HUD remember your information and positioning】
Because of the Memorize function of S@R Intelligent Beauty HUD Series, the HUD will adjust automatically the strength of the face light, the setting of the smile and/or Typing animation, the positions of your eyelashes as you set up just before, if you reattach your HUD when you re-logon to the SL-Viewer,
No need the manual setting for your strength of the face light or smile thanks to this new function!
S@R Intelligent Beauty HUDシリーズには4種類の仕様があり、
それぞれ別製品として販売させていただいております。
個々の商品のご使用方法・設定方法などの詳細は、以下のリンクからご覧下さい。
There are 4 kinds of method in S@R Intelligent Beauty HUD Series.
You can get them according to your needs.
Please find further details of each products in the following link:
*Intelligent 2in1 HUD
(Face light + Smile)
*Intelligent 3in1 HUD Eyelash Version
(Face light + Smile + Moving Eyelash)
*Intelligent 3in1 HUD Typing Version
(Face light + Smile + Natural Typing AO)
*Intelligent 4in1 HUD
(Face light + Smile + Moving eyelash + Natural Typing AO)
-----------------------------------------------------------------------------------
フェイスライトの使用には十分な知識が必要です
誤った知識で装着すると、周囲の人に迷惑をかけてしまうことになります。
以下のページに詳細が記してありますので、是非一度ご覧ください。
http://snowrabbit.slmame.com/e44524.html
By using the face light, you need enough knowledge about it!
Do you know really about face light? If you use the face light without correct information, you may bother your friends or neighbor.
Please read carefully the details about face light in the Link Page below:
http://snowrabbit.slmame.com/e44524.html
Thank you for your attention.
2008年01月17日
Intelligent 3in1HUD Typing

商品のご説明
Product Manual
【HUDが情報を記憶】
Intelligent 3in1 HUDではHUDに記憶機能を搭載させることにより、
リログなどで再装着された際に、フェイスライトの強さや
スマイル・タイピングの設定を直前の状態に自動調整します。
毎回手動でライトの強さや笑顔の状態を再設定する必要はなくなりました。
【HUD remember your information and positioning】
Intelligent 3in1 HUD has great memorize function. If you
reattach your HUD when you re-logon to the SL-Viewer,
the HUD will adjust automatically the strength of the face light,
the setting of the smile and typing as you set up just before.
No need the manual setting for your strength of the face light
or the smile any more thanks to this new function!
-----------------------------------------------------------------------------------
内容物説明
●Intelligent 3in1 HUD Typing Version
・S@R Intelligent 3in1 HUD T(JY) 日本語版横タイプ(装着位置Top)
・S@R Intelligent 3in1 HUD T(JT) 日本語版縦タイプ(装着位置Top Left)
・S@R Intelligent 3in1 HUD T(EV) 英語版横タイプ (装着位置Top)
・S@R Intelligent 3in1 HUD T(EH) 英語版縦タイプ(装着位置Top Left)
・S@R FL (Typing) on chin (装着位置-あご)
・S@R FL (Typing) on mouth (装着位置-口)
・Manual (取り扱い説明書)
Contents
●Intelligent 3in1 HUD
・S@R Intelligent 3in1 HUD (JY) Japanese horizontal
(Setting Position: Top)
・S@R Intelligent 3in1 HUD (JT) Japanese vertical
(Setting Position: Top Left)
・S@R Intelligent 3in1 HUD (EV) English horizontal
(Setting Position: Top)
・S@R Intelligent 3in1 HUD (EH) English vertical
(Setting Position: Top Left)
・S@R FL (Typing) on chin (attached to chin)
・S@R FL (Typing) on mouth (attached to mouth)
・Manual (Product Manual)
-----------------------------------------------------------------------------------
装着方法
この製品はHUDユニットとFLユニットの2つで構成されています。
必ずS@R Intelligent 3in1 HUD T と
S@R FL (Typing) の両方を装着してください。
S@R Intelligent 3in1 HUD Tは、画面Topに装着するものと、
Top Leftに装着するものがあります。
S@R FL (Typing) の装着位置も、口(on mouth)とあご(on chin)の2種類があります。
どちらか片方だけをお使いください。
【How to attach】
This Products consists of two different units. They are HUD-Unit and
FL-Unit. Please be sure to attach both S@R Intelligent 3in1 HUD T
and S@R FL (Typing).
There are two type of S@R Intelligent 3in1 HUD.
One is horizontal layout on top and the other is vertical layout on left.
Also there are the S@R FL 3in1 attached to mouth and attached to chin.
-----------------------------------------------------------------------------------
【使用方法】

●FaceLight
・HUDボタン左から
ライトOFF→ライト一灯→ライト2灯(弱)→ライト2灯(強)→ライト3灯
選択されているボタンは黄色に変わります。
ライト3灯に関しては、オプションと考えておりますので、選択時にメッセージ
ダイアログが出ます。詳細は以下のURLでご確認ください。
http://snowrabbit.slmame.com/e44524.html
【How to use】
●FaceLight
・HUD button from left:
Light OFF→1 Light→2 Lights(Soft)→2 Lights(Strong)→3 Lights
The button selected will be turned on yellow.
The strongest three lightning is intended only as an option, so that
you will see the dialog window for your confirmation when you
choose the Three lights. Further information please see my
website below:
http://snowrabbit.slmame.com/e44524.html
●Smile
HUDの顔マークのボタンを押してください。
開いたダイアログから『笑顔』を選択すると、更にダイアログが開きます。
8種類の笑顔から、お好きなものを選択してください。
選択されているボタンは黄色に変わります。
【ボタンの説明】
(S)-----頻繁に笑います。
(L)------笑顔の間隔が広くなります。
☆-------十字のパーティクル
☆☆----飛び散るパーティクル
●Smile
Please push the button with the face icon.
The dialog box will appear. If you choose the button “smile” in the
dialog box,
the further dialog box will pop up.
Please choose your preference from 8 kinds of smiles.
The button selected will be turned on yellow
【Explanation of the button】
(S)-----you smile often
(L)------the interval of the smile is longer than smile (S)
☆-------cross particle
☆☆----Sparkling particle
●Typing
HUDのTypingボタンをクリックし、現れたダイアログの優先順位3、優先順位4、
OFFの中からご希望のボタンをお選びください。
以下の理由から通常は優先順位3に設定しておいて、時に4番やOFFを
使い分けるようなご使用方法をお勧めします。
●Typing
Please click on the Typing button, and choose the typing priority
3, 4, or OFF in the dialog box shown.
I recommend you that you set normally priority 3, and choose 4 or
OFF occasionally for the following reasons.
アニメーションの優先順位に関して
SLの全てのアニメーションは、その製作者によって1~4番の動作の
優先順位が設定されています。1番は最も優先順位が低く、逆に4番は全てに
最優先されます。また、優先順位が同じ場合には、後から再生命令を受けた
方が優先するという決まりがあります。
デフォルトの歩きやタイピングなどのビルドインアニメーションの優先度は2番です。
市販のAOなどはデフォルトのビルドインアニメーションより優先しないと
意味がないので、2番より上(3番か4番が多い)に設定されています。
Regarding the priority of the animation
All animations in SL are set the priority of the action from 1 to 4 by
each maker. No. 1 is the lowest priority, and in the opposite No. 4
is the highest priority. If the priority levels are the same between
two actions, the action ordered later
take a priority over the previous action.
Built-in animation like default walking or typing are priority level 2.
AOs (Animation overdrive) that you can buy in SL are set on the
priority level higher than 2 (almost all 3 or 4), since there is no
mean, if the AO does not take the priority higher than the default
animation.
S@R 3in1HUD Typing はこれら無数に存在するアニメーションの全てと
相性が良いわけではありません。立ちポーズは下半身のアニメも設定して
いるので問題ありませんが、座りポーズの場合は個々の座りアニメーションの
腰の角度によって、時として上半身の角度が奇妙なタイピング姿勢になること
があります。
そのような場合に、座りポーズのポーズボールやAOと
うまく共存するために、当製品の方で優先順位を変更する必要があります。
S@R 3in1HUD Typing cannot suit all countless animations
that you can find all over the In-World. There is no problem if you
type with standing pose.Because I set some random animations
for the lower part of the body for the standing pose.
But it may be infrequently shown strange angle of the upper part
of the body by the typing according to each angle of the waist by
the sitting animation.
In such a case you need to change the priority of the typing with
HUD in order to coexist with the other poses.
●HUD位置の変更に関しまして
諸事情により、ユーザーがHUDの装着位置を変更なされる場合があると思います。
イベンタリーからHUDを右クリックしてHUDに添付で装着位置を変更すると、
HUDプリムが裏返ってしまい、画面上に現れなくなる可能性があります。
そのような際は、お使いのOSがWindowsの方はCtrl+Alt+tを押して下さい。
Mac OSをお使いの方は Ctrl+Option+t を押してください。
透明Primが可視化できます。可視化されたプリムを選択し、
Z方向に180度回転させれば、HUDの表面が現れます。
位置調整をした後にもう一度同じキーを押して不可視プリムの表示を消してください。
●changing the position of HUD
According to the various reasons some user change the position of HUD.
If you change the position from inventory by the right-mouse-clicking,
the HUD may not appear on your SL-Viewer, because the HUD
turned inside out according to the position change.
Under such circumstances Please press Ctrl+Alt+t, if you are a
windows-user. If you use Mac OS, please press Ctrl+Option+t.
Then transparent prim will be visible. Please choose the visible
prim, and turn 180° to Z-direction. Now the surface of the HUD
will turn out.
After adjusting the HUD-Position, Please press the same keys
that you pressed before,
so that you can turn off the shown invisible prims.
稀にテレポートなどでボタンの一部が消えてしまうことがあります。
(HUDベースが完全に消えることはありませんが、選択されているはずの
ボタンが黄色く表示されないことがあります)
これはSLのプログラムの不具合ですので、完全な解決方法はありません。
このような場合の緊急回避方法として、見えているHUDのパーツを
右クリック選択すると消えていたHUDが現れます。
On the occasion of the teleport, a part of the HUD button may
seldom disappear.
(The foundation of the HUD will not completely disappear, but the
selected button could not be shown in yellow.)
This caused by the bug of the SL program, so that we cannot avoid
this problem completely.
If you would like to avoid this, Please right-mouse-click on a part of HUD,
that you can still see. Then the part of HUD, which is not shown will
turn out again.
-----------------------------------------------------------------------------------
【免責事項】
フェイスライトに関しては、現時点でもスクリプト禁止区域ではライトの選択機能は
使えません。(たとえば2-Softのライト設定で、スクリプト禁止区域に入った場合は、
2-Softの設定のままの点灯になります。このような区域でリログした場合も
同じ結果になります)
SIMに負荷がかかった条件ではパーティクルの動作が正常にされない場合があります。
SL世界の諸条件の中で正確を期すのは難しいということを、ご理解頂けますよう
お願いします。
また、2008/2/10現在、ごく稀ではありますけど、テレポート直後に
以下のようなメッセージが出ることがありますが、特に不具合はないのでご安心ください。
【Exemption clause】
Referring to the face light you cannot change the setting of the face
light, if you are in the script forbidden area. (e.g. If you enter to
the script forbidden area with the two face light setting,
your setting stays the setting 2 Lights (Soft). it is also the
same, if you re-login such area.)
Moreover the particle might not work correctly by the bad
conditions e.g. overload of the SIM. In this regards please
kindly understand that it is difficult to be perfect
under divers conditions of SL (In-World).
Furthermore you may see the message below after the
teleport (status: 10. Feb. 08), but we found no problem
concerning the message. So please have no anxiety in this
regards.
Thank you for your attention.
2007年12月16日
Intelligent 4in1 HUD

商品のご説明
Product Manual
【HUDが位置情報等を記憶】
Intelligent 4in1 HUDではHUDに記憶機能を搭載させることにより、
リログなどで再装着された際に、フェイスライトの強さ、まつ毛の位置や、
スマイル・タイピングの設定を直前の状態に自動調整します。
毎回手動でライトの強さや笑顔の状態を再設定する必要はなくなりました。
また、別売りのオプショナルまつ毛を購入された場合でも、
既に位置調整を終えたHUDを使用することで、
再度まつ毛の位置合わせをすることなくお使い頂けます。
【HUD remember your information and positioning】
Intelligent 4in1 HUD has great memorize function. If you reattach your HUD when you re-logon to the SL-Viewer, the HUD will adjust automatically the strength of the face light, the positions of your eyelashes and the setting of the smile as you set up just before.
No need the manual setting for your strength of the face light or the smile any more thanks to this new function!
Moreover if you want to change your eyelashes to the optional eyelashes that separately sold by me, you can use them without manual setting again by using the HUD already consists of your setting.
【複数アバターでのHUDの使い分け】
まつ毛の位置情報はHUDユニットに記憶されます。
シェイプ形状の違う複数のアバターをお使いの方は、
HUDユニットをコピーし、アバターごとの専用HUDとして使用することで、
固有のまつ毛の位置情報を持たせることが出来ます。
【How to use your HUD with several Avatar-shapes】
Information of eyelash-setting will be memorized to the HUD-unit.
If you use the different shapes for your avatar, please copy the HUD-unit,
and set your HUD for each shapes of your avatar. So that the each
setting of your eyelashes positions will memorized individually to each HUD.
【まつ毛位置合わせ支援ツールの強化】
以前の3in1HUDでは、まつ毛の位置調整が難しいという意見を多く頂きました。
まつ毛枚数の簡略化(6枚→4枚)、付属のまつ毛位置合わせ用ポーズスタンドの
機能強化により、以前より格段に位置合わせが楽になっております。
【Improvement of the support tool for the eyelash-positioning】
Many feedbacks are given regarding the difficulties of the
eyelash-positioning for the last version.
Now it is much easier to adjust your eyelashes thanks to the
simplification of the numbers of eyelashes (from 6 to 4), and
the function improvement of the pose stand for the eyelash-positioning
enclosed to Intelligent 3in1 HUD Eyelash.
-----------------------------------------------------------------------------------
内容物説明
●Intelligent 4in1 HUD
・S@R Intelligent 4in1 HUD (JY) 日本語版横タイプ(装着位置Top)
・S@R Intelligent 4in1 HUD (JT) 日本語版縦タイプ(装着位置Top Left)
・S@R Intelligent 4in1 HUD (EV) 英語版横タイプ (装着位置Top)
・S@R Intelligent 4in1 HUD (EH) 英語版縦タイプ(装着位置Top Left)
・S@R FL 4in1 on chin (装着位置-あご)
・S@R FL 4in1 on mouth (装着位置-口)
・S@R eyelash grid skin
・S@R Eyelash Pose Stand (まつ毛位置合わせ専用ポーズスタンド)
・Manual (取り扱い説明書)
Contents
●Intelligent 4in1 HUD
・S@R Intelligent 4in1 HUD (JY) Japanese horizontal
(Setting Position: Top)
・S@R Intelligent 4in1 HUD (JT) Japanese vertical
(Setting Position: Top Left)
・S@R Intelligent 4in1 HUD (EV) English horizontal
(Setting Position: Top)
・S@R Intelligent 4in1 HUD (EH) English vertical
(Setting Position: Top Left)
・S@R FL 4in1 on chin (attached to chin)
・S@R FL 4in1 on mouth (attached to mouth)
・S@R Eyelash Pose Stand
(Pose Stand specialized for eyelash-positioning)
・Manual (Product Manual)
-----------------------------------------------------------------------------------
【装着方法】
この製品はHUDユニットとFLユニットの2つで構成されています。
必ずS@R Intelligent 4in1 HUD と
S@R FL 4in1 の両方を装着してください。
S@R Intelligent 4in1 HUD は、画面Topに装着するものと、
Top Leftに装着するものがあります。
S@R FL 4in1 の装着位置も、口(on mouth)とあご(on chin)の2種類があります。
どちらか片方だけをお使いください。
【How to attach】
This Products consists of two different units. They are HUD-Unit and
FL-Unit.
Please be sure to attach both S@R Intelligent 4in1 HUD and S@R FL.
There are two type of S@R Intelligent 4in1 HUD.
One is horizontal layout on top and the other is vertical layout on left.
Also there are the S@R FL 4in1 attached to mouth and attached to chin.
Please choose each one of them which is suitable for you.
-----------------------------------------------------------------------------------
まつ毛位置設定方法
How to set up your eyelashes
お客様のシェイプに合わせて、付けまつ毛の位置を調整して頂く必要があります。
You should adjust the positions of your eyelashes to fit your shape.
Step.1
装着するS@R Intelligent 4in1 HUD (2言語、2位置から選択)、
S@R FL 4in1 の位置(mouth かchin から選択)が決まりましたら、
それぞれを複製し、間違いのないように個々の名前を変更し、
(製品名の最後にアバター名を入れるなど)アバターに装着してください。
装着後HUDとまつ毛が情報のやり取りを終えるまで、
15秒待ってからStep2へ進んでください。
Once you decide your S@R Intelligent 4in1 HUD
(from 2 languages, 2 positions) and the position of S@R FL 4in1
(mouth or chin), please copy them, and change the name of the copies
(e.g. enter your avatar name at the end).
Then please attach these copies to your avatar.
After wearing the HUD and eyelashes please wait 15 seconds then go
to Step 2. So that the HUD and eyelashes can finish to exchange the
information properly.
この後の工程でまつ毛の編集作業に入りますが、
オリジナルを編集することは危険ですのでおやめ下さい。
After this step you may modify your eyelashes. Though please do not
modify the original because of the risk to lose the initial setting.
Step.2
まつげの位置調整をするには、あなたのアバターの顔を固定する必要があります。
スマイルのアニメーションをOffにして、同封のS@R EyeLash Standにお立ちください。
キーボードのEscキーを押すとアバターの顔がUPになります。上下の微調整は
Shift+←で下方向へ、Shift+→で上方向へ調整できます。
上記操作で顔の位置を調整した後は、矢印キー↑ ↓ ← → で視点変更が可能です。
また、Page UPキーとPage Downキーでカメラの寄り引きが出来ます。
万が一カメラが動かない場合は、Altキー(MacではOptionキー)を押しながら、
少しだけマウスを動かしてみてから、もう一度試してみてください。
(少しショックを与えると必ず動きますよw)
矢印キーで操作できない角度から見たい場合には、通常のSLの操作と同じで、
Altキー(MacではOptionキー)を押しながら焦点を決めて、
左クリックでマウスを移動させてください。
再度視点を戻したい場合にはEscキーを押してください。
To adjust the position of eyelashes, you have to fix your avatar.
Please set your smile animation off, and stand up on the enclosed S@R
Eyelash Stand. If you press Esc key on your keyboard, your will see
your face as close-up view.
To adjust your view, please press the key Shift+← to down, Shift+→
to up. After you adjust the position of your face as mentioned,
you can change your point of view with the index keys ↑ ↓ ← → .
Moreover you can zoom in and out of your camera view with Page UP
and Down key. In case you cannot move your camera, please move
your mouse little bit with pressing the Alt key(Option key with MAC),
and try again.(Please give a little shock, then it functions for sure lol)
If you would like to view from the angle where is unable to control
the cursor with the index keys, please take the focus on the point
with Alt-key (Option key with Mac)
and move the mouse with left mouse-clicking.
If you would like to return your focus, please press the Esc key.
Step.3
お使いのOSがWindowsの方はCtrl+Alt+tを押して下さい。
Mac OSをお使いの方は Ctrl+Option+t を押してください。
透明Primが可視化できます。表示を消したい場合にはもう一度同じキーを押してください。
If you are a Windows user please press “Ctrl+Alt+t” and
if you are a Mac user please press
“Option+Alt+t” Now you can see transparent prim.
When you would not see them please press the same keys again.
Step.4
可視化された付けまつ毛のプリムを右クリックで選択して編集を選び、
開いたウィンドウから“リンク部位を編集”にチェックを入れます。
これですべてのまつ毛を個別に動かすことができます。
ご自分のシェイプに合わせてまつ毛の位置を調整してください。
アバターの顔の形状によっては上下左右奥行きの位置移動だけでなく、
回転も必要かもしれません。
詳細なフィッテイングをご希望の場合、目の形状に合わせてまつ毛のカーブ
を変更する必要があります。そのような場合には、編集ウィンドウの
まつ毛サイズのX,Y、Z の値を少しだけ調整してみてください。
ご使用になられているスキンでは位置合わせがやりにくい場合は、
同封されているS@R eyelash grid skinを装着してください。
グリッドが入った単色スキンですので、位置合わせが容易に出来ます。
Please right mouse click on the visible eyelashes and choose edit,
then check the box “Edit linked parts” in the popup menu. Now you can
move each eyelash separately.
Please adjust the eyelashes for your own shape.
According to your avatar’s face shape, you may need to rotate your
eyelashes other than the positioning of the direction e.g. up, down,
left, or the depth.
If you wish the detailed fitting, you should adjust the curve of the
eyelashes to match the shape of your eyes. In such a case please
adjust the x, y, z parameter of eyelash-size in the edit window.
If it is difficult for you to adjust the positions of your eyelashes
with your skin, please wear “S@R eyelash grid skin”, which
enclosed in our product. This is a grid included mono-color skin.
So you can adjust the positions easily.
【まつげのベースプリム形状を変更される方へ】
編集ウィンドウの値は一部の数値を除いて
基本的に編集可能ですので調整して頂いて結構です。
ただしHUDが記憶できるのはxyzのスケール情報・回転情報
(編集ウィンドウ左側の値)・マウスで移動させた位置情報だけ
になります。それ以外の値(編集ウィンドウ右側の値)を編集した
場合には、他のまつ毛へ情報を引き継ぐことは出来ませんので、
まつ毛ごとに個々の調整が必要です。
【for someone who change the eyelash’s base prims】
You can adjust the parameter in the object tab of the edit window
basically. However the informations that can be memorized in the
HUD are only: On the left side in the object tab (x,y,z parameter)
- Size parameter
- Rotation parameter
- Position parameter
If you adjust other than the above mentioned parameter
(on the right side of the object tab in the edit window), it is
unable to take over these informations to the another eyelashes.
So that you need to adjust each eyelash individually in that case.
Step.5
Step.4で、移動したまつ毛の位置、回転、サイズの情報はHUDの情報として
瞬時に自動記憶されますが、万が一操作ミスなどでまつ毛がずれた場合の
予防策として、位置が完全に確定した後に、HUDの顔マークをクリックし、
開いたダイアログから、『まつげ』を選択し、更に開いた画面で『位置の記憶』
ボタンを押してください。万が一まつ毛がずれた場合でも『位置の復元』ボタン
であなたの設定した位置に戻すことが出来ます。
万が一誤った位置を設定してしまった場合でも、『初期化』ボタンで、出荷位置に
戻すことが出来ます。
以上でまつ毛の位置合わせは終了です。
『位置の記憶』ボタンを押すとHUDとまつ毛は情報のやり取りをします。
その間3秒間は笑顔を動作させないでください。
FLユニットは、透明パーツで構成されています。FLユニットを、身体に
装着せずに地面に置くことは、ユニットの紛失や破損の危険性に
つながりますのでおやめください。
注)現在SIMの環境によって、『位置の復元』ボタン、『初期化』ボタンを押しても
まつ毛が元の位置に戻らない症状が発生しています。このような場合でも、
各ボタンを押した後に、まつ毛を右クリック選択するとまつ毛は正常な位置へ
移動します。
(ショック療法のようですけど、時にはSL世界にはこのようなやり方も有効です)
As mentioned in Step 4 the information of position, rotation, and
size of eyelashes that you adjusted will automatically memorized in
HUD in an instant. Though in case of any operational errors, I
recommend followings after the positioning completed:
-Please click the Face icon in HUD.
-Please choose “Eyelash” button in the dialog box
-Please choose “save pos” in the next dialog box
If you move your eyelashes to the wrong position by mistake,
you can put back the position that you saved by clicking the
button “restore pos” in the dialog box.
If you save the wrong position by mistake, you can put back
the initial position by clicking the button “initial”
So now finished the adjustment of the eyelashes.
If you push “save pos” button, the HUD and eyelashes exchange
the information. Please do not use smile function 3 seconds due
to this information exchange.
FL unit consists of transparent parts. Please do not rez the FL
unit on the ground to avoid to lose or damage the unit. That means
you should ALWAYS wear the unit to adjust or modify your eyelashes
Note)
according to the condition of the SIM, it may happen, that the button
“restore pos” or “initail”. In a such case please try to right mouse click
on the eyelashes after clicking the appropriate button, then the
eyelashes shall move to the right position.
(It’s kind a shock therapy, but sometimes it works really like this
in SL.)
【注意事項】
まつ毛を装着せずに、地面などにRezして位置調整はしないでください。
Rezした状態で位置調整をしてしまうと、誤った座標がHUDに記憶されてしまいます。
(装着した状態ではアバターに対してのまつ毛の座標がHUDに記憶されるのですが、
Rezした状態ではSIMに対してのまつ毛の座標がHUDに記憶されることになります)
このような状態になったまつ毛を装着すると、アバターの体が見えなくなったり
するトラブルを引き起こします。もし、Step.5でご説明した『初期化』ボタンで
出荷状態に戻すことが出来ます。ただし、地面にRezした状態で『初期化』ボタンを
押すことは、絶対にしないでください。
【Caution】
Please do not adjust your eyelashes without attaching to your face
(e.g. Rez on the ground)
If you do so, the HUD memorize completely wrong coordinates.
(When you adjust the attached eyelashes, the coordinates will be set
on your avatar, but when you adjust the rezzed eyelashes on the ground,
the coordinates will be set on SIM)
If you attach such a eyelashes, you may get into trouble e.g. you can
not see your body...
In case of an emergency, you can put back the position with clicking
the button “initial”.
-----------------------------------------------------------------------------------
補足
テレポートやログインの直後に、HUDユニットはまつ毛の位置調整を行います。
しかし、テレポートやログイン直後には様々な情報(衣服や髪の毛などなど)を読み込む
必要があり、それらが読み込まれている間は、一時的に(10数秒程度)まつげ位置が
ずれたり、ボタン操作が正常に行われないことがあります。
衣服などの読み込みが完了した後にHUDユニットの機能がONになる為です。
どうかご理解ください。
Appendix
HUD will adjust your position automatically just after the login
or teleport.
Though it may happen that your eyelashes slip to the wrong position
instantly (just about 10 min.) or button doesn’t work correctly.
Because the divers information (e.g. clothes or hair etc.) have to
be loaded just after the teleport or login.
Please kindly understand that the function of the HUD-unit will
be ready once your appearance is completely loaded.
-----------------------------------------------------------------------------------
【使用方法】

●FaceLight
・HUDボタン左から
ライトOFF→ライト一灯→ライト2灯(弱)→ライト2灯(強)→ライト3灯
選択されているボタンは黄色に変わります。
ライト3灯に関しては、オプションと考えておりますので、選択時にメッセージ
ダイアログが出ます。詳細は以下のURLでご確認ください。
http://snowrabbit.slmame.com/e44524.html
【How to use】
●FaceLight
・HUD button from left:
Light OFF→1 Light→2 Lights(Soft)→2 Lights(Strong)→3 Lights
The button selected will be turned on yellow.
The strongest three lightning is intended only as an option, so that
you will see the dialog window for your confirmation when you
choose the Three lights. Further information please see my
website below:
http://snowrabbit.slmame.com/e44524.html
●Smile
HUDの顔マークのボタンを押してください。
開いたダイアログから『笑顔』を選択すると、更にダイアログが開きます。
8種類の笑顔から、お好きなものを選択してください。
選択されているボタンは黄色に変わります。
【ボタンの説明】
(S)-----頻繁に笑います。
(L)------笑顔の間隔が広くなります。
☆-------十字のパーティクル
☆☆----飛び散るパーティクル
●Smile
Please push the button with the face icon.
The dialog box will appear. If you choose the button “smile” in the
dialog box,
the further dialog box will pop up.
Please choose your preference from 8 kinds of smiles.
The button selected will be turned on yellow
【Explanation of the button】
(S)-----you smile often
(L)------the interval of the smile is longer than smile (S)
☆-------cross particle
☆☆----Sparkling particle
●Eyelash
HUDの顔マークをクリックして現れるダイアログから『笑顔』を選んでください。
更に開いたダイアログから、笑顔の種類を選択すると、まつ毛の移動機能がONに
なります。笑顔がONの時に、まつ毛は自動的に笑顔に合わせて上下します。
Please choose “Smile” in the dialog box after the clicking a face icon
in HUD.
If you choose “smile”, the function of the eyelash movement will
be on. That’s means, that the smile is on, the eyelashes will
move automatically according to your smile.
●Typing
HUDのTypingボタンをクリックし、現れたダイアログの優先順位3、優先順位4、
OFFの中からご希望のボタンをお選びください。
以下の理由から通常は優先順位3に設定しておいて、時に4番やOFFを
使い分けるようなご使用方法をお勧めします。
●Typing
Please click on the Typing button, and choose the typing priority
3, 4, or OFF in the dialog box shown.
I recommend you that you set normally priority 3, and choose 4 or
OFF occasionally for the following reasons.
アニメーションの優先順位に関して
SLの全てのアニメーションは、その製作者によって1~4番の動作の
優先順位が設定されています。1番は最も優先順位が低く、逆に4番は全てに
最優先されます。また、優先順位が同じ場合には、後から再生命令を受けた
方が優先するという決まりがあります。
デフォルトの歩きやタイピングなどのビルドインアニメーションの優先度は2番です。
市販のAOなどはデフォルトのビルドインアニメーションより優先しないと
意味がないので、2番より上(3番か4番が多い)に設定されています。
Regarding the priority of the animation
All animations in SL are set the priority of the action from 1 to 4 by
each maker. No. 1 is the lowest priority, and in the opposite No. 4
is the highest priority. If the priority levels are the same between
two actions, the action ordered later
take a priority over the previous action.
Built-in animation like default walking or typing are priority level 2.
AOs (Animation overdrive) that you can buy in SL are set on the
priority level higher than 2 (almost all 3 or 4), since there is no
mean, if the AO does not take the priority higher than the default
animation.
S@R Intelligent 4in1 HUDはこれら無数に存在するアニメーションの全てと
相性が良いわけではありません。立ちポーズは下半身のアニメも設定して
いるので問題ありませんが、座りポーズの場合は個々の座りアニメーションの
腰の角度によって、時として上半身の角度が奇妙なタイピング姿勢になること
があります。
そのような場合に、座りポーズのポーズボールやAOと
うまく共存するために、当製品の方で優先順位を変更する必要があります。
S@R Intelligent 4in1 HUD cannot suit all countless animations
that you can find all over the In-World. There is no problem if you
type with standing pose.Because I set some random animations
for the lower part of the body for the standing pose.
But it may be infrequently shown strange angle of the upper part
of the body by the typing according to each angle of the waist by
the sitting animation.
In such a case you need to change the priority of the typing with
HUD in order to coexist with the other poses.
●HUD位置の変更に関しまして
諸事情により、ユーザーがHUDの装着位置を変更なされる場合があると思います。
イベンタリーからHUDを右クリックしてHUDに添付で装着位置を変更すると、
HUDプリムが裏返ってしまい、画面上に現れなくなる可能性があります。
そのような際は、お使いのOSがWindowsの方はCtrl+Alt+tを押して下さい。
Mac OSをお使いの方は Ctrl+Option+t を押してください。
透明Primが可視化できます。可視化されたプリムを選択し、
Z方向に180度回転させれば、HUDの表面が現れます。
位置調整をした後にもう一度同じキーを押して不可視プリムの表示を消してください。
●changing the position of HUD
According to the various reasons some user change the position of HUD.
If you change the position from inventory by the right-mouse-clicking,
the HUD may not appear on your SL-Viewer, because the HUD
turned inside out according to the position change.
Under such circumstances Please press Ctrl+Alt+t, if you are a
windows-user. If you use Mac OS, please press Ctrl+Option+t.
Then transparent prim will be visible. Please choose the visible
prim, and turn 180° to Z-direction. Now the surface of the HUD
will turn out.
After adjusting the HUD-Position, Please press the same keys
that you pressed before,
so that you can turn off the shown invisible prims.
稀にテレポートなどでボタンの一部が消えてしまうことがあります。
(HUDベースが完全に消えることはありませんが、選択されているはずの
ボタンが黄色く表示されないことがあります)
これはSLのプログラムの不具合ですので、完全な解決方法はありません。
このような場合の緊急回避方法として、見えているHUDのパーツを
右クリック選択すると消えていたHUDが現れます。
On the occasion of the teleport, a part of the HUD button may
seldom disappear.
(The foundation of the HUD will not completely disappear, but the
selected button could not be shown in yellow.)
This caused by the bug of the SL program, so that we cannot avoid
this problem completely.
If you would like to avoid this, Please right-mouse-click on a part of HUD,
that you can still see. Then the part of HUD, which is not shown will
turn out again.
-----------------------------------------------------------------------------------
【免責事項】
現状スクリプト禁止区域でも、まつ毛関連のスクリプトは働くように
設定していますが(まつ毛の位置合わせやスマイル時の上下移動)
今後のSLプログラムの変更などにより、スクリプト禁止地域では動作しなくなる
可能性があります。
フェイスライトに関しては、現時点でもスクリプト禁止区域ではライトの選択機能は
使えません。(たとえば2-Softのライト設定で、スクリプト禁止区域に入った場合は、
2-Softの設定のままの点灯になります。このような区域でリログした場合も
同じ結果になります)
SIMに負荷がかかった条件ではまつ毛の移動や、パーティクルの動作が
正常にされない場合があります。
SL世界の諸条件の中で正確を期すのは難しいということを、ご理解頂けますよう
お願いします。
また、2008/2/10現在、ごく稀ではありますけど、テレポート直後に
以下のようなメッセージが出ることがありますが、特に不具合はないのでご安心ください。
【Exemption clause】
Referring to the face light you cannot change the setting of the
face light, if you are in the script forbidden area.
(e.g. If you enter to the script forbidden area with the
two face light setting, your setting stays the setting 2 Lights (Soft).
it is also the same, if you re-login such area.)
Moreover the particle might not work correctly by the bad
conditions e.g. overload of the SIM. In this regards please
kindly understand that it is difficult to be perfect
under divers conditions of SL (In-World).
Furthermore you may see the message below after the
teleport (status: 10. Feb. 08), but we found no problem
concerning the message. So please have no anxiety in this
regards.
Thank you for your attention.
2007年12月16日
Intelligent 3in1HUD Eyelash

商品のご説明
Product Manual
【HUDが位置情報等を記憶】
Intelligent 3in1 HUDではHUDに記憶機能を搭載させることにより、
リログなどで再装着された際に、フェイスライトの強さ、まつ毛の位置や、
スマイルの設定を直前の状態に自動調整します。
毎回手動でライトの強さや笑顔の状態を再設定する必要はなくなりました。
また、別売りのオプショナルまつ毛を購入された場合でも、
既に位置調整を終えたHUDを使用することで、
再度まつ毛の位置合わせをすることなくお使い頂けます。
【HUD remember your information and positioning】
Intelligent 3in1 HUD has great memorize function. If you reattach your HUD when you re-logon to the SL-Viewer, the HUD will adjust automatically the strength of the face light, the positions of your eyelashes and the setting of the smile as you set up just before.
No need the manual setting for your strength of the face light or the smile any more thanks to this new function!
Moreover if you want to change your eyelashes to the optional eyelashes that separately sold by me, you can use them without manual setting again by using the HUD already consists of your setting.
【複数アバターでのHUDの使い分け】
まつ毛の位置情報はHUDユニットに記憶されます。
シェイプ形状の違う複数のアバターをお使いの方は、
HUDユニットをコピーし、アバターごとの専用HUDとして使用することで、
固有のまつ毛の位置情報を持たせることが出来ます。
【How to use your HUD with several Avatar-shapes】
Information of eyelash-setting will be memorized to the HUD-unit.
If you use the different shapes for your avatar, please copy the HUD-unit,
and set your HUD for each shapes of your avatar. So that the each
setting of your eyelashes positions will memorized individually to each HUD.
【まつ毛位置合わせ支援ツールの強化】
以前の3in1HUDでは、まつ毛の位置調整が難しいという意見を多く頂きました。
まつ毛枚数の簡略化(6枚→4枚)、付属のまつ毛位置合わせ用ポーズスタンドの
機能強化により、以前より格段に位置合わせが楽になっております。
【Improvement of the support tool for the eyelash-positioning】
Many feedbacks are given regarding the difficulties of the
eyelash-positioning for the last version.
Now it is much easier to adjust your eyelashes thanks to the
simplification of the numbers of eyelashes (from 6 to 4), and
the function improvement of the pose stand for the eyelash-positioning
enclosed to Intelligent 3in1 HUD Eyelash.
-----------------------------------------------------------------------------------
内容物説明
●Intelligent 3in1 HUD Eyelash Version
・S@R Intelligent 3in1 HUD E(JY) 日本語版横タイプ(装着位置Top)
・S@R Intelligent 3in1 HUD E(JT) 日本語版縦タイプ(装着位置Top Left)
・S@R Intelligent 3in1 HUD E(EV) 英語版横タイプ (装着位置Top)
・S@R Intelligent 3in1 HUD E(EH) 英語版縦タイプ(装着位置Top Left)
・S@R FL (eyelash) on chin (装着位置-あご)
・S@R FL (eyelash) on mouth (装着位置-口)
・S@R eyelash grid skin
・S@R Eyelash Pose Stand (まつ毛位置合わせ専用ポーズスタンド)
・Manual (取り扱い説明書)
Contents
●Intelligent 3in1 HUD
・S@R Intelligent 3in1 HUD (JY) Japanese horizontal
(Setting Position: Top)
・S@R Intelligent 3in1 HUD (JT) Japanese vertical
(Setting Position: Top Left)
・S@R Intelligent 3in1 HUD (EV) English horizontal
(Setting Position: Top)
・S@R Intelligent 3in1 HUD (EH) English vertical
(Setting Position: Top Left)
・S@R FL (eyelashes) on chin (attached to chin)
・S@R FL (eyelashes) on mouth (attached to mouth)
・S@R Eyelash Pose Stand
(Pose Stand specialized for eyelash-positioning)
・Manual (Product Manual)
-----------------------------------------------------------------------------------
【装着方法】
この製品はHUDユニットとFLユニットの2つで構成されています。
必ずS@R Intelligent 3in1 HUD E と
S@R FL (eyelash) の両方を装着してください。
S@R Intelligent 3in1 HUD Eは、画面Topに装着するものと、
Top Leftに装着するものがあります。
S@R FL (eyelash) の装着位置も、口(on mouth)とあご(on chin)の2種類があります。
どちらか片方だけをお使いください。
【How to attach】
This Products consists of two different units. They are HUD-Unit and
FL-Unit.
Please be sure to attach both S@R Intelligent 3in1 HUD E and
S@R FL (eyelash).
There are two type of S@R Intelligent 3in1 HUD.
One is horizontal layout on top and the other is vertical layout on left.
Also there are the S@R FL 3in1 attached to mouth and attached to chin.
Please choose each one of them which is suitable for you.
-----------------------------------------------------------------------------------
まつ毛位置設定方法
How to set up your eyelashes
お客様のシェイプに合わせて、付けまつ毛の位置を調整して頂く必要があります。
You should adjust the positions of your eyelashes to fit your shape.
Step.1
装着するS@R Intelligent 3in1 HUD (2言語、2位置から選択)、
S@R FL (eyelash)の位置(mouth か chin から選択) が決まりましたら、
それぞれを複製し、間違いのないように個々の名前を変更し、
(製品名の最後にアバター名を入れるなど)アバターに装着してください。
装着後HUDとまつ毛が情報のやり取りを終えるまで、
15秒待ってからStep2へ進んでください。
Once you decide your S@R Intelligent 3in1 HUD (from 2 languages,
2 positions) and the position of S@R FL (eyelash)(mouth or chin),
please copy them, and change the name of the copies (e.g. enter
your avatar name at the end).
Then please attach these copies to your avatar.
After wearing the HUD and eyelashes please wait 15 seconds then go
to Step 2. So that the HUD and eyelashes can finish to exchange the
information properly.
この後の工程でまつ毛の編集作業に入りますが、
オリジナルを編集することは危険ですのでおやめ下さい。
After this step you may modify your eyelashes. Though please do not
modify the original because of the risk to lose the initial setting.
Step.2
まつげの位置調整をするには、あなたのアバターの顔を固定する必要があります。
スマイルのアニメーションをOffにして、同封のS@R EyeLash Standにお立ちください。
キーボードのEscキーを押すとアバターの顔がUPになります。上下の微調整は
Shift+←で下方向へ、Shift+→で上方向へ調整できます。
上記操作で顔の位置を調整した後は、矢印キー↑ ↓ ← → で視点変更が可能です。
また、Page UPキーとPage Downキーでカメラの寄り引きが出来ます。
万が一カメラが動かない場合は、Altキー(MacではOptionキー)を押しながら、
少しだけマウスを動かしてみてから、もう一度試してみてください。
(少しショックを与えると必ず動きますよw)
矢印キーで操作できない角度から見たい場合には、通常のSLの操作と同じで、
Altキー(MacではOptionキー)を押しながら焦点を決めて、
左クリックでマウスを移動させてください。
再度視点を戻したい場合にはEscキーを押してください。
To adjust the position of eyelashes, you have to fix your avatar.
Please set your smile animation off, and stand up on the enclosed S@R
Eyelash Stand. If you press Esc key on your keyboard, your will see
your face as close-up view.
To adjust your view, please press the key Shift+← to down, Shift+→
to up. After you adjust the position of your face as mentioned,
you can change your point of view with the index keys ↑ ↓ ← → .
Moreover you can zoom in and out of your camera view with Page UP
and Down key. In case you cannot move your camera, please move
your mouse little bit with pressing the Alt key(Option key with MAC),
and try again.(Please give a little shock, then it functions for sure lol)
If you would like to view from the angle where is unable to control
the cursor with the index keys, please take the focus on the point
with Alt-key (Option key with Mac)
and move the mouse with left mouse-clicking.
If you would like to return your focus, please press the Esc key.
Step.3
お使いのOSがWindowsの方はCtrl+Alt+tを押して下さい。
Mac OSをお使いの方は Ctrl+Option+t を押してください。
透明Primが可視化できます。表示を消したい場合にはもう一度同じキーを押してください。
If you are a Windows user please press “Ctrl+Alt+t” and
if you are a Mac user please press
“Option+Alt+t” Now you can see transparent prim.
When you would not see them please press the same keys again.
Step.4
可視化された付けまつ毛のプリムを右クリックで選択して編集を選び、
開いたウィンドウから“リンク部位を編集”にチェックを入れます。
これですべてのまつ毛を個別に動かすことができます。
ご自分のシェイプに合わせてまつ毛の位置を調整してください。
アバターの顔の形状によっては上下左右奥行きの位置移動だけでなく、
回転も必要かもしれません。
詳細なフィッテイングをご希望の場合、目の形状に合わせてまつ毛のカーブ
を変更する必要があります。そのような場合には、編集ウィンドウの
まつ毛サイズのX,Y、Z の値を少しだけ調整してみてください。
ご使用になられているスキンでは位置合わせがやりにくい場合は、
同封されているS@R eyelash grid skinを装着してください。
グリッドが入った単色スキンですので、位置合わせが容易に出来ます。
Please right mouse click on the visible eyelashes and choose edit,
then check the box “Edit linked parts” in the popup menu. Now you can
move each eyelash separately.
Please adjust the eyelashes for your own shape.
According to your avatar’s face shape, you may need to rotate your
eyelashes other than the positioning of the direction e.g. up, down,
left, or the depth.
If you wish the detailed fitting, you should adjust the curve of the
eyelashes to match the shape of your eyes. In such a case please
adjust the x, y, z parameter of eyelash-size in the edit window.
If it is difficult for you to adjust the positions of your eyelashes
with your skin, please wear “S@R eyelash grid skin”, which
enclosed in our product. This is a grid included mono-color skin.
So you can adjust the positions easily.
【まつげのベースプリム形状を変更される方へ】
編集ウィンドウの値は一部の数値を除いて
基本的に編集可能ですので調整して頂いて結構です。
ただしHUDが記憶できるのはxyzのスケール情報・回転情報
(編集ウィンドウ左側の値)・マウスで移動させた位置情報だけ
になります。それ以外の値(編集ウィンドウ右側の値)を編集した
場合には、他のまつ毛へ情報を引き継ぐことは出来ませんので、
まつ毛ごとに個々の調整が必要です。
【for someone who change the eyelash’s base prims】
You can adjust the parameter in the object tab of the edit window
basically. However the informations that can be memorized in the
HUD are only: On the left side in the object tab (x,y,z parameter)
- Size parameter
- Rotation parameter
- Position parameter
If you adjust other than the above mentioned parameter
(on the right side of the object tab in the edit window), it is
unable to take over these informations to the another eyelashes.
So that you need to adjust each eyelash individually in that case.
Step.5
Step.4で、移動したまつ毛の位置、回転、サイズの情報はHUDの情報として
瞬時に自動記憶されますが、万が一操作ミスなどでまつ毛がずれた場合の
予防策として、位置が完全に確定した後に、HUDの顔マークをクリックし、
開いたダイアログから、『まつげ』を選択し、更に開いた画面で『位置の記憶』
ボタンを押してください。万が一まつ毛がずれた場合でも『位置の復元』ボタン
であなたの設定した位置に戻すことが出来ます。
万が一誤った位置を設定してしまった場合でも、『初期化』ボタンで、出荷位置に
戻すことが出来ます。
以上でまつ毛の位置合わせは終了です。
『位置の記憶』ボタンを押すとHUDとまつ毛は情報のやり取りをします。
その間3秒間は笑顔を動作させないでください。
FLユニットは、透明パーツで構成されています。FLユニットを、身体に
装着せずに地面に置くことは、ユニットの紛失や破損の危険性に
つながりますのでおやめください。
注)現在SIMの環境によって、『位置の復元』ボタン、『初期化』ボタンを押しても
まつ毛が元の位置に戻らない症状が発生しています。このような場合でも、
各ボタンを押した後に、まつ毛を右クリック選択するとまつ毛は正常な位置へ
移動します。
(ショック療法のようですけど、時にはSL世界にはこのようなやり方も有効です)
As mentioned in Step 4 the information of position, rotation, and
size of eyelashes that you adjusted will automatically memorized in
HUD in an instant. Though in case of any operational errors, I
recommend followings after the positioning completed:
-Please click the Face icon in HUD.
-Please choose “Eyelash” button in the dialog box
-Please choose “save pos” in the next dialog box
If you move your eyelashes to the wrong position by mistake,
you can put back the position that you saved by clicking the
button “restore pos” in the dialog box.
If you save the wrong position by mistake, you can put back
the initial position by clicking the button “initial”
So now finished the adjustment of the eyelashes.
If you push “save pos” button, the HUD and eyelashes exchange
the information. Please do not use smile function 3 seconds due
to this information exchange.
FL unit consists of transparent parts. Please do not rez the FL
unit on the ground to avoid to lose or damage the unit. That means
you should ALWAYS wear the unit to adjust or modify your eyelashes
Note)
according to the condition of the SIM, it may happen, that the button
“restore pos” or “initail”. In a such case please try to right mouse click
on the eyelashes after clicking the appropriate button, then the
eyelashes shall move to the right position.
(It’s kind a shock therapy, but sometimes it works really like this
in SL.)
【注意事項】
まつ毛を装着せずに、地面などにRezして位置調整はしないでください。
Rezした状態で位置調整をしてしまうと、誤った座標がHUDに記憶されてしまいます。
(装着した状態ではアバターに対してのまつ毛の座標がHUDに記憶されるのですが、
Rezした状態ではSIMに対してのまつ毛の座標がHUDに記憶されることになります)
このような状態になったまつ毛を装着すると、アバターの体が見えなくなったり
するトラブルを引き起こします。もし、Step.5でご説明した『初期化』ボタンで
出荷状態に戻すことが出来ます。ただし、地面にRezした状態で『初期化』ボタンを
押すことは、絶対にしないでください。
【Caution】
Please do not adjust your eyelashes without attaching to your face
(e.g. Rez on the ground)
If you do so, the HUD memorize completely wrong coordinates.
(When you adjust the attached eyelashes, the coordinates will be set
on your avatar, but when you adjust the rezzed eyelashes on the ground,
the coordinates will be set on SIM)
If you attach such a eyelashes, you may get into trouble e.g. you can
not see your body...
In case of an emergency, you can put back the position with clicking
the button “initial”.
-----------------------------------------------------------------------------------
補足
テレポートやログインの直後に、HUDユニットはまつ毛の位置調整を行います。
しかし、テレポートやログイン直後には様々な情報(衣服や髪の毛などなど)を読み込む
必要があり、それらが読み込まれている間は、一時的に(10数秒程度)まつげ位置が
ずれたり、ボタン操作が正常に行われないことがあります。
衣服などの読み込みが完了した後にHUDユニットの機能がONになる為です。
どうかご理解ください。
Appendix
HUD will adjust your position automatically just after the login
or teleport.
Though it may happen that your eyelashes slip to the wrong position
instantly (just about 10 min.) or button doesn’t work correctly.
Because the divers information (e.g. clothes or hair etc.) have to
be loaded just after the teleport or login.
Please kindly understand that the function of the HUD-unit will
be ready once your appearance is completely loaded.
-----------------------------------------------------------------------------------
【使用方法】
●FaceLight
・HUDボタン左から
ライトOFF→ライト一灯→ライト2灯(弱)→ライト2灯(強)→ライト3灯
選択されているボタンは黄色に変わります。
ライト3灯に関しては、オプションと考えておりますので、選択時にメッセージ
ダイアログが出ます。詳細は以下のURLでご確認ください。
http://snowrabbit.slmame.com/e44524.html
【How to use】
●FaceLight
・HUD button from left:
Light OFF→1 Light→2 Lights(Soft)→2 Lights(Strong)→3 Lights
The button selected will be turned on yellow.
The strongest three lightning is intended only as an option, so that
you will see the dialog window for your confirmation when you
choose the Three lights. Further information please see my
website below:
http://snowrabbit.slmame.com/e44524.html
●Smile
HUDの顔マークのボタンを押してください。
開いたダイアログから『笑顔』を選択すると、更にダイアログが開きます。
8種類の笑顔から、お好きなものを選択してください。
選択されているボタンは黄色に変わります。
【ボタンの説明】
(S)-----頻繁に笑います。
(L)------笑顔の間隔が広くなります。
☆-------十字のパーティクル
☆☆----飛び散るパーティクル
●Smile
Please push the button with the face icon.
The dialog box will appear. If you choose the button “smile” in the
dialog box,
the further dialog box will pop up.
Please choose your preference from 8 kinds of smiles.
The button selected will be turned on yellow
【Explanation of the button】
(S)-----you smile often
(L)------the interval of the smile is longer than smile (S)
☆-------cross particle
☆☆----Sparkling particle
●Eyelash
HUDの顔マークをクリックして現れるダイアログから『笑顔』を選んでください。
更に開いたダイアログから、笑顔の種類を選択すると、まつ毛の移動機能がONに
なります。笑顔がONの時に、まつ毛は自動的に笑顔に合わせて上下します。
Please choose “Smile” in the dialog box after the clicking a face icon
in HUD.
If you choose “smile”, the function of the eyelash movement will
be on. That’s means, that the smile is on, the eyelashes will
move automatically according to your smile.
●HUD位置の変更に関しまして
諸事情により、ユーザーがHUDの装着位置を変更なされる場合があると思います。
イベンタリーからHUDを右クリックしてHUDに添付で装着位置を変更すると、
HUDプリムが裏返ってしまい、画面上に現れなくなる可能性があります。
そのような際は、お使いのOSがWindowsの方はCtrl+Alt+tを押して下さい。
Mac OSをお使いの方は Ctrl+Option+t を押してください。
透明Primが可視化できます。可視化されたプリムを選択し、
Z方向に180度回転させれば、HUDの表面が現れます。
位置調整をした後にもう一度同じキーを押して不可視プリムの表示を消してください。
●changing the position of HUD
According to the various reasons some user change the position of HUD.
If you change the position from inventory by the right-mouse-clicking,
the HUD may not appear on your SL-Viewer, because the HUD
turned inside out according to the position change.
Under such circumstances Please press Ctrl+Alt+t, if you are a
windows-user. If you use Mac OS, please press Ctrl+Option+t.
Then transparent prim will be visible. Please choose the visible
prim, and turn 180° to Z-direction. Now the surface of the HUD
will turn out.
After adjusting the HUD-Position, Please press the same keys
that you pressed before,
so that you can turn off the shown invisible prims.
稀にテレポートなどでボタンの一部が消えてしまうことがあります。
(HUDベースが完全に消えることはありませんが、選択されているはずの
ボタンが黄色く表示されないことがあります)
これはSLのプログラムの不具合ですので、完全な解決方法はありません。
このような場合の緊急回避方法として、見えているHUDのパーツを
右クリック選択すると消えていたHUDが現れます。
On the occasion of the teleport, a part of the HUD button may
seldom disappear.
(The foundation of the HUD will not completely disappear, but the
selected button could not be shown in yellow.)
This caused by the bug of the SL program, so that we cannot avoid
this problem completely.
If you would like to avoid this, Please right-mouse-click on a part of HUD,
that you can still see. Then the part of HUD, which is not shown will
turn out again.
-----------------------------------------------------------------------------------
【免責事項】
現状スクリプト禁止区域でも、まつ毛関連のスクリプトは働くように
設定していますが(まつ毛の位置合わせやスマイル時の上下移動)
今後のSLプログラムの変更などにより、スクリプト禁止地域では動作しなくなる
可能性があります。
フェイスライトに関しては、現時点でもスクリプト禁止区域ではライトの選択機能は
使えません。(たとえば2-Softのライト設定で、スクリプト禁止区域に入った場合は、
2-Softの設定のままの点灯になります。このような区域でリログした場合も
同じ結果になります)
SIMに負荷がかかった条件ではまつ毛の移動や、パーティクルの動作が
正常にされない場合があります。
SL世界の諸条件の中で正確を期すのは難しいということを、ご理解頂けますよう
お願いします。
また、2008/2/10現在、ごく稀ではありますけど、テレポート直後に
以下のようなメッセージが出ることがありますが、特に不具合はないのでご安心ください。
【Exemption clause】
Referring to the face light you cannot change the setting of the
face light, if you are in the script forbidden area.
(e.g. If you enter to the script forbidden area with the
two face light setting, your setting stays the setting 2 Lights (Soft).
it is also the same, if you re-login such area.)
Moreover the particle might not work correctly by the bad
conditions e.g. overload of the SIM. In this regards please
kindly understand that it is difficult to be perfect
under divers conditions of SL (In-World).
Furthermore you may see the message below after the
teleport (status: 10. Feb. 08), but we found no problem
concerning the message. So please have no anxiety in this
regards.
Thank you for your attention.
2007年10月13日
3in1 HUD
商品のご説明
Product Manual
この度は、Snow Rabbit 3in1 HUDを
お買い求め頂きまして、有難うございます。
重要な内容ですので、必ずお読みください。
Thank you for buying Snow Rabbit 3in1 HUD. Please find following the
very important notice for future use, so that do not use this HUD until
you read and understand the instructions in this manual.
最初に、お客様のシェイプに合わせて、付けまつ毛の位置を調整して頂く必要があります。
位置調整をするには、あなたのアバターの顔を固定する必要があります。
同封のポーズスタンド等をご用意してください。
To adjust the position of the eyelashes for your shape you should fix
your avatar’s face. To fix it please use the attached pose stand.
Step.1 S@R 3in1(on mouth or onchin)のコピーを取ってください。
オリジナルを編集することは危険ですのでおやめ下さい。
Please make a copy of S@R Face Light+Smile+Prim Lashes (3in1)
for the adjustment, and keep your original unchanged.
Because it is risky to edit your original.
Step.2 S@R 3in1とS@R 3in1 HUD の2つを装着してください。
S@R 3in1には装着位置がmouthとchinがあります。
S@R 3in1 HUDにも、装着位置がTopのものとTop Left のものがあります。
あなたの条件に合った装着位置のものをお選びください。
Please attache the S@R 3in1 and S@R 3in1 HUD.
There are the S@R 3in1 attached to mouth and chin.
Also there are two type of S@R 3in1 HUD.
One is horizontal layout and the other is vertical layout.
Please choose each one of them which is suitable for you.
Step.3 スマイルのアニメーションをOffにして、ポーズスタンドにお立ちください。
Please turn off the smile animation and stand on the pose stand.
Step.4 お使いのOSがWindowsの方はCtrl+Alt+tを押して下さい。Mac OSを
お使いの方は Ctrl+Option+t を押してください。
透明Primが可視化できます。消す場合にはもう一度同じキーを押してください。
If you are a Windows user please press “Ctrl+Alt+t” and
if you are a Mac user please press
“Option+Alt+t” Now you can see transparent prim.
When you would not see them please press the same keys again.

Step.5 可視化された付けまつ毛のプリムを右クリックして編集を選び、
開いたウィンドウから“リンク部位を編集”にチェックを入れます。
これですべてのまつ毛を個別に動かすことができます。
ご自分のシェイプに合わせてまつ毛の位置を調整してください。
万が一位置合わせがうまくいかない場合には、HUDの顔マークをクリックしてください。
ダイアログが現れますので、
Please right mouse click on the visible eyelashes and choose edit,
then check the box “Edit linked parts” in the popup menu. Now you
can move each eyelash separately.
Please adjust the eyelashes for your own shape.
If the adjustment does not work so good, please click a face icon
in the HUD-bar. After a dialog box will appear on the window.
Now choose the button “eyelash” then “Set Initial Pos”.
So that you can reset to the default position.
Step.6 まつ毛の位置調整が完了しましたら、HUDの顔マークをクリックしてください。
現れたダイアログからeyelash → Set Posを押してください。
これであなたの調整したまつ毛の位置が記憶されました。
この操作を完了しないと、装着ごとにまつ毛の位置がずれてしまいます。
Clear posを押すと、あなたの設定した数値はクリヤーされます。
If you finish the position adjustment of the eyelashes please click
on the face icon in the HUD-bar. After please choose the button
“eyelash” then “Set Pos” in the dialog box.
If you forget this process you have to adjust the position of your
eyelashes each time you put on your eyelashes. If you clear your
adjustment, you should press the button “Clear pos” in the dialog box.
更に、まつ毛の形状を変更することも可能ですが、これには出荷時のリセットが適応
されません。必ずオリジナルのコピーを取った上で、ご自身の責任においてやられるようにお願いします。
Furthermore, you can modify the shape of the eyelashes. However you cannot reset to the default position anymore once you change the shape of the eyelashes. So please make sure that you made the copy of original and please be noticed that you should take full responsibility for any trouble caused by the changing or modifying the eyelashes.
まつ毛の移動にはスクリプトを使用しています。
SIMに負荷がかかった条件ではまつ毛の移動や、パーテイクルの動作が
正常にされない場合があります。これはスクリプトを用いる上で仕方のないこと
ですので、どうかご理解下さい。
Moreover some scripts are used for the movement of the eyelashes. So it could be possible that the particle scripts or the movement of the eyelashes don’t work correctly by the bad conditions e.g. overload of the SIM. Unfortunately it cannot be avoided if we use scripts. So please understand any inconveniences caused by such situations.
また、通常でもパーティクルの現れるタイミングも不定期になることが確認されています。
こちらに関しても、SL世界の諸条件の中で正確を期すのは難しいということを
ご理解頂けますようお願いします。
In addition, we found that the timing of the showing up of particle is sometimes irregular even at the normal conditions. Also in this regards please kindly understand that it is difficult to be perfect under divers conditions of SL-World.
Thank you very much for your attention, and please do not hesitate to contact me.
もし、何かお気づきの点などありましたら、Shirousagi NoelまでIM頂けますよう
お願いします。今後の改良に役立ててまいります。
Snow Rabbitというグループを作りました。
新商品のリリースやサポートなどをお伝えしていく“通知”をお送りします。
O円で入れますので、ご興味のある方はぜひ入会をお願いします。
メニューの検索でグループタブを選択して、Snow Rabbitと入力して頂ければ
出てきますので、そこから入会できます。
派手な宣伝通知などを頻繁に流すつもりはありませんので、お気軽にご入会下さい。
Snow Rabbit Owner Shirousagi Noel
2007年10月10日
001Series eyes
001シリーズの瞳は全部で10色あります。
各色には、テンプレートを基準に100%、105%、110%、115%の
大きさがあり、1色のパッケージに同封されています。
There are totally 10 color eyes in 001 Series.
In each color of eyes, there is a size of 100%, 105%, 110%, and 115% based
on the template size, and all size of eyes are enclosed in each of
one-color-package.
長く使って頂くために、落ち着いた色を基準に用意しています。
Chic and moderate colors are selected for the eyes so that you can wear
them timelessly.
Japanese Brown

Red Brown

Rabbit Red

Greyish Purple

Pure Green

Pure Blue

Deep Blue

Cool Grey

Greyish Green

Greyish Yerrow

サイズはそれぞれ4種類です。(1パッケージに4つの大きさが同封されています)
Eye ColorはGreyish Purpleを例にして見ていただきます。
Skin Colorはw001 Misty Roseです。
As mentioned there are 4 sizes in each color. (4 sizes are enclosed in a box)
Below you can see the examples of each size of eyes in “Greyish Purple”
with skin color in “w001 Misty Rose”.
100% (リンデンのテンプレートの瞳の大きさです)
100% (It is the same size of eyes as Linden's template.)

105%

110%

115%

1色(4サイズ)60L$
全色(各4サイズ)500L$
コピー可、譲渡不可、編集不可
One color with four sizes: 60L$
All colors with each four sizes: 500L$
Copy OK, No Transfer, No Modify
各色には、テンプレートを基準に100%、105%、110%、115%の
大きさがあり、1色のパッケージに同封されています。
There are totally 10 color eyes in 001 Series.
In each color of eyes, there is a size of 100%, 105%, 110%, and 115% based
on the template size, and all size of eyes are enclosed in each of
one-color-package.
長く使って頂くために、落ち着いた色を基準に用意しています。
Chic and moderate colors are selected for the eyes so that you can wear
them timelessly.
Japanese Brown
Red Brown
Rabbit Red
Greyish Purple
Pure Green
Pure Blue
Deep Blue
Cool Grey
Greyish Green
Greyish Yerrow
サイズはそれぞれ4種類です。(1パッケージに4つの大きさが同封されています)
Eye ColorはGreyish Purpleを例にして見ていただきます。
Skin Colorはw001 Misty Roseです。
As mentioned there are 4 sizes in each color. (4 sizes are enclosed in a box)
Below you can see the examples of each size of eyes in “Greyish Purple”
with skin color in “w001 Misty Rose”.
100% (リンデンのテンプレートの瞳の大きさです)
100% (It is the same size of eyes as Linden's template.)
105%
110%
115%
1色(4サイズ)60L$
全色(各4サイズ)500L$
コピー可、譲渡不可、編集不可
One color with four sizes: 60L$
All colors with each four sizes: 500L$
Copy OK, No Transfer, No Modify
2007年10月06日
w001Series Skin
w001シリーズは100%手描きで描かれたSkinです。
w001 Series is 100% hand-drawn Skin.
4種類の肌の色、それぞれに3種類のメイクをご用意しています。
合計12通りのバリエーションがあります。
4 types of skin colors and 3 types of make-ups for each type
of skins are available.
So you will find totally 12 variation of skins.

口の中にも気を使い、体の隅々まで丁寧に描きました。
体の描写は、一部の写真を使用したSkinにも劣ることはないと自負しています。
I draw carefully all delicate details of body even in the mouth.
I am sure that the precise portrayal of body is not at all inferior
to some skins used photograph.


w001シリーズのスキンには、
下まつ毛が描かれているタイプと、描かれていないタイプが同封されています。
Moreover you will find two different type of each variation of skins
in w001 Series Skin.
One is the skin with the eyelashes drawing and the other is without the eyelashes drawing.
http://snowrabbit.slmame.com/c6596.html
パッケージは全部で4種類あります。
3種類のメイクはそれぞれのパッケージに同封されています。
There are totally four kinds of packages according to the skin color.
Three kinds of make-ups are included in each package.
1パッケージの価格は1200L$です。
4色全てを同時に購入する場合は3000L$になります。
One Package costs 1200L$.
When you would like to buy all 4-Color-Skin package, it costs 3000L$.
コピー可、譲渡不可、編集不可
Copy OK, No Transfer, No Modify
w001 Series is 100% hand-drawn Skin.
4種類の肌の色、それぞれに3種類のメイクをご用意しています。
合計12通りのバリエーションがあります。
4 types of skin colors and 3 types of make-ups for each type
of skins are available.
So you will find totally 12 variation of skins.
口の中にも気を使い、体の隅々まで丁寧に描きました。
体の描写は、一部の写真を使用したSkinにも劣ることはないと自負しています。
I draw carefully all delicate details of body even in the mouth.
I am sure that the precise portrayal of body is not at all inferior
to some skins used photograph.
w001シリーズのスキンには、
下まつ毛が描かれているタイプと、描かれていないタイプが同封されています。
Moreover you will find two different type of each variation of skins
in w001 Series Skin.
One is the skin with the eyelashes drawing and the other is without the eyelashes drawing.
http://snowrabbit.slmame.com/c6596.html
パッケージは全部で4種類あります。
3種類のメイクはそれぞれのパッケージに同封されています。
There are totally four kinds of packages according to the skin color.
Three kinds of make-ups are included in each package.
1パッケージの価格は1200L$です。
4色全てを同時に購入する場合は3000L$になります。
One Package costs 1200L$.
When you would like to buy all 4-Color-Skin package, it costs 3000L$.
コピー可、譲渡不可、編集不可
Copy OK, No Transfer, No Modify
2007年10月06日
About Skin of Snow Rabbit
w001シリーズのスキンには、
下まつ毛が描かれているタイプと、描かれていないタイプが同封されています。
There are two type of skins in w001 Series.
One is a skin with the drawing of under-eyelashes
and without the drawing of under-eyelashes.
下まつ毛が描かれているタイプ
Type with under-eyelashes’ drawing
まつ毛が描かれていないタイプ
Type without under under-eyelashes’ drawing

この2種類のSkinが同封されている理由は、Smile-HudとPrim eyelashの関係によります。
The reason why these two kinds of Skin are enclosed depends on the relation
between Smile-Hud and Prim eyelash.
当店のPrim eyelashは上まつ毛だけのものと、上下のまつ毛があるのものが同封されています。
In Prim Eyelash of my shop you will find the prims of upper-eyelashes only
and the prims of upper- and under-eyelashes.
これらは、組み合わせて使用します。
You will use these prim-eyelashes with combination.
もしあなたがprim eyelashを使用するのなら、Scond Lifeの初期設定から、
まつ毛の長さを最短にすることをお勧めします。
If you would like to use Prim Eyelash, you should shorten your eyelashes
to minimam (0) in the default appearance setting of the Second Life.

下まつ毛の描画があるSkin + 上だけのPrim eyelash
Skin with under-eyelash drawing + only upper prim eyelashes

まつ毛の描画がないSkin + 上下のPrim eyelash
Skin without under-eyelashes drawing + upper and lower prim eyelashes

組み合わせが必要な理由は何でしょうか?
その原因はsmile-HUDにあります。
Why should we combinate these eyelashes?
The reason why you will find in the smile-HUD.
下の画像は悪い組み合わせです。
まつ毛の描画がないSkin + 上下のPrim eyelash + smile-HUD
笑顔によって、下まつ毛がずれています。
The image below is a bad combination.
Skin without under-eyelashes + upper & lower prim eyelash + smile HUD
You can see that the under-eyelashes has slipped because of the smile movement.

こちらが正しい組み合わせです。
下まつ毛の描画があるSkin + 上だけのPrim eyelash
Here is a correct combination.
Skin with under-eyelashes drawing + only upper prim eyelash

もしあなたが、prim eyelashを使用しないのであれば、
まつ毛の描画がないSkin + 上下のPrim eyelashをお勧めします。
smile-HUDを使わない場合には、こちらの組み合わせの方が美しい目元が演出できるからです。
If you do not use smile-HUD, I recommend the following combination.
Skin without the under-eyelashes + upper and lower prim eyelash
Because if you do not use smile-HUD, this combination effects
more beautiful eyes for your avatar than any other combinations.
Thank you for your attention.
下まつ毛が描かれているタイプと、描かれていないタイプが同封されています。
There are two type of skins in w001 Series.
One is a skin with the drawing of under-eyelashes
and without the drawing of under-eyelashes.
下まつ毛が描かれているタイプ
Type with under-eyelashes’ drawing
まつ毛が描かれていないタイプ
Type without under under-eyelashes’ drawing
この2種類のSkinが同封されている理由は、Smile-HudとPrim eyelashの関係によります。
The reason why these two kinds of Skin are enclosed depends on the relation
between Smile-Hud and Prim eyelash.
当店のPrim eyelashは上まつ毛だけのものと、上下のまつ毛があるのものが同封されています。
In Prim Eyelash of my shop you will find the prims of upper-eyelashes only
and the prims of upper- and under-eyelashes.
これらは、組み合わせて使用します。
You will use these prim-eyelashes with combination.
もしあなたがprim eyelashを使用するのなら、Scond Lifeの初期設定から、
まつ毛の長さを最短にすることをお勧めします。
If you would like to use Prim Eyelash, you should shorten your eyelashes
to minimam (0) in the default appearance setting of the Second Life.
下まつ毛の描画があるSkin + 上だけのPrim eyelash
Skin with under-eyelash drawing + only upper prim eyelashes
まつ毛の描画がないSkin + 上下のPrim eyelash
Skin without under-eyelashes drawing + upper and lower prim eyelashes
組み合わせが必要な理由は何でしょうか?
その原因はsmile-HUDにあります。
Why should we combinate these eyelashes?
The reason why you will find in the smile-HUD.
下の画像は悪い組み合わせです。
まつ毛の描画がないSkin + 上下のPrim eyelash + smile-HUD
笑顔によって、下まつ毛がずれています。
The image below is a bad combination.
Skin without under-eyelashes + upper & lower prim eyelash + smile HUD
You can see that the under-eyelashes has slipped because of the smile movement.
こちらが正しい組み合わせです。
下まつ毛の描画があるSkin + 上だけのPrim eyelash
Here is a correct combination.
Skin with under-eyelashes drawing + only upper prim eyelash
もしあなたが、prim eyelashを使用しないのであれば、
まつ毛の描画がないSkin + 上下のPrim eyelashをお勧めします。
smile-HUDを使わない場合には、こちらの組み合わせの方が美しい目元が演出できるからです。
If you do not use smile-HUD, I recommend the following combination.
Skin without the under-eyelashes + upper and lower prim eyelash
Because if you do not use smile-HUD, this combination effects
more beautiful eyes for your avatar than any other combinations.
Thank you for your attention.
2007年10月04日
About Face Light
Second Lifeが画面表示に使用しているOpenGLという機能には
再現できるライトの数に最大8つまでという制限があります。
さらにそのうちの2つは太陽や月、反射光に使われてしまいますので、
残りは6つということになります。
For the monitor appearance of the graphics in Second life it is used an
program interface called “Open GL”, and there is an limitation
concerning the number of lights that are arrowed to be shown.
Now the limitation of lights in OpenGL is up to max. 8.
Furthermore two of them are always used for the sun, moon, or the
reflection of light. So it means the available lights are only 6.
もし、あなたのアバターの周りにたくさんのライトがあっても、
あなたのアバターを照らす光はどんな時でも、
『あなたのアバターに届く光のうち、強いものから順番に数えて6つまでです。』
No matter there are a lot of lights around your avatar,
you are always lighted up by the first six lights in surroundings
which are counted according to the power of the light.
下の図では、あなたから見ると、4の光源はAの光源より遠くにありますが、
4の光源から届く光の強さがAの光源から届く光よりも強いので、4番の光源が優先されます。
Please see the figure below. From your side the source of light
No.4 situate further than A. However the light from No.4 is stronger
than “A”. So that the source of the light no. 4 have priority over “A”.

あなたのモニターに太陽や月以外のローカルライトを反映させる為には、
初期設定で近隣のローカルライトの設定をONにする必要があります
If you would like to activate the local light other than the sun or moon
on your monitor, you need to choose “Nearby local light” in Lighting
detail tab under Graphics details of the preference menu.
フェイスライトの使用は気をつけなければいけません。
あなたがあまりに多くの光源を使うと、他人の光を奪ってしまうことになるからです。
Please use carefully the face light. If you use too many sources
of the light, you might be take the light of the other people.
下の図を見てください。
赤い丸はアバターです。
黄色い丸はフェイスライトの数です。
Please see the figure below.
The red circles are avatars.
The yellow circles means the number of face lights.

左の図は、問題ありません。
しかし、右の図には問題があります。
Bの光源が多すぎるのです。
その為にAから見たCはBに光を奪われて暗く見えます。
Cから見たAも同様にフェイスライトが反映されずに暗く見えます。
You don’t see any problem on the left figure.
But You will see the problem with the right figure.
Avatar B use too many sources of lights.
Because of this Avatar C seen from A looks dark.
Avatar A seen from C looks also dark due to the same reason.
これらの理由から、フェイスライトの光源の数は1つが理想です。
しかし、1つの光源だけで顔をきれいに照らすことは困難です。
From these reasons the number of the face light is ideally only one.
But it is impossible to light up your face completely
only with one source of light in point of esthetic view.
様々な環境での使用を考慮すると、それは2つの光源でも難しいです。
当店では、3つまでの光源を切り替えて使用することができるフェイスライトを開発しました。
When you take into account the use under various environment,
it is even difficult with two sources of lights. So in our shop we
developed a face light which you can switch up to 3 sources of lights.
Please confirm if there are some avatars near around you then
use your face light depend on the situations. Thank you.
再現できるライトの数に最大8つまでという制限があります。
さらにそのうちの2つは太陽や月、反射光に使われてしまいますので、
残りは6つということになります。
For the monitor appearance of the graphics in Second life it is used an
program interface called “Open GL”, and there is an limitation
concerning the number of lights that are arrowed to be shown.
Now the limitation of lights in OpenGL is up to max. 8.
Furthermore two of them are always used for the sun, moon, or the
reflection of light. So it means the available lights are only 6.
もし、あなたのアバターの周りにたくさんのライトがあっても、
あなたのアバターを照らす光はどんな時でも、
『あなたのアバターに届く光のうち、強いものから順番に数えて6つまでです。』
No matter there are a lot of lights around your avatar,
you are always lighted up by the first six lights in surroundings
which are counted according to the power of the light.
下の図では、あなたから見ると、4の光源はAの光源より遠くにありますが、
4の光源から届く光の強さがAの光源から届く光よりも強いので、4番の光源が優先されます。
Please see the figure below. From your side the source of light
No.4 situate further than A. However the light from No.4 is stronger
than “A”. So that the source of the light no. 4 have priority over “A”.
あなたのモニターに太陽や月以外のローカルライトを反映させる為には、
初期設定で近隣のローカルライトの設定をONにする必要があります
If you would like to activate the local light other than the sun or moon
on your monitor, you need to choose “Nearby local light” in Lighting
detail tab under Graphics details of the preference menu.
フェイスライトの使用は気をつけなければいけません。
あなたがあまりに多くの光源を使うと、他人の光を奪ってしまうことになるからです。
Please use carefully the face light. If you use too many sources
of the light, you might be take the light of the other people.
下の図を見てください。
赤い丸はアバターです。
黄色い丸はフェイスライトの数です。
Please see the figure below.
The red circles are avatars.
The yellow circles means the number of face lights.
左の図は、問題ありません。
しかし、右の図には問題があります。
Bの光源が多すぎるのです。
その為にAから見たCはBに光を奪われて暗く見えます。
Cから見たAも同様にフェイスライトが反映されずに暗く見えます。
You don’t see any problem on the left figure.
But You will see the problem with the right figure.
Avatar B use too many sources of lights.
Because of this Avatar C seen from A looks dark.
Avatar A seen from C looks also dark due to the same reason.
これらの理由から、フェイスライトの光源の数は1つが理想です。
しかし、1つの光源だけで顔をきれいに照らすことは困難です。
From these reasons the number of the face light is ideally only one.
But it is impossible to light up your face completely
only with one source of light in point of esthetic view.
様々な環境での使用を考慮すると、それは2つの光源でも難しいです。
当店では、3つまでの光源を切り替えて使用することができるフェイスライトを開発しました。
When you take into account the use under various environment,
it is even difficult with two sources of lights. So in our shop we
developed a face light which you can switch up to 3 sources of lights.
Please confirm if there are some avatars near around you then
use your face light depend on the situations. Thank you.

